## Unhook Garden Hose Winter: The Ultimate Guide to Winterizing Your Water System
The crisp air of winter brings with it the beauty of snow-covered landscapes, but it also presents challenges for homeowners. One often overlooked task is preparing your outdoor water systems for freezing temperatures. Neglecting to **unhook garden hose winter** can lead to burst pipes, damaged hoses, and costly repairs. This comprehensive guide will provide you with expert advice and step-by-step instructions on how to properly disconnect and store your garden hoses, ensuring they survive the winter unscathed. We’ll explore the importance of this crucial winterizing step, covering everything from identifying the right time to take action to the best storage practices. Our goal is to equip you with the knowledge and confidence to protect your investment and avoid the headaches associated with frozen water systems. Proper garden hose care in winter is not just about the hose itself; it’s about safeguarding your entire home’s plumbing. Let’s dive in.
## Understanding the Importance of Unhooking Your Garden Hose in Winter
The simple act of unhooking your garden hose before winter arrives is a crucial preventative measure that can save you significant time, money, and frustration. But why is it so important? Let’s explore the underlying reasons.
### Preventing Freezing and Bursting
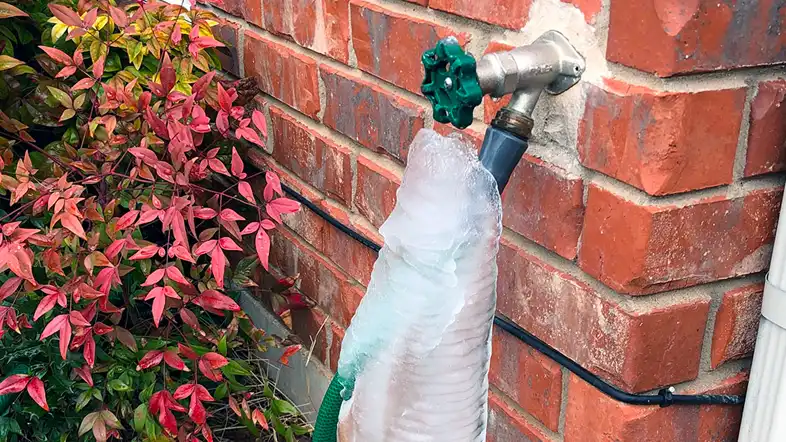
Water expands when it freezes. When a garden hose remains connected to a faucet during freezing temperatures, any water trapped inside the hose or the faucet can freeze and expand. This expansion can exert tremendous pressure, leading to burst hoses, cracked faucets, and even damaged pipes inside your home. The cost of repairing burst pipes can easily run into hundreds or even thousands of dollars, making the few minutes it takes to unhook your hose a worthwhile investment.
### Protecting Your Faucet and Plumbing
Beyond the hose itself, leaving it connected can also damage your outdoor faucet (also known as a hose bib). The expanding ice can crack the faucet housing or damage the internal valve, leading to leaks and the need for replacement. In severe cases, the freezing can even extend into the pipes inside your walls, causing further damage and potentially leading to water damage inside your home. By disconnecting the hose, you eliminate a major pathway for cold air to reach your plumbing system.
### Avoiding Costly Repairs
The cost of repairing or replacing a faucet, hose, or burst pipe far outweighs the minimal effort required to unhook your garden hose. Furthermore, water damage resulting from burst pipes can lead to mold growth and structural damage, adding even more to the repair bill. Taking preventative measures like unhooking your hose is a simple way to avoid these potential financial burdens.
### Extending the Life of Your Hose
Repeated freezing and thawing cycles can weaken the material of your garden hose, making it brittle and prone to cracking. By properly storing your hose indoors or in a protected area, you can prevent this damage and extend its lifespan, saving you the cost of replacing it prematurely.
## When to Unhook Your Garden Hose: Timing is Key
Knowing when to unhook your garden hose is just as important as knowing how. The ideal time to take action is before the first hard freeze of the season. But how do you determine when that is?
### Monitoring the Weather Forecast
The most reliable way to determine when to unhook your hose is to monitor your local weather forecast. Pay close attention to predictions for overnight temperatures. A “hard freeze” typically refers to temperatures below 28°F (-2°C) for an extended period. Once you see a hard freeze in the forecast, it’s time to act.
### Using Frost Dates as a Guideline
Frost dates are historical averages of the first and last dates of freezing temperatures in a given area. While not foolproof, they can provide a general guideline. You can find frost date information for your area online or by contacting your local agricultural extension office. Aim to unhook your hose a week or two before your average first frost date to be on the safe side.
### Observing Environmental Cues
Nature can also provide clues. Watch for signs like the leaves changing color and falling from trees, the first light frosts on the ground, and the overall feeling of cold in the air. These are all indicators that winter is approaching and it’s time to winterize your outdoor water systems.
### Don’t Wait Until the Last Minute
It’s always better to be proactive than reactive. Waiting until the last minute can lead to a rushed job and potential mistakes. Plan ahead and make unhooking your hose part of your fall home maintenance routine.
## Step-by-Step Guide: How to Properly Unhook Your Garden Hose for Winter
Now that you understand the importance of unhooking your hose and when to do it, let’s walk through the process step-by-step.
### 1. Turn Off the Water Supply
Before disconnecting the hose, turn off the water supply to the outdoor faucet. This is typically done at a shut-off valve located inside your home, often in the basement or crawl space. Knowing the location of this valve is crucial in case of emergencies.
### 2. Disconnect the Hose from the Faucet
Carefully unscrew the hose from the faucet. If the connection is tight, use pliers to loosen it, but be careful not to damage the hose or the faucet. Once disconnected, inspect the hose and faucet for any signs of damage, such as cracks or leaks.
### 3. Drain the Hose Completely
This is perhaps the most critical step. Lay the hose flat on the ground and walk along its length, squeezing out any remaining water. You can also elevate one end of the hose to allow gravity to assist with draining. Ensure there are no kinks or bends that could trap water.
### 4. Coil the Hose Loosely
Avoid tightly coiling the hose, as this can put stress on the material and lead to cracking. Instead, coil it loosely into a large loop. A diameter of 2-3 feet is generally recommended.
### 5. Store the Hose Properly
The way you store your hose is crucial for its longevity. Here are a few options:
* **Indoors:** The best option is to store the hose indoors, in a garage, shed, or basement. This protects it from freezing temperatures and the damaging effects of sunlight.
* **Hose Reel:** If you must store the hose outdoors, use a hose reel to keep it off the ground and organized. Choose a reel that offers some protection from the elements.
* **Avoid Direct Sunlight:** Regardless of where you store the hose, avoid direct sunlight, as UV rays can degrade the material over time.
### 6. Insulate the Faucet (Hose Bib)
Even with the hose disconnected, your outdoor faucet is still vulnerable to freezing. Protect it by using a faucet cover, which is an insulated cap that fits over the faucet. You can also wrap the faucet with insulating tape or rags. Make sure to use weather-resistant materials.
## Choosing the Right Garden Hose for Cold Climates: A Buyer’s Guide
If you live in an area with harsh winters, consider investing in a garden hose specifically designed for cold climates. These hoses are typically made from more durable materials that are less prone to cracking and damage from freezing temperatures. Some features to look for include:
* **Reinforced Construction:** Look for hoses with multiple layers of reinforcement to prevent bursting.
* **Cold-Weather Flexibility:** Choose a hose that remains flexible even in cold temperatures.
* **Durable Fittings:** Ensure the hose has sturdy, corrosion-resistant fittings.
Leading brands like Craftsman, Flexzilla, and Gilmour offer cold-weather hoses that are designed to withstand the rigors of winter. While these hoses may be slightly more expensive, they can save you money in the long run by lasting longer and preventing damage.
## Troubleshooting Common Problems: What to Do if Your Hose Freezes
Despite your best efforts, sometimes hoses can still freeze. If you discover a frozen hose, here’s what to do:
### Never Use Open Flame
Never use an open flame, such as a torch or lighter, to thaw a frozen hose. This can damage the hose and create a fire hazard.
### Use Warm Water
The safest way to thaw a frozen hose is to run warm (not hot) water over it. Start at the faucet end and gradually work your way down the hose. You can also submerge the hose in a tub of warm water.
### Use a Hair Dryer
A hair dryer can also be used to gently thaw a frozen hose. Keep the hair dryer moving and avoid overheating any one spot.
### Prevent Re-Freezing
Once the hose is thawed, drain it completely and store it properly to prevent it from freezing again.
## The Role of Sprinkler Systems in Winterization: A Comprehensive Overview
While focusing on garden hoses, it’s essential to consider the broader context of winterizing your entire outdoor water system, especially if you have a sprinkler system. Sprinkler systems are particularly vulnerable to freezing damage, and neglecting to winterize them can result in costly repairs.
### Types of Sprinkler System Winterization
There are three main methods for winterizing sprinkler systems:
* **Blow-Out Method:** This involves using an air compressor to blow all the water out of the sprinkler lines. This is the most effective method, but it requires specialized equipment and knowledge.
* **Drainage Method:** This involves opening drain valves at the lowest points in the system to allow gravity to drain the water. This method is less effective than the blow-out method, but it’s simpler and requires less equipment.
* **Manual Drain Method:** Similar to the drainage method, but requires manually opening each sprinkler head to drain any remaining water.
### The Importance of Professional Winterization
While DIY winterization is possible, it’s often best to hire a professional sprinkler system technician. They have the experience and equipment to properly winterize your system and prevent damage. They can also identify potential problems and make necessary repairs before winter arrives. A common pitfall we’ve observed is homeowners underestimating the amount of water still left in the pipes, leading to cracks and breaks during the freeze.
## Expert Insights: Advanced Tips for Winterizing Your Outdoor Water System
Beyond the basics, here are some advanced tips for winterizing your outdoor water system:
### Inspect Your Faucets Regularly
Check your outdoor faucets for leaks or cracks throughout the year. Repair any damage promptly to prevent further problems during the winter.
### Consider Frost-Free Faucets
Frost-free faucets are designed to prevent freezing by extending the valve deep inside the house, where it’s protected from the cold. If you live in an area with harsh winters, consider replacing your standard faucets with frost-free models.
### Use Heat Tape on Exposed Pipes
If you have any exposed pipes that are vulnerable to freezing, wrap them with heat tape. Heat tape is an electrical cable that provides a small amount of heat to prevent the pipes from freezing.
### Document Your Winterization Process
Keep a record of the steps you take to winterize your outdoor water system each year. This will help you remember what you did and identify any areas that need improvement.
## Insightful Q&A: Addressing Your Winterization Concerns
Here are some frequently asked questions about winterizing outdoor water systems:
1. **Q: How do I know if my faucet is frost-free?**
A: Frost-free faucets are typically longer than standard faucets and have a handle that is located further away from the wall. They also have a slight slope downward to allow water to drain out.
2. **Q: Can I use antifreeze in my garden hose?**
A: No, never use antifreeze in your garden hose or sprinkler system. Antifreeze is toxic and can contaminate your water supply.
3. **Q: What if I forget to unhook my hose before it freezes?**
A: If you forget to unhook your hose and it freezes, try thawing it with warm water or a hair dryer. If the hose is damaged, replace it.
4. **Q: How often should I replace my garden hose?**
A: The lifespan of a garden hose depends on the quality of the hose and how well it’s cared for. A good quality hose can last for 5-10 years with proper maintenance.
5. **Q: Is it necessary to winterize my outdoor water system if I live in a mild climate?**
A: Even in mild climates, it’s still a good idea to take some precautions to protect your outdoor water system from freezing. A few nights of freezing temperatures can still cause damage.
6. **Q: What are the signs of a frozen or burst pipe?**
A: Signs of a frozen or burst pipe include a sudden drop in water pressure, visible leaks, and the sound of running water when no fixtures are turned on.
7. **Q: How can I prevent my outdoor faucet from freezing even with a faucet cover?**
A: Ensure the faucet cover fits snugly and is made of insulating material. You can also wrap the faucet with insulating tape or rags for added protection.
8. **Q: What’s the best way to store my garden hose to prevent mold and mildew?**
A: Before storing your hose, drain it completely and allow it to dry thoroughly. Store it in a well-ventilated area to prevent mold and mildew growth.
9. **Q: Can I leave my garden hose connected to a frost-free faucet during the winter?**
A: While frost-free faucets offer some protection, it’s still best to disconnect your garden hose during the winter to prevent freezing and damage. The hose itself is still vulnerable.
10. **Q: Are there any eco-friendly ways to winterize my outdoor water system?**
A: Yes, you can use natural materials like straw or leaves to insulate your faucets and pipes. You can also collect rainwater in the fall to use for watering plants during the winter.
## Conclusion: Protecting Your Investment and Ensuring Peace of Mind
Winterizing your outdoor water system, including the simple act of **unhook garden hose winter**, is a crucial step in protecting your home from costly damage. By following the expert advice and step-by-step instructions outlined in this guide, you can ensure that your pipes, faucets, and hoses survive the winter unscathed. Remember to monitor the weather forecast, take action before the first hard freeze, and store your hoses properly. Taking these preventative measures will not only save you money but also give you peace of mind knowing that your home is protected from the elements. If you have any further questions or concerns, don’t hesitate to contact a qualified plumber or sprinkler system technician. Share your experiences with winterizing your outdoor water system in the comments below. We encourage you to explore our advanced guide to sprinkler system winterization for even more in-depth information. Contact our experts for a consultation on best practices for your region.
