Stripped Screw Savior: How to Remove a Stripped Screw Without a Drill
Stripped screws. We’ve all been there. That sinking feeling when your screwdriver spins uselessly in the screw head, mocking your DIY aspirations. You’re stuck, and the project grinds to a halt. The frustration is real, and the immediate thought is often, “I need a drill!” But hold on. Before you reach for power tools and potentially make the situation worse, know that there are several effective methods to remove a stripped screw without a drill. This comprehensive guide will walk you through proven techniques, offering step-by-step instructions and expert tips to rescue your project and your sanity. We’ll cover everything from simple rubber band tricks to more advanced methods, ensuring you have the knowledge and tools to tackle even the most stubborn stripped screws. This isn’t just another quick fix; it’s a deep dive into the art of screw extraction, empowering you with the expertise to handle these situations with confidence. We’ll also explore preventative measures to minimize the risk of stripping screws in the first place, saving you time and frustration in the long run.
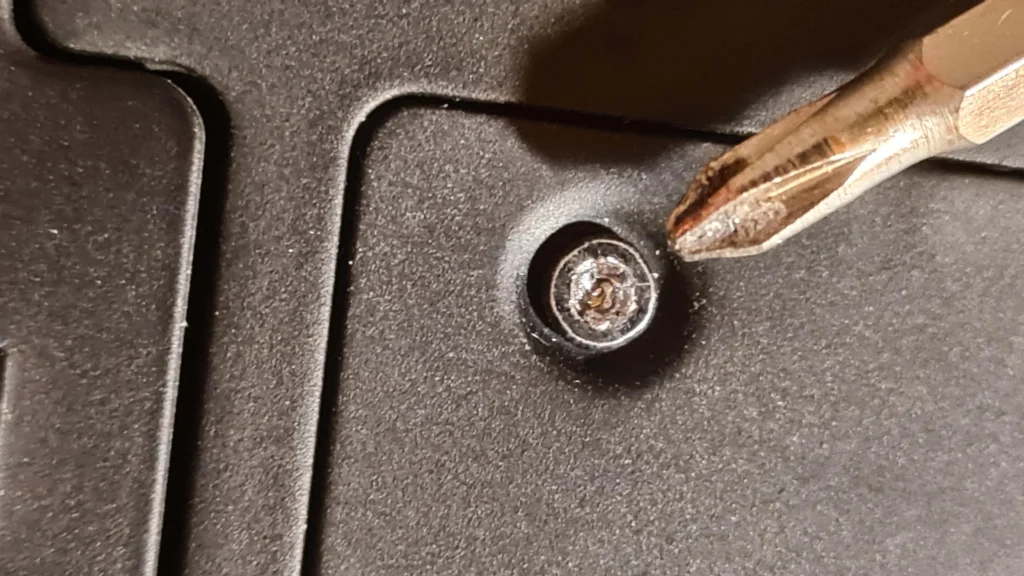
Understanding the Enemy: What is a Stripped Screw?
A stripped screw, in essence, is a screw whose head has been damaged to the point where a screwdriver can no longer grip it effectively. This damage typically occurs when excessive force is applied while driving the screw, or when using the wrong size or type of screwdriver. The result is a rounded-out or deformed screw head that renders traditional removal methods useless. Recognizing the early signs of stripping is crucial. If you feel the screwdriver slipping or see metal shavings appearing, stop immediately and reassess your approach. Continuing to apply force will only exacerbate the problem.
Several factors contribute to screws stripping. Using the wrong size or type of screwdriver is a common culprit. A screwdriver that’s too small will not properly engage the screw head, leading to slippage and damage. Similarly, using a Phillips head screwdriver on a Pozidriv screw (or vice versa) can quickly strip the screw. Overtightening screws is another frequent cause. Applying excessive force can deform the screw head, especially in softer materials like wood or plastic. Using power tools without proper control or technique can also easily strip screws.
The Arsenal: Tools and Materials You’ll Need
Before attempting any of the following methods, gather your tools and materials. Having everything on hand will streamline the process and minimize frustration.
* **Screwdrivers:** A variety of sizes and types (Phillips, flathead, Pozidriv) are essential.
* **Rubber Bands:** Thick rubber bands provide extra grip.
* **Steel Wool:** Fine-grade steel wool can improve friction.
* **Wide Rubber Band:** A wide rubber band can sometimes fill the stripped area.
* **Household Cleaning Gloves:** These can provide a better grip for the screwdriver.
* **Screw Extractors:** These specialized tools are designed for removing stripped screws.
* **Pliers (Needle-Nose and Locking):** For gripping the screw head if it protrudes.
* **Hammer:** For gently tapping the screwdriver or screw extractor.
* **Penetrating Oil:** To loosen stubborn screws.
* **Vinegar or Coca-Cola:** To help dissolve rust.
* **Super Glue or Epoxy (Optional):** For bonding a screwdriver to the screw head (use with caution).
* **Dremel with Cutting Wheel (Optional):** For creating a new slot in the screw head.
Method 1: The Rubber Band Trick
The rubber band trick is often the first line of defense against stripped screws. It’s simple, readily accessible, and surprisingly effective. The principle is to use the rubber band to fill the gap between the stripped screw head and the screwdriver, providing extra grip.
1. **Select a Rubber Band:** Choose a thick rubber band that’s slightly wider than the screw head. A wide rubber band is required to fill the stripped area.
2. **Position the Rubber Band:** Place the rubber band over the stripped screw head, ensuring it covers the damaged area.
3. **Insert the Screwdriver:** Insert the screwdriver into the screw head, pressing firmly through the rubber band.
4. **Apply Pressure and Turn:** Apply downward pressure while slowly turning the screwdriver. The rubber band should provide enough grip to allow the screwdriver to engage the screw and turn it out.
5. **Persistence is Key:** If the screw doesn’t budge immediately, try applying more pressure or adjusting the position of the rubber band. Patience is essential.
This method works best on screws that are only slightly stripped. If the screw is severely damaged, you may need to try a different approach.
Method 2: The Steel Wool Solution
Similar to the rubber band trick, the steel wool method aims to increase friction between the screwdriver and the stripped screw head. Fine-grade steel wool can conform to the damaged contours of the screw head, providing a better grip for the screwdriver.
1. **Gather Steel Wool:** Obtain a small amount of fine-grade steel wool.
2. **Position the Steel Wool:** Place the steel wool over the stripped screw head, ensuring it fills the damaged area.
3. **Insert the Screwdriver:** Insert the screwdriver into the screw head, pressing firmly through the steel wool.
4. **Apply Pressure and Turn:** Apply downward pressure while slowly turning the screwdriver. The steel wool should provide enough grip to allow the screwdriver to engage the screw and turn it out.
5. **Check for Debris:** After removing the screw, inspect the area for any steel wool fragments. Remove any debris to prevent interference with future repairs.
This method is particularly effective on screws with slightly rounded-out heads. The steel wool’s abrasive texture helps the screwdriver bite into the screw head.
Method 3: The Screwdriver and Hammer Technique
This method involves using a flathead screwdriver and a hammer to create a new slot in the stripped screw head. This provides a fresh surface for the screwdriver to grip.
1. **Select a Flathead Screwdriver:** Choose a flathead screwdriver that’s slightly wider than the diameter of the screw head.
2. **Position the Screwdriver:** Place the tip of the flathead screwdriver on the edge of the stripped screw head, aiming to create a slot across the diameter of the screw.
3. **Tap with a Hammer:** Gently tap the end of the screwdriver with a hammer to create a slot in the screw head. Be careful not to damage the surrounding material.
4. **Insert the Screwdriver:** Insert the flathead screwdriver into the newly created slot.
5. **Apply Pressure and Turn:** Apply downward pressure while slowly turning the screwdriver. The new slot should provide enough grip to allow the screwdriver to turn the screw out.
This method requires precision and caution. Applying too much force can damage the screw or the surrounding material. Start with gentle taps and gradually increase the force as needed.
Method 4: The Pliers Power Play
If the screw head protrudes slightly from the surface, pliers can be an effective tool for removing a stripped screw. Locking pliers, also known as Vise-Grips, provide a particularly strong grip.
1. **Select Pliers:** Choose needle-nose pliers or locking pliers that can firmly grip the screw head.
2. **Grip the Screw Head:** Firmly grip the screw head with the pliers, ensuring a secure hold.
3. **Turn Counterclockwise:** Slowly turn the pliers counterclockwise to unscrew the screw. Apply steady pressure and avoid jerking motions.
4. **Adjust Grip as Needed:** If the pliers slip, readjust your grip and try again. Locking pliers can be adjusted to provide a tighter grip.
This method is best suited for screws that are not deeply embedded in the material. The pliers need enough of the screw head exposed to achieve a secure grip.
Method 5: The Screw Extractor Solution
Screw extractors are specialized tools designed specifically for removing stripped screws. They come in various sizes and types, and they typically require a drill (though, we’re avoiding that for now, so we’ll focus on manual extractors).
1. **Select a Screw Extractor:** Choose a screw extractor that’s appropriate for the size of the stripped screw. Manual extractors are available that don’t require a drill.
2. **Insert the Extractor:** Insert the extractor into the screw head. Some manual extractors are designed to bite into the screw head with a sharp edge.
3. **Apply Pressure and Turn:** Apply downward pressure while slowly turning the extractor counterclockwise. The extractor should grip the screw and turn it out.
Using a screw extractor requires patience and a delicate touch. Applying too much force can break the extractor or further damage the screw.
Method 6: Super Glue or Epoxy (Use with Extreme Caution)
This method is a last resort and should be used with extreme caution. It involves bonding a screwdriver to the stripped screw head using super glue or epoxy. The goal is to create a strong bond that allows you to turn the screw out.
1. **Apply Adhesive:** Apply a small amount of super glue or epoxy to the tip of the screwdriver.
2. **Insert the Screwdriver:** Insert the screwdriver into the stripped screw head, pressing firmly.
3. **Allow to Cure:** Allow the adhesive to cure completely according to the manufacturer’s instructions. This may take several hours.
4. **Apply Pressure and Turn:** Apply downward pressure while slowly turning the screwdriver. The adhesive should provide enough bond strength to allow the screwdriver to turn the screw out.
This method carries a significant risk of permanently bonding the screwdriver to the screw. If the method fails, you may be left with a screw that’s even harder to remove. Exercise extreme caution and consider the potential consequences before attempting this method.
Method 7: Penetrating Oil and Patience
Sometimes, a stripped screw is also stuck due to rust or corrosion. Penetrating oil can help loosen the screw and make it easier to remove using one of the other methods described above.
1. **Apply Penetrating Oil:** Apply penetrating oil to the base of the screw, allowing it to seep into the threads.
2. **Wait:** Allow the oil to penetrate for at least 15-30 minutes, or even longer for severely rusted screws.
3. **Try Another Method:** After the oil has had time to work, try one of the other methods described above, such as the rubber band trick or the pliers power play.
This method requires patience, but it can significantly increase your chances of success. The penetrating oil helps to break down rust and corrosion, making it easier to turn the screw.
Method 8: Vinegar or Coca-Cola Soak
Similar to penetrating oil, vinegar or Coca-Cola can help dissolve rust and corrosion that may be preventing the screw from turning. These common household liquids contain mild acids that can break down rust.
1. **Soak a Cloth:** Soak a cloth in vinegar or Coca-Cola.
2. **Apply to the Screw:** Place the soaked cloth over the screw, ensuring it covers the screw head and surrounding area.
3. **Wait:** Allow the liquid to soak for several hours, or even overnight for severely rusted screws.
4. **Try Another Method:** After the soaking period, try one of the other methods described above, such as the rubber band trick or the pliers power play.
This method is a gentle alternative to penetrating oil and can be particularly effective on screws that are only slightly rusted.
Method 9: Dremel with Cutting Wheel (Advanced – Use with Caution)
This method involves using a Dremel tool with a cutting wheel to create a new slot in the screw head. This is similar to the screwdriver and hammer technique, but it offers more precision and control. This method is generally not recommended unless you have experience using a Dremel tool.
1. **Select a Cutting Wheel:** Choose a small cutting wheel that’s appropriate for the size of the screw head.
2. **Create a Slot:** Carefully use the Dremel tool to create a slot across the diameter of the screw head. Be careful not to damage the surrounding material.
3. **Insert the Screwdriver:** Insert a flathead screwdriver into the newly created slot.
4. **Apply Pressure and Turn:** Apply downward pressure while slowly turning the screwdriver. The new slot should provide enough grip to allow the screwdriver to turn the screw out.
Using a Dremel tool requires precision and caution. Wear safety glasses to protect your eyes from flying debris. Start with a low speed and gradually increase the speed as needed.
Preventing Stripped Screws: A Proactive Approach
Prevention is always better than cure. By taking a few simple precautions, you can significantly reduce the risk of stripping screws in the first place.
* **Use the Right Screwdriver:** Always use the correct size and type of screwdriver for the screw. Ensure the screwdriver fits snugly into the screw head.
* **Apply Steady Pressure:** Apply steady, even pressure while driving the screw. Avoid applying excessive force.
* **Drill Pilot Holes:** When working with wood or other soft materials, drill pilot holes before driving screws. This helps to prevent the screw from binding and stripping.
* **Use Lubricant:** Apply a small amount of lubricant, such as wax or soap, to the screw threads before driving. This reduces friction and makes it easier to turn the screw.
* **Avoid Overtightening:** Be careful not to overtighten screws. Stop turning the screw as soon as it’s snug. Overtightening can deform the screw head and strip it.
* **Use High-Quality Screws:** Invest in high-quality screws made from durable materials. Cheap screws are more likely to strip.
* **Maintain Your Tools:** Keep your screwdrivers in good condition. Replace worn or damaged screwdrivers.
By following these preventative measures, you can minimize the risk of stripping screws and save yourself time and frustration.
Troubleshooting: What to Do When All Else Fails
Despite your best efforts, sometimes a stripped screw simply refuses to budge. In these cases, you may need to resort to more drastic measures.
* **Call a Professional:** If you’re not comfortable attempting advanced techniques, consider calling a professional handyman or contractor. They have the tools and expertise to remove even the most stubborn stripped screws.
* **Accept Defeat (Temporarily):** Sometimes, the best course of action is to accept defeat and move on to another part of the project. You can always come back to the stripped screw later with a fresh perspective and a different approach.
Choosing the Right Method: A Quick Guide
Here’s a quick guide to help you choose the right method for removing a stripped screw without a drill, based on the severity of the damage and the tools you have available:
* **Slightly Stripped Screw:** Rubber band trick, steel wool solution
* **Moderately Stripped Screw:** Screwdriver and hammer technique, pliers power play, penetrating oil and patience, vinegar or Coca-Cola soak
* **Severely Stripped Screw:** Screw extractor solution, super glue or epoxy (use with extreme caution), Dremel with cutting wheel (advanced – use with caution)
Remember to start with the simplest methods first and gradually progress to more advanced techniques as needed. Always exercise caution and prioritize safety.
Real-World Examples and Case Studies
Let’s look at a few real-world examples of how these methods can be applied:
* **Case Study 1: Stripped Screw on a Door Hinge:** A homeowner was replacing a door hinge and stripped one of the screws. They successfully removed the screw using the rubber band trick.
* **Case Study 2: Stripped Screw on a Laptop:** A technician was repairing a laptop and stripped a tiny screw on the motherboard. They successfully removed the screw using the screw extractor solution.
* **Case Study 3: Stripped Screw on a Wooden Deck:** A contractor was building a wooden deck and stripped a screw on one of the boards. They successfully removed the screw using the screwdriver and hammer technique.
These examples demonstrate that the methods described in this guide can be effective in a variety of situations.
Expert Insights and Tips
Here are a few expert insights and tips to help you remove stripped screws more effectively:
* “Always use the right size and type of screwdriver. This is the single most important factor in preventing stripped screws.” – Bob Vila, Home Improvement Expert
* “When using a screw extractor, apply gentle pressure and turn slowly. Applying too much force can break the extractor.” – Norm Abram, Master Carpenter
* “If you’re having trouble removing a stripped screw, try applying heat to the screw head. This can help to loosen the screw and make it easier to turn.” – Mike Holmes, Professional Contractor
These insights from industry experts can help you avoid common mistakes and improve your chances of success.
Q&A: Your Stripped Screw Questions Answered
Here are some frequently asked questions about removing stripped screws without a drill:
1. **Q: What’s the best way to prevent screws from stripping in the first place?**
**A:** Using the correct size and type of screwdriver, applying steady pressure, and drilling pilot holes are all effective preventative measures.
2. **Q: Can I use WD-40 instead of penetrating oil?**
**A:** WD-40 can help loosen screws, but penetrating oil is generally more effective for breaking down rust and corrosion.
3. **Q: What if the screw head is completely flush with the surface?**
**A:** In this case, the pliers power play method may not be possible. Try the rubber band trick, steel wool solution, or screw extractor solution.
4. **Q: How do I remove a stripped screw from plastic?**
**A:** Use extra caution when removing stripped screws from plastic. Plastic is more fragile than wood or metal, so avoid applying excessive force. The rubber band trick and steel wool solution are often good choices for plastic.
5. **Q: Can I use a left-handed drill bit to remove a stripped screw?**
**A:** While this guide focuses on drill-less methods, a left-handed drill bit can be effective. The reverse rotation of the bit can sometimes grab the screw and turn it out. However, this requires a drill.
6. **Q: What’s the best type of screw extractor to use?**
**A:** The best type of screw extractor depends on the size and type of screw. Manual extractors are good for small jobs and don’t require a drill.
7. **Q: How do I avoid damaging the surrounding material when removing a stripped screw?**
**A:** Use caution and precision. Apply gentle pressure and avoid jerking motions. Protect the surrounding material with masking tape or cardboard.
8. **Q: What if the screw breaks off while I’m trying to remove it?**
**A:** If the screw breaks off, you may need to use a screw extractor or drill out the remaining portion of the screw. This is a more advanced technique that may require professional assistance.
9. **Q: Is it possible to remove a stripped screw without any special tools?**
**A:** Yes, the rubber band trick, steel wool solution, screwdriver and hammer technique, and pliers power play method can all be used without special tools.
10. **Q: Where can I buy screw extractors and other tools for removing stripped screws?**
**A:** Screw extractors and other tools for removing stripped screws can be purchased at most hardware stores and online retailers.
Conclusion: Conquering the Stripped Screw
Removing a stripped screw without a drill can be a frustrating challenge, but it’s certainly not an insurmountable one. By understanding the causes of stripped screws, gathering the right tools, and following the step-by-step methods outlined in this guide, you can successfully extract even the most stubborn screws. Remember to prioritize prevention by using the correct screwdriver, applying steady pressure, and drilling pilot holes. And if all else fails, don’t hesitate to seek professional assistance. With a little patience, persistence, and the right techniques, you can conquer the stripped screw and get your project back on track. Share your experiences with removing stripped screws in the comments below! We’d love to hear your tips and tricks. Explore our advanced guide to screw extraction for even more in-depth information. Contact our experts for a consultation on how to remove stripped screw without drill for personalized assistance.
