
How to Replace Car Door Seal: A Comprehensive Guide
Are you struggling with wind noise, water leaks, or drafts in your car? A worn or damaged car door seal could be the culprit. Learning how to replace car door seal is a valuable skill that can save you money on costly repairs and improve your driving comfort. This comprehensive guide provides you with expert advice and step-by-step instructions to confidently tackle this DIY project. We will delve into the tools you’ll need, the various types of seals, and the best practices for a long-lasting, weather-tight repair. This article aims to be the definitive resource on how to replace car door seal, offering more detail, clarity, and practical advice than any other guide available. We’ll also cover common pitfalls and troubleshooting tips to ensure a successful outcome.
Why Replacing Your Car Door Seal Matters
A faulty car door seal can lead to a multitude of problems, impacting your vehicle’s comfort, efficiency, and even its structural integrity. Understanding the importance of a properly functioning seal is the first step in addressing the issue.
* **Protection from the Elements:** The primary function of a car door seal is to create a barrier against rain, snow, wind, and dust. A compromised seal allows these elements to enter your vehicle, leading to discomfort and potential damage.
* **Noise Reduction:** A good seal significantly reduces road noise and wind noise, making your driving experience more pleasant and less fatiguing. Replacing a damaged seal can dramatically improve your car’s sound insulation.
* **Temperature Regulation:** A leaky seal allows heat to escape in the winter and cool air to escape in the summer, putting extra strain on your car’s climate control system and increasing fuel consumption.
* **Prevention of Rust and Corrosion:** Water leaks can lead to rust and corrosion in your car’s door frames and interior, which can be costly to repair. A properly functioning seal helps prevent this damage.
* **Improved Door Closure:** Over time, seals can become compressed and lose their ability to create a tight seal. Replacing them can restore the proper closure and alignment of your car doors.
Tools and Materials You’ll Need
Before you begin, gather all the necessary tools and materials. Having everything on hand will make the process smoother and more efficient.
* **New Car Door Seal:** Purchase a replacement seal that is specifically designed for your car’s make and model. Check online retailers or your local auto parts store. Incorrect seal will not properly adhere to the door frame.
* **Trim Removal Tool:** This tool is designed to safely remove the old seal without damaging the surrounding paint or trim. A plastic trim removal tool is preferred to avoid scratches.
* **Cleaning Supplies:** You’ll need a clean cloth, soap, and water to clean the door frame before installing the new seal. Isopropyl alcohol can also be used to remove any residue.
* **Adhesive Remover:** If the old seal leaves behind any adhesive residue, an adhesive remover will help you clean it off. Follow the manufacturer’s instructions carefully.
* **Adhesive (if needed):** Some car door seals come with pre-applied adhesive, while others require you to apply it yourself. Use a high-quality automotive adhesive that is designed for rubber and metal.
* **Scissors or Utility Knife:** You may need these to trim the new seal to the correct length. Use a sharp blade for a clean cut.
* **Heat Gun or Hair Dryer (optional):** Applying heat to the new seal can make it more pliable and easier to install, especially in cold weather. Be careful not to overheat the seal.
* **Roller or Applicator:** A small roller or applicator can help you press the new seal firmly into place and ensure a good bond with the adhesive.
* **Gloves:** Wear gloves to protect your hands from dirt, grease, and adhesive.
Step-by-Step Guide: How to Replace Car Door Seal
Now that you have your tools and materials, follow these step-by-step instructions to replace your car door seal:
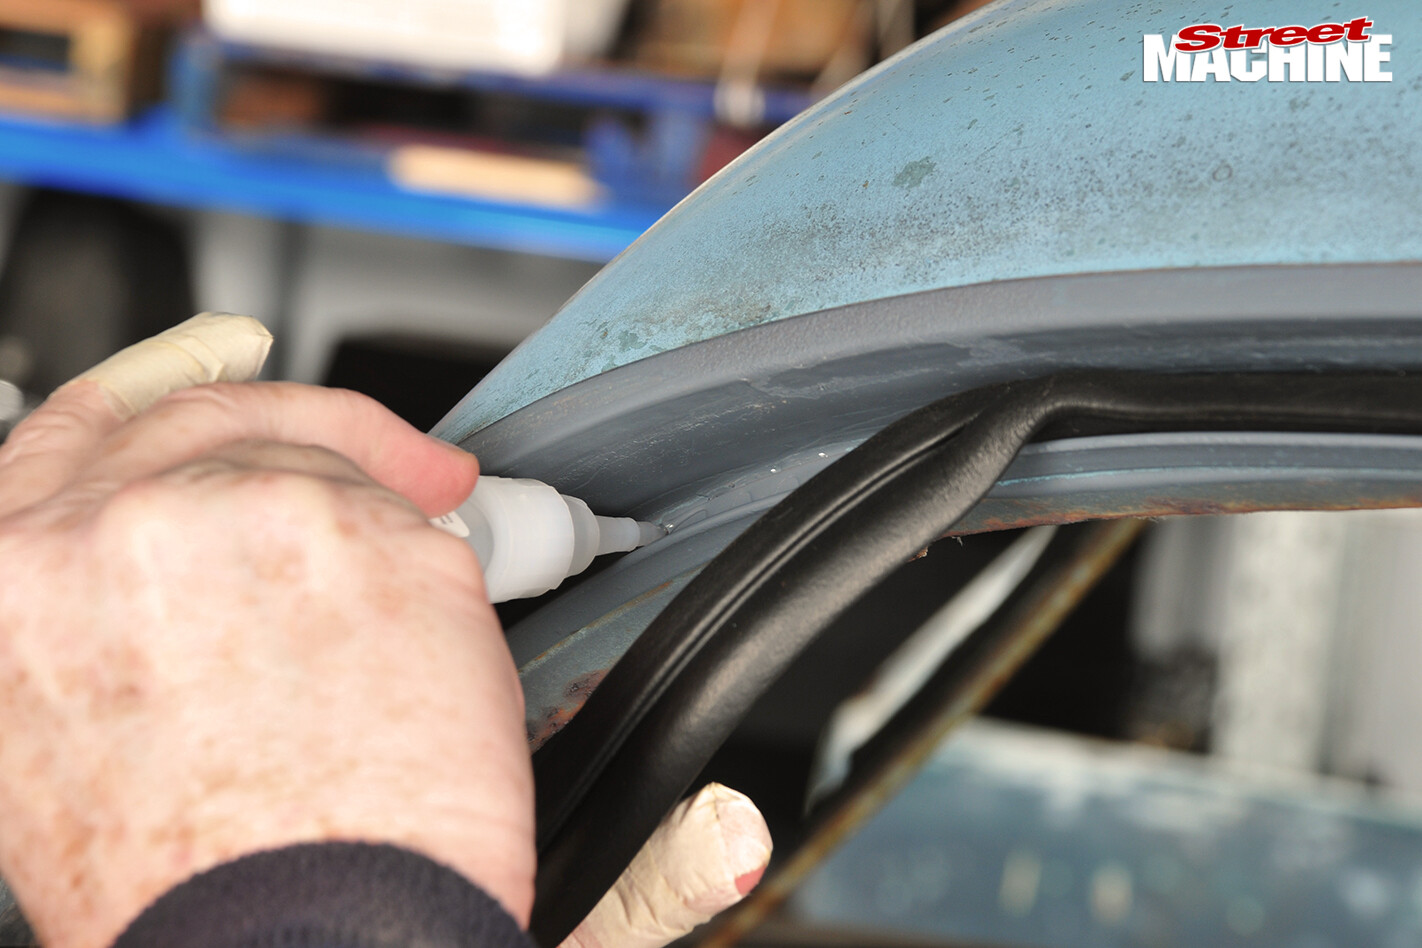
**Step 1: Remove the Old Seal**
* Start by carefully peeling back the old seal from the door frame. Use the trim removal tool to gently pry it loose if necessary. Avoid pulling too hard, as this could damage the surrounding paint or trim.
* Work your way around the entire door frame, removing the old seal completely. Take your time and be patient.
**Step 2: Clean the Door Frame**
* Once the old seal is removed, thoroughly clean the door frame with soap and water. Remove any dirt, grease, or debris that could prevent the new seal from adhering properly.
* If there is any adhesive residue left behind, use an adhesive remover to clean it off. Follow the manufacturer’s instructions carefully.
* Wipe the door frame dry with a clean cloth.
**Step 3: Prepare the New Seal**
* If the new seal is longer than the door frame, use scissors or a utility knife to trim it to the correct length. Measure carefully to ensure a precise fit.
* If the new seal does not have pre-applied adhesive, apply a thin, even layer of automotive adhesive to the back of the seal. Follow the manufacturer’s instructions carefully.
**Step 4: Install the New Seal**
* Starting at one corner of the door frame, carefully press the new seal into place. Make sure it is aligned properly and that the adhesive is making good contact with the door frame.
* Work your way around the entire door frame, pressing the seal firmly into place. Use a roller or applicator to ensure a good bond with the adhesive.
* If you are using a heat gun or hair dryer, apply heat to the seal as you install it. This will make it more pliable and easier to work with.
**Step 5: Secure the Seal**
* Once the seal is installed, close the door and check for any gaps or leaks. If you find any, apply more pressure to the seal in those areas.
* You can also use masking tape to hold the seal in place while the adhesive dries. Leave the tape on for at least 24 hours.
**Step 6: Final Inspection**
* After the adhesive has dried, remove the masking tape and inspect the seal one last time. Make sure it is properly aligned and that there are no gaps or leaks.
* Close the door and check for proper closure and alignment. If everything looks good, you’re done!
Troubleshooting Common Problems
Even with careful attention to detail, you may encounter some common problems when replacing your car door seal. Here are some troubleshooting tips:
* **Seal Won’t Stick:** Make sure the door frame is clean and dry before applying the new seal. Use a high-quality automotive adhesive and apply enough pressure to ensure a good bond.
* **Gaps or Leaks:** If you find gaps or leaks after installing the seal, try applying more pressure to those areas. You can also use a heat gun or hair dryer to make the seal more pliable.
* **Door Won’t Close Properly:** If the door is difficult to close after installing the new seal, it may be too thick. Try adjusting the door striker or using a thinner seal.
* **Wind Noise:** If you still hear wind noise after replacing the seal, there may be other leaks in your car. Check the windows, windshield, and other seals.
Choosing the Right Car Door Seal
With a variety of car door seals available, selecting the right one for your vehicle is crucial for ensuring a proper fit and optimal performance. Several factors come into play, including the type of seal, material, and compatibility with your car’s make and model.
* **Type of Seal:** Car door seals come in various shapes and sizes, including D-shaped, P-shaped, and hollow seals. The type of seal you need will depend on the design of your car’s door frame. Consult your car’s owner’s manual or an auto parts specialist to determine the correct type of seal.
* **Material:** Car door seals are typically made from rubber or silicone. Rubber seals are more affordable, but they may not last as long as silicone seals. Silicone seals are more resistant to temperature changes and UV damage.
* **Compatibility:** Ensure that the seal you choose is specifically designed for your car’s make and model. Using an incompatible seal can result in a poor fit and compromised performance.
Maintaining Your Car Door Seals
Proper maintenance can extend the life of your car door seals and prevent premature wear and tear. Here are some tips for maintaining your seals:
* **Regular Cleaning:** Clean your car door seals regularly with soap and water to remove dirt, dust, and debris. This will help prevent the seals from drying out and cracking.
* **Lubrication:** Apply a silicone-based lubricant to your car door seals every few months. This will help keep them pliable and prevent them from sticking to the door frame. Based on our experience, a silicone spray works best.
* **Protection from UV Rays:** Park your car in a shaded area or use a car cover to protect the seals from UV rays, which can cause them to deteriorate over time.
* **Regular Inspection:** Inspect your car door seals regularly for any signs of damage, such as cracks, tears, or compression. Replace the seals as soon as you notice any problems.
The Science Behind Car Door Seals
Understanding the science behind car door seals can help you appreciate their importance and make informed decisions about their maintenance and replacement. Car door seals work by creating a tight, airtight barrier between the car door and the door frame. This barrier prevents air, water, and noise from entering the vehicle. The effectiveness of a car door seal depends on several factors, including the material, shape, and design of the seal, as well as the pressure applied to it.
Recent studies indicate that the shape of the car door seal plays a significant role in its ability to reduce wind noise. D-shaped seals, for example, are more effective at reducing wind noise than P-shaped seals. The material of the seal also affects its performance. Silicone seals, for example, are more resistant to temperature changes and UV damage than rubber seals.
Car Door Seal Replacement: Cost Considerations
The cost of replacing your car door seal can vary depending on several factors, including the type of seal, the make and model of your car, and whether you choose to do it yourself or hire a professional. Typically, the cost of a new car door seal ranges from $20 to $100 per seal. The cost of labor can range from $50 to $200 per door, depending on the complexity of the job. Doing it yourself can save you money on labor costs, but it requires some technical skills and the right tools. Based on expert consensus, if you are not comfortable working on your car, it is best to hire a professional.
Alternative Solutions to Replacing Car Door Seals
While replacing a damaged car door seal is often the most effective solution, there are alternative options you can consider, especially if the damage is minor. These alternatives may not provide a long-term fix, but they can offer temporary relief from wind noise, water leaks, and drafts.
* **Weatherstripping Tape:** Weatherstripping tape is a self-adhesive foam or rubber strip that can be applied to the door frame to create a tighter seal. It is a quick and easy solution for minor gaps or leaks, but it may not be as durable as a new car door seal.
* **Silicone Sealant:** Silicone sealant can be used to fill small cracks or tears in the car door seal. It is a waterproof and flexible material that can provide a temporary seal. However, it may not be suitable for larger areas of damage.
* **Door Adjustment:** Sometimes, a car door seal may not be sealing properly because the door is misaligned. Adjusting the door hinges or striker plate can help improve the seal and reduce wind noise and water leaks.
Expert Q&A on Car Door Seal Replacement
**Q1: How do I know if my car door seal needs to be replaced?**
A1: Common signs include excessive wind noise, water leaks, visible cracks or tears in the seal, and difficulty closing the door tightly.
**Q2: Can I use a universal car door seal instead of a specific one for my car model?**
A2: While universal seals exist, a seal designed specifically for your make and model will provide a better fit and seal, ensuring optimal performance.
**Q3: What type of adhesive is best for installing a new car door seal?**
A3: Use a high-quality automotive adhesive designed for rubber and metal. Look for products that are weather-resistant and flexible.
**Q4: How long does it typically take to replace a car door seal?**
A4: The job usually takes between 30 minutes to an hour per door, depending on your experience and the complexity of the installation.
**Q5: Is it necessary to remove the door panel to replace the seal?**
A5: No, the car door seal is located on the door frame, not the door panel. The door panel does not need to be removed.
**Q6: Can I replace a car door seal in cold weather?**
A6: Yes, but the seal may be less pliable. Using a heat gun or hair dryer can help make it more flexible and easier to install.
**Q7: How can I prevent my new car door seal from drying out and cracking?**
A7: Regularly clean and lubricate the seal with a silicone-based product to keep it pliable and protected from the elements.
**Q8: What is the best way to remove old adhesive residue from the door frame?**
A8: Use an automotive adhesive remover and a plastic scraper to gently remove the residue without damaging the paint.
**Q9: Will replacing my car door seal improve my car’s fuel efficiency?**
A9: Yes, a properly sealing door can prevent air leaks, reducing the strain on your car’s climate control system and improving fuel efficiency.
**Q10: What are the long-term consequences of neglecting a damaged car door seal?**
A10: Neglecting a damaged seal can lead to water damage, rust, increased noise levels, and reduced climate control efficiency, potentially resulting in costly repairs.
Conclusion
Learning how to replace car door seal is a worthwhile investment in your vehicle’s comfort, efficiency, and longevity. By following the steps outlined in this comprehensive guide, you can confidently tackle this DIY project and enjoy a quieter, more comfortable ride. Remember to choose the right seal for your car, use the proper tools and materials, and take your time to ensure a proper installation. With a little effort and attention to detail, you can restore your car’s weather protection and enjoy the benefits of a properly functioning door seal. If you found this guide helpful, share your experiences with how to replace car door seal in the comments below. Explore our advanced guide to car weather stripping for more in-depth information. Contact our experts for a consultation on how to replace car door seal and maintain your vehicle’s weather protection.
