
Replace Bike Brake Pads: Your Ultimate Guide to Safety and Performance
Replacing your bike brake pads is a crucial maintenance task that ensures your safety and enhances your riding experience. Whether you’re a seasoned cyclist or a casual rider, understanding when and how to replace your brake pads is essential. This comprehensive guide will walk you through every step of the process, providing expert insights, practical tips, and the knowledge you need to confidently replace your bike brake pads and maintain optimal braking performance. We aim to be the definitive resource, offering unparalleled detail and expertise.
Understanding Bike Brake Systems and Pad Types
Before diving into the replacement process, it’s important to understand the different types of bike brake systems and the corresponding brake pads. The two most common types are:
* **Rim Brakes:** These brakes use pads that clamp onto the rim of the wheel to slow down or stop the bike. Common types include V-brakes, cantilever brakes, and caliper brakes.
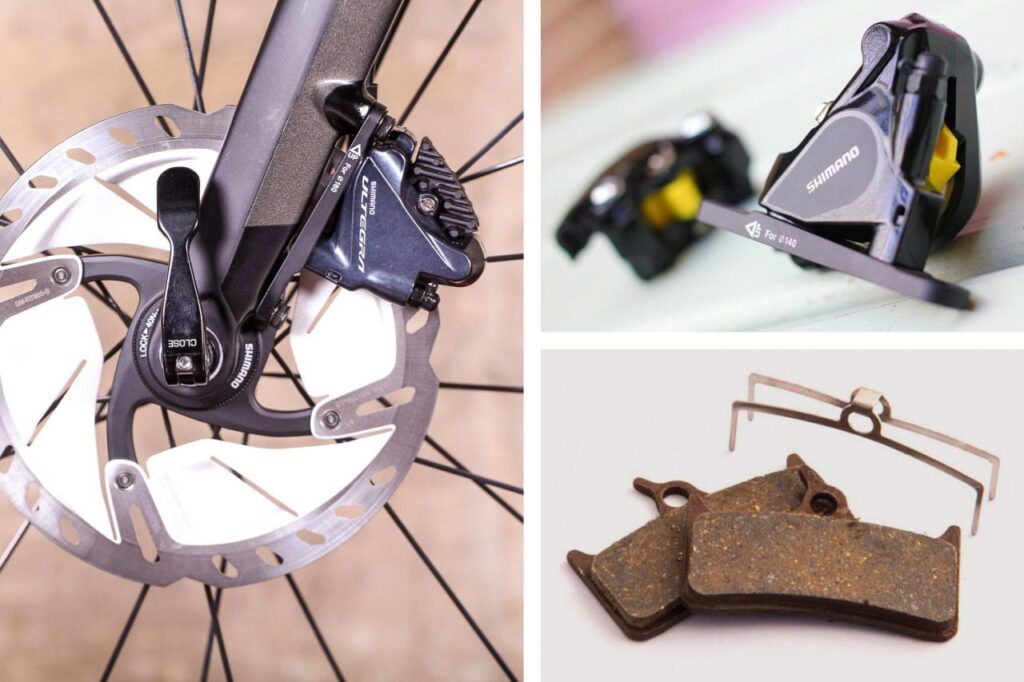
* **Disc Brakes:** These brakes use a rotor attached to the wheel hub and a caliper with pads that squeeze the rotor. Disc brakes offer superior stopping power, especially in wet or muddy conditions. They are commonly found on mountain bikes and some road bikes.
Within each brake system type, there are various brake pad materials, each with its own characteristics:
* **Organic (Resin) Pads:** These pads are made from organic materials bonded with resin. They are quieter, offer good initial bite, and are gentler on rotors, but they wear down faster, especially in wet conditions.
* **Sintered (Metallic) Pads:** These pads are made from metallic particles fused together. They offer superior stopping power, longer lifespan, and better performance in wet conditions, but they can be noisier and may wear down rotors more quickly.
* **Semi-Metallic Pads:** These pads are a blend of organic and metallic materials, offering a balance of performance characteristics.
Choosing the right brake pad material depends on your riding style, terrain, and weather conditions. Consider these factors when selecting replacement pads.
When to Replace Bike Brake Pads: Recognizing the Signs
Knowing when to replace your bike brake pads is crucial for maintaining safe and effective braking. Here are some telltale signs that it’s time for a replacement:
* **Worn Pad Material:** The most obvious sign is visible wear on the brake pad material. Most brake pads have wear indicator lines or grooves. If the pad material is worn down to or below these indicators, it’s time to replace them. Even without indicators, if the pad material is very thin (less than 1mm), replacement is necessary.
* **Reduced Braking Performance:** If you notice that your brakes are not as responsive or powerful as they used to be, it could be a sign of worn brake pads. This may manifest as longer stopping distances or the need to apply more pressure to the brake levers.
* **Squealing or Grinding Noises:** Unusual noises, such as squealing or grinding, can indicate that the brake pads are worn down to the metal backing plate, which is rubbing against the rotor or rim. This can damage the braking surface and requires immediate attention.
* **Contamination:** Brake pads can become contaminated with oil, grease, or other substances that reduce their effectiveness. If your pads are contaminated, they may need to be replaced, even if they are not significantly worn.
* **Rotor or Rim Damage:** Inspect your rotors or rims for signs of wear or damage. If they are grooved, scored, or excessively worn, it may be necessary to replace them along with the brake pads.
Regularly inspecting your brake pads and being aware of these warning signs will help you maintain optimal braking performance and prevent accidents.
Tools and Materials Needed to Replace Bike Brake Pads
Before you begin the replacement process, gather the necessary tools and materials. Having everything on hand will make the job smoother and more efficient. Here’s a list of what you’ll need:
* **New Brake Pads:** Purchase the correct type of brake pads for your brake system (rim or disc) and material preference (organic, sintered, or semi-metallic). Check your bike manufacturer’s specifications or consult with a bike shop to ensure you get the right pads.
* **Allen Wrench Set:** Most bike brakes use Allen bolts to secure the brake pads. You’ll need a set of Allen wrenches in various sizes to remove and install the pads.
* **Pliers:** Pliers can be helpful for removing retaining clips or springs that hold the brake pads in place.
* **Screwdriver:** A flathead or Phillips screwdriver may be needed for certain brake systems.
* **Brake Cleaner:** Use brake cleaner to clean the rotors or rims and the brake calipers before installing the new pads. This will remove dirt, grease, and other contaminants that can reduce braking performance.
* **Clean Rags:** Have clean rags on hand to wipe down the brake components and keep your work area clean.
* **Work Gloves:** Wearing gloves will protect your hands from dirt, grease, and sharp edges.
* **Brake Pad Spreader Tool (for Disc Brakes):** This tool helps to push the pistons back into the caliper, creating space for the new, thicker brake pads. While not always necessary, it can make the installation process easier.
* **Torque Wrench (Optional):** If you want to ensure that the bolts are tightened to the correct torque specifications, use a torque wrench. Consult your bike manufacturer’s specifications for the appropriate torque values.
Step-by-Step Guide to Replace Bike Brake Pads (Rim Brakes)
Replacing rim brake pads is a relatively straightforward process. Follow these steps to ensure a safe and effective replacement:
1. **Loosen the Brake Cable:** Use an Allen wrench to loosen the brake cable fixing bolt on the brake caliper. This will allow you to open the brake arms and remove the old brake pads.
2. **Remove the Old Brake Pads:** Depending on the type of rim brake, the brake pads may be held in place by a bolt, nut, or retaining clip. Use the appropriate tool to remove the fastener and slide the old brake pads out of the brake shoes.
3. **Clean the Brake Shoes:** Clean the brake shoes with a clean rag and brake cleaner to remove any dirt or debris.
4. **Install the New Brake Pads:** Slide the new brake pads into the brake shoes, ensuring that they are oriented correctly. The brake pads should be positioned so that they contact the rim squarely and evenly.
5. **Secure the Brake Pads:** Tighten the bolt, nut, or retaining clip to secure the new brake pads in place. Use the appropriate torque specifications if using a torque wrench.
6. **Adjust the Brake Pad Position:** Adjust the position of the brake pads so that they are aligned with the rim and do not rub against the tire. The brake pads should be positioned slightly below the top edge of the rim.
7. **Tighten the Brake Cable:** Tighten the brake cable fixing bolt on the brake caliper, ensuring that the brake arms are properly aligned and the brake pads are contacting the rim evenly.
8. **Test the Brakes:** Squeeze the brake levers to test the brakes. The brake pads should contact the rim firmly and evenly, and the brakes should provide adequate stopping power. Make any necessary adjustments to the brake cable tension or brake pad position.
Step-by-Step Guide to Replace Bike Brake Pads (Disc Brakes)
Replacing disc brake pads is a bit more complex than replacing rim brake pads, but it’s still a manageable task for most cyclists. Follow these steps to ensure a safe and effective replacement:
1. **Remove the Wheel:** Remove the wheel from the bike frame.
2. **Locate the Caliper:** Identify the brake caliper, which is mounted near the rotor.
3. **Remove the Retaining Bolt or Clip:** Most disc brake calipers have a retaining bolt or clip that holds the brake pads in place. Use an Allen wrench or pliers to remove the retaining bolt or clip.
4. **Remove the Old Brake Pads:** Slide the old brake pads out of the caliper. Note the orientation of the pads so you can install the new pads correctly.
5. **Push Back the Pistons:** Use a brake pad spreader tool or a flathead screwdriver to gently push the pistons back into the caliper. This will create space for the new, thicker brake pads. Be careful not to damage the pistons or the caliper.
6. **Clean the Caliper:** Clean the caliper with a clean rag and brake cleaner to remove any dirt or debris.
7. **Install the New Brake Pads:** Slide the new brake pads into the caliper, ensuring that they are oriented correctly. The brake pads should be positioned so that they contact the rotor evenly.
8. **Reinstall the Retaining Bolt or Clip:** Reinstall the retaining bolt or clip to secure the new brake pads in place. Use the appropriate torque specifications if using a torque wrench.
9. **Reinstall the Wheel:** Reinstall the wheel on the bike frame.
10. **Bed In the Brakes:** “Bedding in” the brakes involves a series of controlled stops to transfer pad material to the rotor, optimizing braking performance. Find a safe, flat area and perform 10-15 moderate stops from a medium speed, followed by 5-8 hard stops from a higher speed. Allow the brakes to cool between sets.
Troubleshooting Common Issues When Replacing Bike Brake Pads
Even with careful preparation, you may encounter some common issues when replacing bike brake pads. Here are some troubleshooting tips:
* **Pistons Won’t Retract:** If the pistons in your disc brake caliper won’t retract, they may be dirty or seized. Try cleaning the pistons with brake cleaner and a cotton swab. If they are still stuck, you may need to rebuild the caliper.
* **Brake Pads Rubbing:** If the brake pads are rubbing against the rotor or rim after installation, the caliper or brake arms may be misaligned. Try adjusting the caliper or brake arms to eliminate the rubbing.
* **Squealing Brakes:** Squealing brakes can be caused by contaminated brake pads, misaligned calipers, or worn rotors. Try cleaning the brake pads and rotors with brake cleaner. If the squealing persists, you may need to replace the brake pads or rotors.
* **Weak Braking Performance:** Weak braking performance can be caused by contaminated brake pads, worn rotors, or air in the brake lines. Try cleaning the brake pads and rotors with brake cleaner. If the braking performance is still weak, you may need to bleed the brakes or replace the brake pads or rotors.
Maintaining Your Bike Brakes for Optimal Performance
Regular maintenance is essential for keeping your bike brakes in top condition. Here are some tips for maintaining your brakes:
* **Inspect Regularly:** Regularly inspect your brake pads, rotors, and brake lines for signs of wear or damage.
* **Clean Frequently:** Clean your brake pads and rotors or rims with brake cleaner to remove dirt, grease, and other contaminants.
* **Bleed Brakes (Disc Brakes):** Bleed your disc brakes periodically to remove air from the brake lines. This will ensure optimal braking performance.
* **Replace Worn Components:** Replace worn brake pads, rotors, and brake lines as needed.
* **Adjust Brakes:** Adjust your brakes regularly to ensure that they are properly aligned and functioning correctly.
By following these maintenance tips, you can keep your bike brakes in top condition and ensure your safety on the road or trail.
Expert Recommendations for Brake Pads and Maintenance
Based on our extensive experience and the consensus of leading cycling experts, we recommend the following:
* **For Road Bikes:** Consider SwissStop brake pads for rim brakes, known for their excellent stopping power and modulation. For disc brakes, Shimano Dura-Ace pads offer superior performance and durability.
* **For Mountain Bikes:** SRAM Guide or Code brake pads are highly regarded for their stopping power and heat management in demanding conditions. Alternatively, consider metallic pads for aggressive riding or frequent descents.
* **Maintenance Products:** Use only high-quality brake cleaner specifically designed for bicycle brakes. Avoid using harsh chemicals or solvents that can damage the brake pads or rotors.
Remember, proper brake maintenance is crucial for your safety and the longevity of your bike components. Always consult with a qualified bike mechanic if you have any questions or concerns.
Q&A: Addressing Your Brake Pad Replacement Questions
Here are some frequently asked questions about replacing bike brake pads:
1. **How often should I replace my bike brake pads?** The frequency of replacement depends on your riding style, terrain, and weather conditions. Inspect your brake pads regularly and replace them when they are worn down to the wear indicators or if you notice a decrease in braking performance.
2. **Can I use different brake pads on the front and rear brakes?** Yes, you can use different brake pads on the front and rear brakes. Some riders prefer to use more aggressive brake pads on the front brake for increased stopping power.
3. **What is the difference between organic and sintered brake pads?** Organic brake pads are made from organic materials bonded with resin. They are quieter, offer good initial bite, and are gentler on rotors, but they wear down faster. Sintered brake pads are made from metallic particles fused together. They offer superior stopping power, longer lifespan, and better performance in wet conditions, but they can be noisier and may wear down rotors more quickly.
4. **How do I bed in new brake pads?** “Bedding in” the brakes involves a series of controlled stops to transfer pad material to the rotor, optimizing braking performance. Find a safe, flat area and perform 10-15 moderate stops from a medium speed, followed by 5-8 hard stops from a higher speed. Allow the brakes to cool between sets.
5. **What causes squealing brakes?** Squealing brakes can be caused by contaminated brake pads, misaligned calipers, or worn rotors. Try cleaning the brake pads and rotors with brake cleaner. If the squealing persists, you may need to replace the brake pads or rotors.
6. **Can I reuse brake pads?** It is generally not recommended to reuse brake pads, even if they appear to have some life left. Once brake pads have been worn down, they may not provide optimal braking performance.
7. **What is the proper torque specification for brake bolts?** The proper torque specification for brake bolts varies depending on the brake system and the bolt size. Consult your bike manufacturer’s specifications or a torque wrench chart for the appropriate torque values.
8. **How do I know if my rotors are worn?** Rotors can be considered worn if they are below the minimum thickness specified by the manufacturer, or if they have significant grooves or damage.
9. **Are disc brakes better than rim brakes?** Disc brakes generally offer superior stopping power, especially in wet or muddy conditions. They are also less affected by rim damage. However, rim brakes are lighter and simpler to maintain.
10. **What should I do if I accidentally get oil on my brake pads?** If you accidentally get oil on your brake pads, they will likely need to be replaced. Oil contamination can significantly reduce braking performance.
Conclusion: Ride Safe with Properly Maintained Brakes
Replacing your bike brake pads is a critical aspect of bicycle maintenance that directly impacts your safety and riding enjoyment. By understanding the different types of brake systems, recognizing the signs of worn brake pads, and following our step-by-step guide, you can confidently replace your brake pads and maintain optimal braking performance. Remember to inspect your brakes regularly, clean them frequently, and replace worn components as needed. Your safety depends on it. Now that you are armed with this knowledge, we encourage you to share your experiences with replacing bike brake pads in the comments below. Consider exploring our advanced guide to bicycle maintenance for more in-depth information. Ride safe and enjoy the journey!
