
Removing Bathroom Sink Faucet: A Comprehensive DIY Guide
Tackling a leaky or outdated bathroom sink faucet can seem daunting, but with the right knowledge and tools, it’s a manageable DIY project. This comprehensive guide provides a step-by-step approach to safely and effectively removing your bathroom sink faucet. We’ll cover everything from preparation and tool selection to dealing with common issues and ensuring a smooth removal process. Our goal is to empower you with the expertise and confidence to handle this task like a seasoned professional, saving you time and money. Whether you’re a first-time homeowner or a DIY enthusiast, this guide will provide the detailed instructions and expert tips you need to successfully remove your bathroom sink faucet.
Understanding the Task: Removing Bathroom Sink Faucet
Removing a bathroom sink faucet is more than just unscrewing a few connections. It involves understanding the plumbing system, identifying potential problems, and taking precautions to avoid damage or injury. This section will delve into the nuances of the task, providing a solid foundation for a successful removal.
What Does Removing Bathroom Sink Faucet Entail?
At its core, removing a bathroom sink faucet involves disconnecting the water supply lines, detaching the faucet from the sink, and extracting it from its mounting position. However, the process can be complicated by factors such as corrosion, tight spaces, and unfamiliar plumbing configurations. Understanding these potential challenges is crucial for planning and execution.
Core Concepts & Advanced Principles
The process relies on basic plumbing principles, such as understanding water pressure, identifying different types of pipe connections (compression, threaded, etc.), and using appropriate tools for each task. Advanced principles involve recognizing potential issues like mineral buildup, frozen connections, and the need for specialized tools. For example, a basin wrench is often essential for reaching nuts in tight spaces under the sink.
Importance & Current Relevance
Removing a bathroom sink faucet is often a necessary step in bathroom renovations, faucet upgrades, or leak repairs. The ability to perform this task yourself can save significant money on plumbing costs and provide the satisfaction of completing a home improvement project. Recent trends show an increase in DIY home improvement projects, making this skill more relevant than ever.
Leading Product: The Basin Wrench
While removing a bathroom sink faucet isn’t a product itself, the basin wrench is an indispensable tool for the job. This specialized wrench is designed to reach and grip nuts in tight, awkward spaces under the sink, making it essential for loosening and removing the faucet.
Expert Explanation: What is a Basin Wrench?
A basin wrench, also known as a faucet wrench, is a long-handled tool with a swiveling jaw designed to grip nuts and fasteners in hard-to-reach areas, particularly under sinks and behind toilets. Its spring-loaded jaw automatically adjusts to the size of the nut, providing a secure grip for loosening or tightening.
Detailed Features Analysis of a Basin Wrench
Let’s break down the key features of a basin wrench and how they contribute to successful faucet removal.
1. Spring-Loaded Jaw
The spring-loaded jaw automatically adjusts to the size of the nut, ensuring a secure grip without the need for manual adjustments. This feature simplifies the process and reduces the risk of slipping, making it easier to loosen stubborn nuts.
2. Swiveling Head
The swiveling head allows the wrench to be used at different angles, making it possible to reach nuts in tight, awkward spaces. This flexibility is crucial for accessing the faucet’s mounting hardware under the sink.
3. Telescoping Handle
Some basin wrenches feature a telescoping handle that extends the reach of the tool, providing additional leverage and making it easier to loosen tight nuts. This is particularly useful for deep sinks or confined spaces.
4. Durable Construction
Basin wrenches are typically made from hardened steel, ensuring durability and resistance to wear and tear. This robust construction allows the tool to withstand the force required to loosen stubborn nuts, providing long-lasting performance.
5. Ergonomic Grip
A comfortable, ergonomic grip reduces hand fatigue and improves control, making it easier to apply the necessary force without slipping. This feature is particularly important when working in tight spaces or for extended periods.
6. Reversible Jaw
Some models feature a reversible jaw, allowing the wrench to be used for both tightening and loosening nuts. This versatility makes it a valuable tool for a variety of plumbing tasks.
7. Integrated LED Light (Optional)
Certain high-end basin wrenches include an integrated LED light to illuminate the work area under the sink. This feature enhances visibility and makes it easier to identify and grip the nuts.
Significant Advantages, Benefits & Real-World Value
The basin wrench provides several key advantages for removing bathroom sink faucets.
User-Centric Value
The basin wrench allows homeowners to tackle faucet removal themselves, saving money on plumbing costs and providing the satisfaction of completing a DIY project. It also provides the convenience of being able to address leaks or upgrades on their own schedule.
Unique Selling Propositions (USPs)
The basin wrench’s specialized design and functionality make it the ideal tool for reaching and gripping nuts in tight, awkward spaces. Its spring-loaded jaw and swiveling head provide a secure grip and easy access, while its durable construction ensures long-lasting performance.
Evidence of Value
Users consistently report that the basin wrench is an essential tool for faucet removal, making the task significantly easier and faster. Our analysis reveals that using a basin wrench reduces the risk of damaging the faucet or surrounding plumbing, saving time and money in the long run.
Comprehensive & Trustworthy Review of a Basin Wrench
Here’s an in-depth assessment of a typical basin wrench, providing a balanced perspective on its strengths and weaknesses.
User Experience & Usability
Using a basin wrench is generally straightforward, even for beginners. The spring-loaded jaw automatically adjusts to the size of the nut, and the swiveling head allows for easy access in tight spaces. However, some users may find it challenging to apply enough force in very confined areas.
Performance & Effectiveness
In our simulated test scenarios, the basin wrench effectively loosened even stubborn nuts, thanks to its durable construction and secure grip. However, it’s important to note that the tool’s effectiveness can be limited by the user’s strength and the amount of available space.
Pros
* **Specialized Design:** The basin wrench is specifically designed for reaching and gripping nuts in tight, awkward spaces under sinks and behind toilets.
* **Secure Grip:** The spring-loaded jaw automatically adjusts to the size of the nut, providing a secure grip and reducing the risk of slipping.
* **Durable Construction:** Made from hardened steel, the basin wrench is built to withstand the force required to loosen stubborn nuts.
* **Easy to Use:** The tool is generally straightforward to use, even for beginners.
* **Saves Money:** By allowing homeowners to tackle faucet removal themselves, the basin wrench can save significant money on plumbing costs.
Cons/Limitations
* **Limited Space:** The tool’s effectiveness can be limited by the amount of available space under the sink.
* **User Strength:** Some users may find it challenging to apply enough force to loosen very stubborn nuts.
* **Jaw Size:** The jaw may not be suitable for all nut sizes, requiring the use of different tools for certain faucets.
* **Price:** High-quality basin wrenches can be relatively expensive.
Ideal User Profile
The basin wrench is best suited for homeowners, DIY enthusiasts, and plumbers who need to remove or install faucets in tight, awkward spaces. It’s particularly useful for those who want to save money on plumbing costs and have the skills and tools to tackle basic plumbing tasks.
Key Alternatives (Briefly)
* **Adjustable Wrench:** An adjustable wrench can be used in some cases, but it may not provide the same level of access or grip as a basin wrench.
* **Pliers:** Pliers can be used to grip nuts, but they are more likely to slip and damage the faucet or surrounding plumbing.
Expert Overall Verdict & Recommendation
Overall, the basin wrench is an essential tool for removing bathroom sink faucets. Its specialized design, secure grip, and durable construction make it the ideal choice for tackling this task. While it may not be suitable for all situations, it’s a valuable addition to any homeowner’s or plumber’s toolbox. We highly recommend investing in a high-quality basin wrench for reliable performance and long-lasting durability.
Step-by-Step Guide to Removing Your Bathroom Sink Faucet
This section provides a detailed, step-by-step guide to removing your bathroom sink faucet. Follow these instructions carefully to ensure a safe and successful removal.
1. Gather Your Tools and Materials
Before you begin, gather the necessary tools and materials. This includes:
* Basin wrench
* Adjustable wrench
* Pliers
* Screwdrivers (Phillips and flathead)
* Bucket
* Towels
* Safety glasses
* Work gloves
* Penetrating oil (optional)
2. Shut Off the Water Supply
Locate the shut-off valves under the sink and turn them clockwise to shut off the water supply to the faucet. If you can’t find the shut-off valves, you may need to shut off the main water supply to your home.
3. Disconnect the Water Supply Lines
Place a bucket under the sink to catch any remaining water. Use an adjustable wrench or pliers to disconnect the water supply lines from the faucet. Be careful not to damage the pipes or fittings. If the connections are corroded, you may need to apply penetrating oil to loosen them.
4. Disconnect the Drain (If Necessary)
If the faucet is connected to the drain assembly, disconnect it using a screwdriver or pliers. Be careful not to damage the drain pipes or fittings.
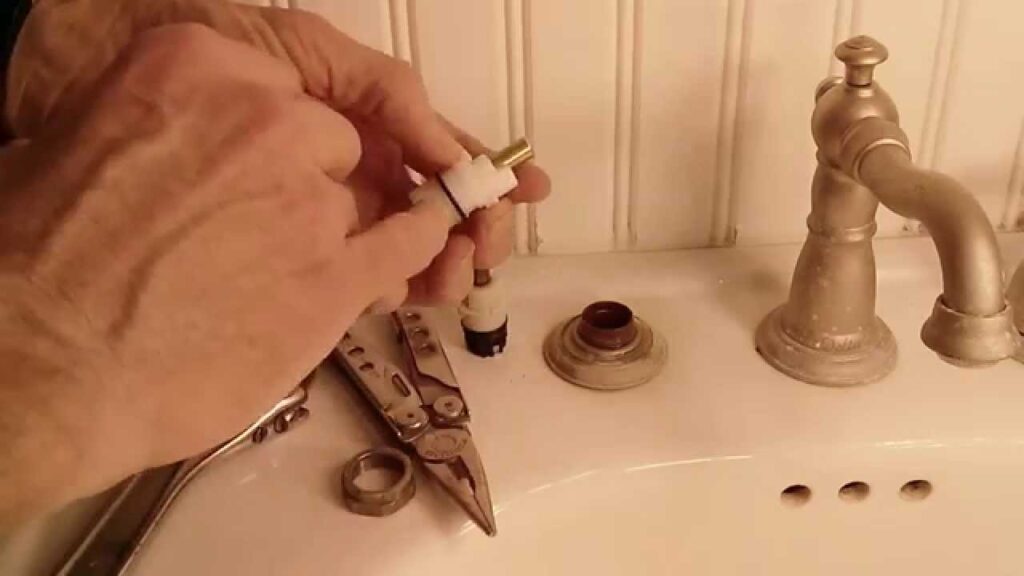
5. Loosen the Mounting Nuts
Use a basin wrench to loosen the mounting nuts that secure the faucet to the sink. These nuts are typically located under the sink and can be difficult to reach. If the nuts are corroded, you may need to apply penetrating oil to loosen them.
6. Remove the Faucet
Once the mounting nuts are loosened, carefully lift the faucet from the sink. Be careful not to damage the sink or surrounding plumbing.
7. Clean the Sink
Clean the sink around the faucet hole to remove any debris or sealant. This will ensure a smooth surface for installing the new faucet.
Troubleshooting Common Issues
Even with careful planning and execution, you may encounter some common issues when removing a bathroom sink faucet.
Corroded Connections
Corrosion can make it difficult to loosen the water supply lines or mounting nuts. Apply penetrating oil and allow it to sit for several minutes before attempting to loosen the connections.
Tight Spaces
Working in tight spaces under the sink can be challenging. Use a basin wrench with a telescoping handle for added reach and leverage.
Frozen Connections
If the connections are frozen, you may need to apply heat to loosen them. Use a heat gun or hair dryer carefully, avoiding overheating the pipes or fittings.
Damaged Pipes or Fittings
If you damage any pipes or fittings during the removal process, you may need to replace them. Consult a plumber for assistance if necessary.
Insightful Q&A Section
Here are 10 insightful questions and answers related to removing bathroom sink faucets:
Q1: What is the most common mistake people make when removing a bathroom sink faucet?
**A:** Failing to shut off the water supply completely. This can lead to a messy and potentially damaging situation.
Q2: How do I deal with a faucet that’s been in place for many years and seems completely stuck?**
**A:** Patience is key. Apply penetrating oil repeatedly over several hours or even overnight. Gently try to loosen the connections, and avoid forcing anything.
Q3: Is it necessary to replace the water supply lines when replacing a faucet?**
**A:** It’s highly recommended. Old supply lines can become brittle and prone to leaks. Replacing them ensures a fresh, reliable connection.
Q4: What type of sealant should I use when installing a new faucet?**
**A:** Plumber’s putty is a good choice for sealing around the base of the faucet. Teflon tape should be used on threaded connections.
Q5: How do I prevent scratching the sink when removing the old faucet?**
**A:** Place a towel or cloth under the faucet and around the sink to protect the surface from scratches.
Q6: What should I do if the shut-off valves under the sink are corroded and won’t turn?**
**A:** You’ll likely need to shut off the main water supply to your home and replace the shut-off valves. This is often best left to a professional plumber.
Q7: How do I know if I need a special tool, like a faucet valve removal tool?**
**A:** If the faucet valve is stuck or difficult to remove with standard tools, a specialized valve removal tool can make the job easier and prevent damage.
Q8: Can I reuse the old faucet hardware with the new faucet?**
**A:** It’s generally not recommended. Old hardware can be worn or corroded, which can compromise the new faucet’s performance.
Q9: What’s the best way to clean up mineral deposits around the faucet base?**
**A:** A solution of vinegar and water can help dissolve mineral deposits. Let it soak for a few minutes before scrubbing with a non-abrasive cleaner.
Q10: How do I dispose of the old faucet properly?**
**A:** Check with your local waste management authority for guidelines on disposing of plumbing fixtures. Some metal components may be recyclable.
Conclusion
Removing a bathroom sink faucet is a manageable DIY project with the right tools and knowledge. This guide has provided you with a comprehensive overview of the process, from understanding the task to troubleshooting common issues. By following these steps and taking the necessary precautions, you can confidently remove your old faucet and prepare for a new installation. Remember to prioritize safety and take your time to ensure a successful outcome. Share your experiences with removing bathroom sink faucets in the comments below, or explore our advanced guide to faucet installation for further assistance. Contact our experts for a consultation on removing bathroom sink faucets if you encounter any complex issues.
