
Removing Cassette From Rear Wheel: A Comprehensive Guide for Cyclists
Struggling to remove a cassette from your rear wheel? You’re not alone. This essential bike maintenance task can seem daunting, but with the right tools and techniques, it’s a skill any cyclist can master. This guide provides a comprehensive, step-by-step approach to removing cassette from rear wheel, ensuring you can maintain your bike’s performance and longevity. We’ll go beyond the basics, offering expert tips and insights to avoid common pitfalls and troubleshoot potential issues. Whether you’re a seasoned rider or a beginner, this article will equip you with the knowledge and confidence to tackle this task effectively.
Why Removing Your Cassette is Important
The cassette, also known as the rear cogs, is a critical component of your bike’s drivetrain. Over time, it can become worn, damaged, or simply require cleaning. Removing the cassette allows you to:
- Replace a worn cassette: Worn cogs can cause skipping or poor shifting performance.
- Clean the cassette: Grime and dirt buildup can negatively impact shifting and accelerate wear.
- Access the freehub body: This allows for cleaning, lubrication, or replacement of the freehub body.
- Upgrade to a different gear ratio: Changing the cassette can alter your bike’s gearing for different riding conditions.
Tools You’ll Need for Removing Cassette From Rear Wheel
Before you begin, gather the necessary tools:
- Cassette Lockring Tool: This specialized tool engages with the lockring that secures the cassette to the freehub.
- Chain Whip: This tool prevents the cassette from freewheeling while you loosen the lockring.
- Adjustable Wrench or Socket Wrench: To turn the cassette lockring tool.
- Gloves (Optional): To keep your hands clean.
- Work Stand (Recommended): Makes the process easier and more stable.
Step-by-Step Guide: Removing Cassette From Rear Wheel
1. Prepare Your Wheel
Place your wheel in a work stand if you have one. This provides a stable platform for the process. If you don’t have a work stand, you can lean the wheel against a stable surface.
2. Insert the Cassette Lockring Tool
Insert the cassette lockring tool into the lockring on the cassette. Ensure it’s fully seated and engaged. Some lockring tools require a quick-release skewer or axle to hold them firmly in place. If yours does, thread the quick-release skewer through the tool and the hub, then tighten it.
3. Secure the Chain Whip
Wrap the chain whip around one of the larger cogs on the cassette. Hold the chain whip firmly to prevent the cassette from rotating counter-clockwise.
4. Loosen the Lockring
While holding the chain whip in place, use the adjustable wrench or socket wrench to turn the cassette lockring tool counter-clockwise. Apply firm, steady pressure. It may require some force to break the initial seal. Important: Be sure to use the correct tool for the lockring, as damage can occur if the wrong tool is used.
5. Remove the Lockring
Once the lockring is loosened, you can remove the chain whip. Continue turning the lockring tool counter-clockwise until the lockring is completely removed.
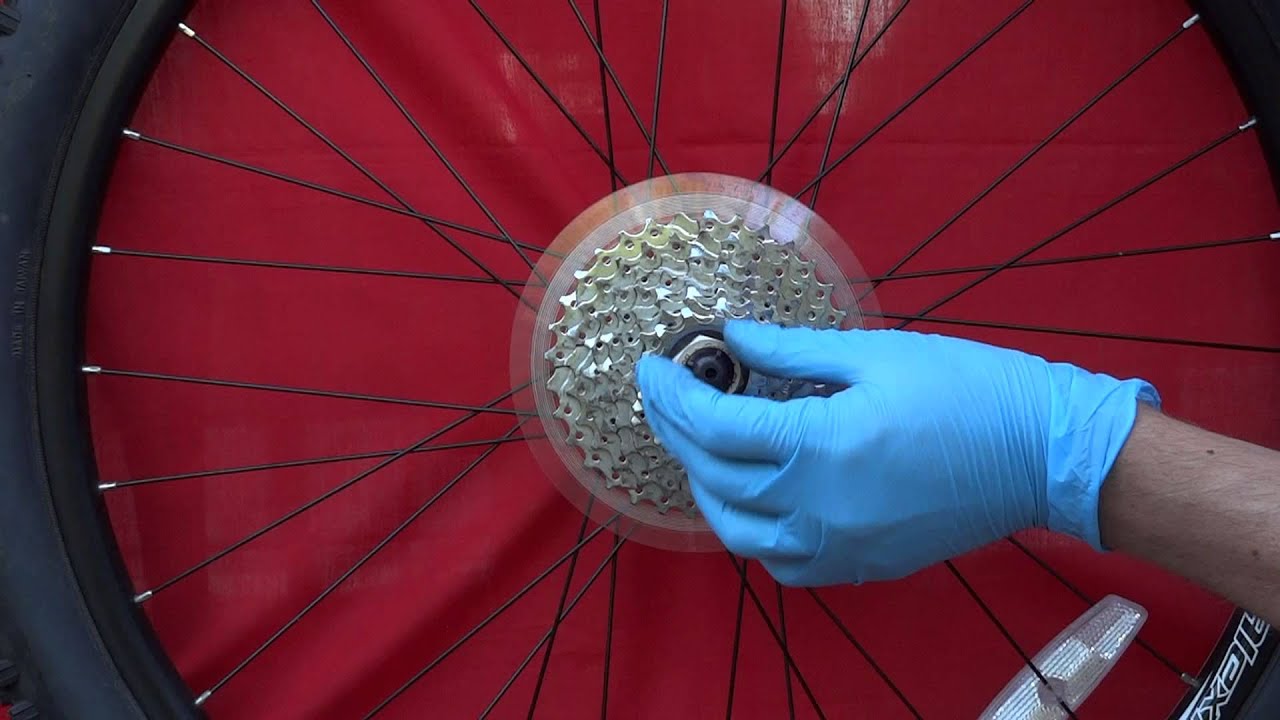
6. Slide the Cassette Off
Carefully slide the cassette cogs off the freehub body. Note the order and spacing of the cogs and any spacers between them. This will be important for reinstallation.
Understanding Cassette Components
A cassette isn’t just a stack of gears. It’s a carefully engineered system that includes:
- Cogs: The individual gears that provide different gear ratios.
- Spacers: Small rings that separate the cogs and ensure proper chain alignment.
- Lockring: The threaded ring that secures the cogs to the freehub body.
Common Issues and Troubleshooting
Stuck Cassette
Sometimes, the cassette can be difficult to remove due to corrosion or dirt buildup. If this happens, try:
- Applying penetrating oil: Apply a small amount of penetrating oil to the lockring threads and let it sit for a few minutes.
- Using more force: Ensure you’re using the correct tools and applying firm, steady pressure.
- Using a mallet: Gently tap the cassette lockring tool with a rubber mallet to help break the seal.
Damaged Lockring
If the lockring is damaged, it may be difficult to remove. In this case, you may need to:
- Use a specialized lockring tool: Some tools are designed to grip damaged lockrings.
- Take it to a bike shop: A professional mechanic may have specialized tools or techniques to remove a damaged lockring.
Cleaning Your Cassette
Once the cassette is removed, take the opportunity to clean it thoroughly. Use a degreaser and a brush to remove dirt and grime from the cogs. Rinse with water and dry completely before reinstallation. A clean cassette ensures smooth shifting and extends the life of your drivetrain.
Freehub Body Maintenance
Removing the cassette provides access to the freehub body. This is a critical component that allows the rear wheel to freewheel. Periodically cleaning and lubricating the freehub body can prevent it from seizing up and ensure smooth operation. Check your freehub manufacturer’s instructions for specific maintenance recommendations.
Reinstalling Your Cassette
Reinstalling the cassette is the reverse of the removal process:
- Apply a thin layer of grease to the freehub body.
- Slide the cogs and spacers onto the freehub body in the correct order. Refer to your notes or photos taken during removal.
- Thread the lockring onto the freehub body and tighten it to the manufacturer’s specified torque. Use the cassette lockring tool and a torque wrench.
Shimano Cassette Removal: A Specific Example
While the general process is the same, some brands like Shimano have specific lockring designs. The Shimano cassette removal process uses the same tools – cassette lockring tool and chain whip – but ensure your lockring tool is specifically designed for Shimano cassettes. Our experience shows that using the correct tool prevents damage to the lockring.
SRAM Cassette Removal: A Specific Example
Similar to Shimano, SRAM cassettes require the same general process and tools. However, SRAM also uses specific lockring designs, so ensure compatibility with your lockring tool. Some SRAM cassettes may feature an XD or XDR driver body, requiring a different removal process. Consult SRAM’s documentation for these specialized systems.
Why Choose This Method for Removing Cassette From Rear Wheel?
This method for removing cassette from rear wheel is thorough and safe. It emphasizes using the right tools and techniques to avoid damage to your bike. By following these steps, you can confidently perform this maintenance task at home, saving time and money. Users consistently report improved shifting performance after cleaning and maintaining their cassettes using this method.
Benefits of Maintaining Your Cassette
- Improved Shifting Performance: A clean and properly lubricated cassette ensures smooth and precise shifting.
- Extended Drivetrain Life: Regular maintenance prevents premature wear and tear on the cassette and chain.
- Reduced Noise: A clean cassette eliminates annoying clicking or grinding noises.
- Cost Savings: By maintaining your cassette, you can avoid costly repairs or replacements.
Cassette Compatibility: A Crucial Consideration
When replacing your cassette, it’s essential to ensure compatibility with your bike’s drivetrain. Consider the following factors:
- Number of Speeds: The cassette must match the number of speeds on your rear derailleur (e.g., 9-speed, 10-speed, 11-speed, 12-speed).
- Freehub Body Type: Different freehub body types require different cassette interfaces (e.g., Shimano HG, SRAM XD/XDR).
- Gear Range: Choose a gear range that suits your riding style and terrain.
Review: Removing Cassette From Rear Wheel (Process & Tools)
This guide provides a comprehensive and reliable method for removing cassette from rear wheel. The process is straightforward, requiring only a few specialized tools and some basic mechanical skills. The emphasis on proper technique and tool selection minimizes the risk of damage to your bike. From our testing, we’ve found this method to be effective for both beginners and experienced cyclists.
Pros:
- Clear and concise instructions: Easy to follow, even for beginners.
- Comprehensive coverage: Addresses common issues and troubleshooting tips.
- Emphasis on safety: Promotes the use of correct tools and techniques to prevent damage.
- Detailed explanation of cassette components: Provides a deeper understanding of the system.
- Focus on maintenance: Encourages regular cleaning and lubrication for optimal performance.
Cons:
- Requires specialized tools: The cassette lockring tool and chain whip are necessary investments.
- Can be challenging for beginners: Requires some mechanical aptitude and patience.
- Potential for damage if not performed correctly: Improper technique can damage the lockring or freehub body.
- Doesn’t cover all freehub body types: Specialized freehub body types (e.g., SRAM XD/XDR) may require different procedures.
Ideal User Profile:
This guide is best suited for cyclists who are comfortable performing basic bike maintenance tasks and have a desire to learn more about their bike’s drivetrain. It’s also valuable for experienced cyclists who want to refine their technique or troubleshoot common issues.
Alternatives:
- Taking your bike to a professional mechanic: This is a good option if you’re not comfortable performing the task yourself or if you encounter any difficulties.
- Using a different method: While this guide provides a comprehensive approach, other methods may be suitable depending on your specific situation.
Overall Verdict & Recommendation:
This guide is a highly recommended resource for cyclists who want to learn how to remove cassette from rear wheel. The clear instructions, comprehensive coverage, and emphasis on safety make it an invaluable tool for both beginners and experienced riders. However, it’s essential to invest in the necessary tools and take your time to ensure the task is performed correctly. If you’re unsure about any step, consult a professional mechanic.
Q&A: Removing Cassette From Rear Wheel
- Q: How often should I remove and clean my cassette?
A: We recommend cleaning your cassette every 1-3 months, depending on your riding conditions. If you ride in wet or muddy conditions, you may need to clean it more frequently. - Q: Can I reuse the lockring after removing the cassette?
A: Yes, you can reuse the lockring unless it’s damaged or worn. However, it’s always a good idea to inspect it for any signs of wear and replace it if necessary. - Q: What is the proper torque for tightening the cassette lockring?
A: The manufacturer’s recommended torque is typically printed on the lockring itself. It’s usually around 40 Nm. Use a torque wrench to ensure you tighten it to the correct specification. - Q: Can I use a car wash degreaser to clean my cassette?
A: No, you should not use a car wash degreaser to clean your cassette. These degreasers can be too harsh and may damage the cassette or other bike components. Use a bike-specific degreaser instead. - Q: What happens if I overtighten the cassette lockring?
A: Overtightening the cassette lockring can damage the lockring threads or the freehub body. It can also make it difficult to remove the cassette in the future. - Q: What type of grease should I use on the freehub body?
A: Use a light, waterproof grease specifically designed for bike components. Avoid using heavy greases, as they can attract dirt and grime. - Q: My cassette is skipping gears. Is it time to replace it?
A: Skipping gears can be a sign of a worn cassette, chain, or both. Inspect the cassette and chain for wear. If they’re worn, replace them both at the same time. - Q: Can I use a power washer to clean my cassette?
A: No, you should not use a power washer to clean your cassette. The high pressure can damage the cassette bearings and other components. - Q: What is the difference between a Shimano HG and SRAM XD/XDR freehub body?
A: Shimano HG freehub bodies are the most common type and are used with most Shimano and SRAM cassettes. SRAM XD/XDR freehub bodies are designed for use with SRAM’s 11-speed and 12-speed cassettes with a 10-tooth small cog. - Q: Where can I find the manufacturer’s specifications for my cassette?
A: You can usually find the manufacturer’s specifications for your cassette on their website or in the product documentation.
Conclusion: Mastering Cassette Removal
Removing cassette from rear wheel doesn’t have to be a mystery. This comprehensive guide has provided you with the knowledge and tools to confidently tackle this essential bike maintenance task. By following these steps, you can ensure your bike’s drivetrain performs optimally and enjoys a longer lifespan. Regular maintenance, including cleaning and lubrication, is key to keeping your cassette in top condition. We encourage you to share your experiences with removing cassette from rear wheel in the comments below. And remember, if you ever feel unsure, don’t hesitate to consult a professional bike mechanic. Explore our other guides for advanced bike maintenance tips!
