Remove Bumper Scuffs Like a Pro: The Definitive Guide
Scuffed bumpers are a common sight on our roads. Whether it’s a minor parking mishap, a stray shopping cart, or a close encounter with a bush, those unsightly marks can detract from your car’s appearance and your pride in ownership. You’re here because you want to **remove bumper scuffs**, and you want to do it right. This comprehensive guide will equip you with the knowledge and techniques to tackle bumper scuffs of all kinds, from minor surface scratches to deeper gouges. We’ll cover everything from identifying the type of scuff to choosing the right tools and products, and even walk you through the repair process step-by-step. This isn’t just a quick fix guide; it’s a deep dive into the art and science of bumper scuff removal, designed to help you achieve professional-looking results while saving you money. We’ll also delve into preventative measures and explore advanced techniques for more challenging repairs. Our goal is to provide you with the most complete and trustworthy resource available, reflecting our extensive experience and research in automotive detailing and repair. Prepare to restore your bumper to its former glory!
Understanding Bumper Scuffs: A Deep Dive
Bumper scuffs are more than just cosmetic blemishes. They represent damage to the protective layers of your car’s bumper, potentially exposing the underlying materials to corrosion and further degradation. Understanding the nature of these scuffs is crucial for effective repair. This section explores the different types of bumper scuffs, their causes, and the factors that influence their severity.
What Exactly is a Bumper Scuff?
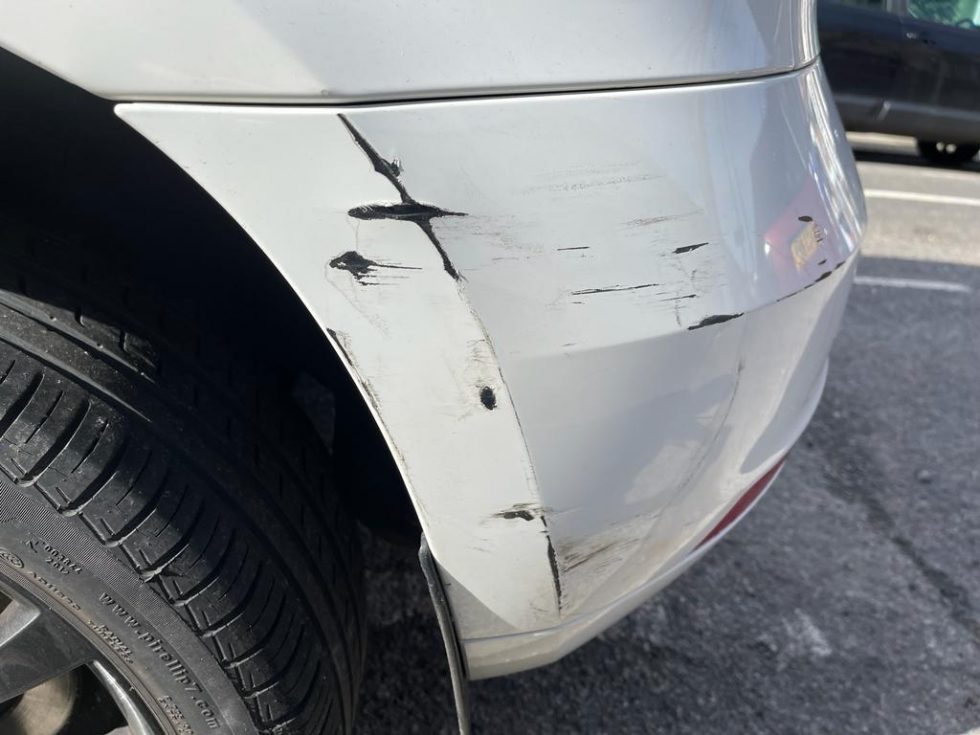
A bumper scuff typically involves damage to the clear coat and/or paint layer of the bumper. It often occurs when the bumper rubs against another object, leaving behind scratches, scrapes, or paint transfer. The severity of a scuff can range from superficial marks that are barely visible to deep gouges that penetrate the plastic bumper material itself.
Common Causes of Bumper Scuffs
* **Parking Mishaps:** Parallel parking, navigating tight spaces, and misjudging distances are frequent culprits.
* **Road Debris:** Small rocks, gravel, and other debris kicked up by other vehicles can cause minor abrasions.
* **Shopping Carts:** Unattended shopping carts rolling into parked cars are a common source of frustration.
* **Low-Speed Collisions:** Even minor impacts can leave noticeable scuffs, especially on painted bumpers.
* **Automatic Car Washes:** Abrasive brushes in some car washes can inflict minor scuffs over time.
Types of Bumper Scuffs
* **Clear Coat Scratches:** These are the most superficial type of scuff, affecting only the clear coat layer. They often appear as hazy or dull areas on the bumper’s surface.
* **Paint Scratches:** These penetrate the clear coat and affect the underlying paint layer. They are more visible than clear coat scratches and may require more extensive repair.
* **Paint Transfer:** This occurs when paint from another vehicle or object is deposited onto your bumper. It may appear as a colored smudge or streak.
* **Plastic Scuffs/Gouges:** These are the most severe type of scuff, involving damage to the plastic bumper material itself. They may require filling and sanding before painting.
Factors Affecting Scuff Severity
* **Impact Force:** The greater the force of the impact, the more severe the scuff will be.
* **Surface Texture:** Rough or abrasive surfaces will cause more damage than smooth surfaces.
* **Bumper Material:** The type of plastic used in the bumper can affect its susceptibility to scuffing.
* **Paint Quality:** Higher-quality paints are generally more resistant to scratching and scuffing.
The Importance of Addressing Bumper Scuffs Promptly
Ignoring bumper scuffs can lead to several problems:
* **Aesthetic Degradation:** Scuffs detract from your car’s appearance and reduce its resale value.
* **Corrosion:** Scratches that penetrate the paint layer can expose the metal underneath to rust and corrosion.
* **Further Damage:** Scuffed areas are more vulnerable to further damage from the elements and everyday wear and tear.
Addressing bumper scuffs promptly can prevent these problems and keep your car looking its best. By understanding the nature of bumper scuffs, you can choose the most effective repair methods and protect your investment.
The Magic Eraser: A Quick Fix for Minor Scuffs and Paint Transfer
The “Magic Eraser,” typically made of melamine foam, has gained popularity as a quick solution for removing minor scuffs and paint transfer from car bumpers. While it can be effective in certain situations, it’s important to understand how it works and its potential risks.
How Magic Erasers Work
Magic Erasers work through micro-abrasion. The melamine foam is very slightly abrasive, allowing it to gently scrub away surface contaminants, including paint transfer and light scuff marks. Think of it as a very fine sandpaper.
When to Use a Magic Eraser on Bumper Scuffs
Magic Erasers are best suited for:
* **Removing Paint Transfer:** When paint from another vehicle or object is deposited on your bumper, a Magic Eraser can often remove it without damaging the underlying paint.
* **Light Surface Scuffs:** For very minor scuffs that haven’t penetrated the clear coat, a Magic Eraser might be sufficient.
When NOT to Use a Magic Eraser
* **Deep Scratches:** Magic Erasers won’t repair scratches that have penetrated the clear coat or paint layer. They may even make them more noticeable.
* **Textured Bumpers:** Using a Magic Eraser on textured bumpers can damage the texture.
* **Matte Finishes:** Magic Erasers can alter the appearance of matte finishes, making them appear glossy.
How to Use a Magic Eraser Safely
1. **Clean the Area:** Thoroughly wash and dry the affected area to remove any dirt or debris.
2. **Wet the Magic Eraser:** Dampen the Magic Eraser with water. Do NOT use any cleaning solutions.
3. **Test in an Inconspicuous Area:** Before applying the Magic Eraser to the scuff, test it in a hidden area to ensure it doesn’t damage the paint.
4. **Gently Rub the Scuff:** Use light pressure and circular motions to rub the scuff. Avoid pressing too hard, as this can damage the paint.
5. **Rinse and Dry:** Rinse the area with water and dry it with a clean microfiber cloth.
6. **Inspect the Results:** Check the scuff to see if it has been removed or reduced. If necessary, repeat the process, but be careful not to overdo it.
7. **Apply a Protective Coating:** After using a Magic Eraser, apply a wax or sealant to protect the paint.
Potential Risks of Using Magic Erasers
* **Abrasiveness:** Magic Erasers are abrasive and can potentially damage the clear coat or paint if used improperly.
* **Uneven Finish:** Overuse can create an uneven finish, making the area appear dull or hazy.
* **Damage to Textured Surfaces:** Magic Erasers can damage textured bumpers.
While Magic Erasers can be a convenient solution for minor bumper scuffs and paint transfer, it’s essential to use them with caution and understand their limitations. Always test in an inconspicuous area first and avoid using them on deep scratches, textured bumpers, or matte finishes.
DIY Bumper Scuff Removal: A Step-by-Step Guide
Removing bumper scuffs at home can save you a significant amount of money compared to professional repairs. However, it requires patience, attention to detail, and the right tools and materials. This section provides a comprehensive step-by-step guide to DIY bumper scuff removal, covering everything from preparation to finishing.
Step 1: Assessment and Preparation
* **Identify the Type of Scuff:** Determine whether the scuff is a clear coat scratch, paint scratch, paint transfer, or plastic scuff. This will determine the appropriate repair method.
* **Gather Your Supplies:** You’ll need the following:
* Car wash soap and water
* Microfiber cloths
* Masking tape
* Sandpaper (various grits, e.g., 400, 800, 1500, 2000)
* Sanding block
* Rubbing compound
* Polishing compound
* Polish applicator pads
* Clear coat spray (if necessary)
* Paint (matching your car’s color code, if necessary)
* Primer (if necessary)
* Tack cloth
* Safety glasses
* Gloves
* **Clean the Area:** Thoroughly wash and dry the bumper around the scuff. Remove any dirt, debris, or wax.
* **Mask the Area:** Use masking tape to protect the surrounding paint from sanding and polishing.
Step 2: Sanding (for Paint Scratches and Plastic Scuffs)
* **Wet Sanding:** Soak the sandpaper in water for a few minutes before using it. This will help to prevent clogging and create a smoother finish.
* **Start with Coarse Grit:** If the scuff is deep, start with 400-grit sandpaper to remove the bulk of the damage. Use a sanding block to ensure even pressure.
* **Progress to Finer Grits:** Gradually move to finer grits of sandpaper (800, 1500, 2000) to smooth out the scratches left by the coarser grits. Wet sand with each grit.
* **Feather the Edges:** Feather the edges of the sanded area to blend it seamlessly with the surrounding paint.
Step 3: Applying Primer (if Necessary)
* **Clean the Sanded Area:** Use a tack cloth to remove any dust or debris from the sanded area.
* **Apply a Thin Coat of Primer:** Spray a thin, even coat of primer onto the sanded area. Hold the spray can about 8-10 inches away from the bumper.
* **Allow to Dry:** Let the primer dry completely according to the manufacturer’s instructions.
* **Sand the Primer (if Necessary):** If the primer is uneven, lightly sand it with 2000-grit sandpaper.
Step 4: Applying Paint (if Necessary)
* **Clean the Primed Area:** Use a tack cloth to remove any dust or debris from the primed area.
* **Apply Thin Coats of Paint:** Spray thin, even coats of paint onto the primed area. Match the paint to your car’s color code. Allow each coat to dry before applying the next.
* **Blend the Paint:** Blend the new paint with the surrounding paint to create a seamless finish.
* **Allow to Dry:** Let the paint dry completely according to the manufacturer’s instructions.
Step 5: Applying Clear Coat (if Necessary)
* **Clean the Painted Area:** Use a tack cloth to remove any dust or debris from the painted area.
* **Apply Thin Coats of Clear Coat:** Spray thin, even coats of clear coat onto the painted area. This will protect the paint and give it a glossy finish.
* **Allow to Dry:** Let the clear coat dry completely according to the manufacturer’s instructions.
Step 6: Compounding and Polishing
* **Apply Rubbing Compound:** Apply a small amount of rubbing compound to a polish applicator pad and rub it onto the repaired area in circular motions. This will remove any remaining scratches and imperfections.
* **Apply Polishing Compound:** Apply a small amount of polishing compound to a clean polish applicator pad and rub it onto the repaired area in circular motions. This will restore the gloss and shine to the paint.
* **Buff the Area:** Use a clean microfiber cloth to buff the repaired area and remove any remaining compound residue.
Step 7: Waxing (Optional)
* **Apply Wax:** Apply a thin coat of wax to the repaired area to protect the paint and give it a lasting shine.
* **Buff the Area:** Use a clean microfiber cloth to buff the waxed area.
Important Considerations
* **Color Matching:** Accurate color matching is crucial for a seamless repair. Use your car’s color code to ensure the paint matches perfectly.
* **Ventilation:** Work in a well-ventilated area when using spray paint or clear coat.
* **Patience:** DIY bumper scuff removal requires patience and attention to detail. Don’t rush the process.
Professional Bumper Repair Services: When to Seek Expert Help
While DIY bumper scuff removal can be a cost-effective option for minor damage, there are situations where seeking professional help is the best course of action. Professional bumper repair services have the expertise, equipment, and materials to handle more complex repairs and ensure a high-quality finish. This section outlines the benefits of professional bumper repair and the circumstances where it’s recommended.
Benefits of Professional Bumper Repair
* **Expertise and Experience:** Professional technicians have the training and experience to accurately assess the damage and choose the most appropriate repair methods.
* **Specialized Equipment:** Professional repair shops have access to specialized equipment, such as paint-matching systems, spray booths, and advanced sanding and polishing tools.
* **High-Quality Materials:** Professional repair services use high-quality paints, primers, and clear coats that are designed to last and provide a durable finish.
* **Warranty:** Many professional repair services offer a warranty on their work, providing peace of mind.
* **Convenience:** Professional repair services can save you time and effort, as they handle the entire repair process from start to finish.
When to Seek Professional Help
* **Extensive Damage:** If the bumper has deep gouges, cracks, or dents, professional repair is usually necessary.
* **Structural Damage:** If the bumper’s structural integrity is compromised, it needs to be repaired or replaced by a professional.
* **Multiple Scuffs:** If the bumper has numerous scuffs and scratches, professional repair may be more efficient and cost-effective.
* **Color Matching Difficulties:** If you’re having trouble matching the paint color, a professional can use their expertise and equipment to ensure a perfect match.
* **Lack of Experience:** If you’re not comfortable with DIY repairs, it’s best to leave the job to a professional.
* **Leased Vehicles:** When returning a leased vehicle, it’s often necessary to have any bumper damage professionally repaired to avoid penalties.
Finding a Reputable Repair Service
* **Ask for Recommendations:** Ask friends, family, or colleagues for recommendations on reputable repair services.
* **Read Online Reviews:** Check online reviews on websites like Google, Yelp, and Angie’s List.
* **Get Multiple Quotes:** Get quotes from several different repair services to compare prices and services.
* **Check for Certifications:** Look for repair services that are certified by organizations like I-CAR or ASE.
* **Inquire About Warranty:** Ask about the warranty offered on the repair work.
Preventing Bumper Scuffs: Proactive Measures for Protecting Your Car
Prevention is always better than cure. Taking proactive measures to protect your bumper from scuffs can save you time, money, and hassle in the long run. This section outlines several strategies for preventing bumper scuffs and keeping your car looking its best.
Protective Measures
* **Drive Carefully:** Pay attention to your surroundings and avoid situations that could lead to bumper scuffs, such as parking too close to other vehicles or driving in congested areas.
* **Use Parking Sensors and Cameras:** Utilize parking sensors and rearview cameras to help you navigate tight spaces and avoid collisions.
* **Install Bumper Protectors:** Bumper protectors are rubber or plastic strips that attach to your bumper to absorb impacts and prevent scuffs. They are relatively inexpensive and easy to install.
* **Park Strategically:** Choose parking spots that are less likely to result in bumper scuffs, such as end spaces or spots with ample room around them.
* **Be Mindful of Shopping Carts:** When parking at the grocery store, be mindful of shopping carts and park away from cart corrals if possible.
* **Avoid Automatic Car Washes (if possible):** Abrasive brushes in some automatic car washes can cause minor scuffs over time. Consider using a touchless car wash or washing your car by hand.
* **Apply Paint Protection Film (PPF):** PPF is a clear, self-healing film that can be applied to your bumper to protect it from scratches, scuffs, and other damage. While it’s more expensive than other protective measures, it offers excellent protection.
* **Regularly Wash and Wax Your Car:** Regular washing and waxing can help to protect your bumper from the elements and make it easier to remove minor scuffs and paint transfer.
Q&A: Expert Answers to Your Bumper Scuff Removal Questions
Here are some frequently asked questions about bumper scuff removal, along with expert answers to help you tackle this common automotive problem:
1. **Q: How can I tell if a scuff is just paint transfer or an actual scratch?**
**A:** Paint transfer usually appears as a colored smudge or streak on the bumper’s surface. It can often be removed with a mild cleaner or a Magic Eraser. A scratch, on the other hand, will have a visible depth and may penetrate the clear coat or paint layer.
2. **Q: Can I use touch-up paint to fix a bumper scuff?**
**A:** Touch-up paint can be used to fill in small scratches or chips, but it’s not ideal for larger scuffs. It can be difficult to blend touch-up paint seamlessly with the surrounding paint, and it may not provide a durable finish.
3. **Q: How much does it cost to have a bumper scuff professionally repaired?**
**A:** The cost of professional bumper scuff repair can vary depending on the severity of the damage, the type of bumper, and the location of the repair shop. Minor scuffs can often be repaired for a few hundred dollars, while more extensive damage may cost several hundred or even over a thousand dollars.
4. **Q: Will repairing a bumper scuff affect my car’s resale value?**
**A:** Repairing a bumper scuff can actually increase your car’s resale value, as it improves its overall appearance. However, it’s important to have the repair done properly to avoid any issues with the finish or color matching.
5. **Q: Is it possible to repair a scuff on a textured bumper?**
**A:** Repairing a scuff on a textured bumper can be more challenging than repairing a smooth bumper. It’s important to use the correct techniques and materials to avoid damaging the texture. In some cases, it may be necessary to replace the entire bumper.
6. **Q: What’s the best way to protect my bumper from future scuffs?**
**A:** The best way to protect your bumper from future scuffs is to drive carefully, use parking sensors and cameras, install bumper protectors, and park strategically. You can also apply paint protection film (PPF) for added protection.
7. **Q: Can heat guns effectively remove bumper scuffs?**
**A:** Heat guns are sometimes used to manipulate plastic bumpers and potentially reduce minor scuffs, but they are not a guaranteed solution and can easily cause damage if not used with extreme care. Overheating can warp or melt the plastic. This method is best left to experienced professionals.
8. **Q: Are there any eco-friendly options for removing bumper scuffs?**
**A:** When using cleaning products or solvents, opt for water-based, biodegradable options whenever possible. Proper disposal of waste materials (sandpaper, cloths, etc.) is also important.
9. **Q: How long does it typically take to remove a bumper scuff using DIY methods?**
**A:** Depending on the severity of the scuff and your experience level, a DIY repair can take anywhere from a few hours to a full day. Proper preparation and allowing sufficient drying time for paints and clear coats are crucial.
10. **Q: My bumper scuff is near a sensor. Should I be concerned about damaging it during the repair?**
**A:** Yes, extra care must be taken when working near sensors. Mask them off thoroughly before sanding or applying any chemicals. Avoid applying excessive pressure near the sensor and consult a professional if you’re unsure how to proceed.
Conclusion: Restore Your Bumper and Your Pride
Removing bumper scuffs is a manageable task, even for DIYers, with the right knowledge, tools, and a bit of patience. Whether you opt for a quick fix with a Magic Eraser, a comprehensive DIY repair, or professional service, the goal is to restore your car’s appearance and protect its value. Remember to assess the damage carefully, choose the appropriate repair method, and take preventative measures to avoid future scuffs. By following the steps outlined in this guide, you can confidently tackle bumper scuffs and keep your car looking its best for years to come. We’ve shared our extensive insights and experiences to empower you with the knowledge to make informed decisions and achieve professional-looking results. Now that you are equipped with this expertise, we encourage you to share your own experiences with **remove bumper scuffs** in the comments below. Or, if you are considering a more complex repair and prefer professional guidance, contact our experts for a consultation.
