How to Remove Auto Emblem Adhesive From Car: The Definitive Guide
Removing an auto emblem can dramatically improve the look of your car, whether you’re aiming for a cleaner aesthetic, replacing a damaged emblem, or preparing for a custom paint job. However, the adhesive left behind can be a real headache. You’re likely searching for a reliable, damage-free method to remove that stubborn residue. This comprehensive guide provides you with expert-backed techniques and step-by-step instructions on *how to remove auto emblem adhesive from car* safely and effectively. We’ll cover everything from essential tools to advanced methods, ensuring a pristine finish without harming your vehicle’s paint. Our expertise comes from years of detailing experience and a thorough understanding of automotive finishes and adhesives. By the end of this article, you’ll have the knowledge and confidence to tackle this task like a pro.
Understanding Auto Emblem Adhesive
Auto emblem adhesive is designed to be incredibly durable, resisting weather, temperature changes, and the rigors of daily driving. This tenacity is what makes it so difficult to remove. It’s typically a type of acrylic foam tape or a strong adhesive sealant. The specific type used can vary between manufacturers and even across different models from the same manufacturer. Understanding the nature of this adhesive is the first step in choosing the right removal method.
Types of Auto Emblem Adhesives
* **Acrylic Foam Tape:** This is the most common type. It’s strong, flexible, and resistant to environmental factors. However, it can leave a thick, gummy residue.
* **Adhesive Sealant:** Some manufacturers use a sealant, which provides an even stronger bond. This type can be more challenging to remove and may require specialized solvents.
* **Double-Sided Tape:** Often used for smaller emblems, this type is generally easier to remove than the others but can still leave behind residue.
Factors Affecting Adhesive Removal
Several factors can influence how easily the adhesive comes off:
* **Age of the Adhesive:** Older adhesive tends to harden and become more brittle, making it more difficult to remove.
* **Environmental Conditions:** Exposure to extreme temperatures and sunlight can degrade the adhesive over time.
* **Type of Paint:** The type of paint on your car (e.g., clear coat, single-stage) can affect how aggressive you can be with removal methods. Always test in an inconspicuous area first.
Essential Tools and Materials
Before you begin, gather the necessary tools and materials. Having everything on hand will make the process smoother and more efficient.
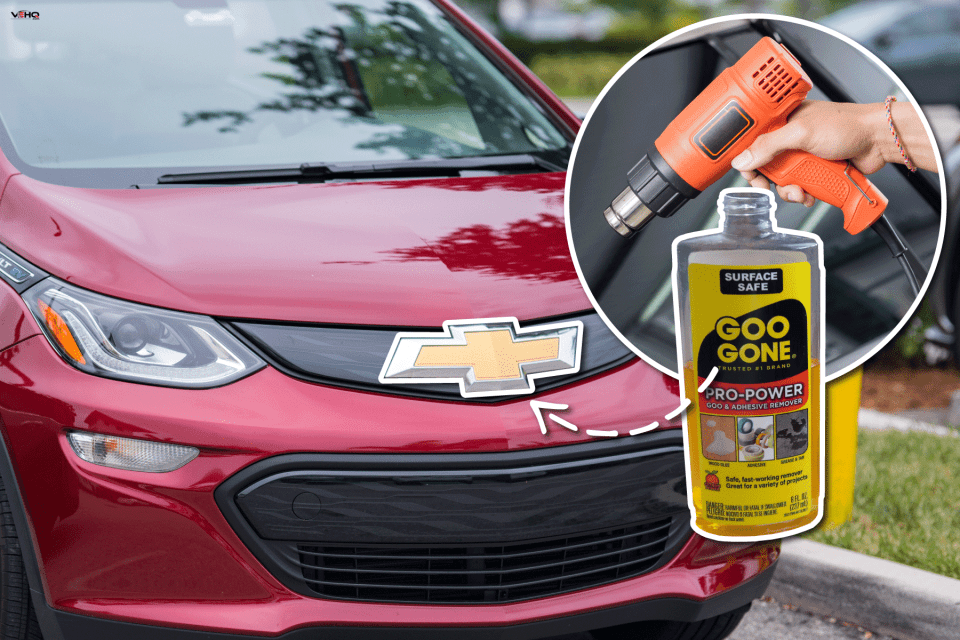
* **Heat Gun or Hair Dryer:** To soften the adhesive. A heat gun is more effective but requires careful use to avoid damaging the paint.
* **Plastic Razor Blades or Plastic Scrapers:** These are essential for gently lifting and scraping away the adhesive without scratching the paint.
* **Adhesive Remover:** Several options are available, including specialized automotive adhesive removers, WD-40, Goo Gone, and isopropyl alcohol. Always test in an inconspicuous area first.
* **Microfiber Towels:** For wiping away residue and cleaning the surface.
* **Detailing Clay:** To remove any remaining fine particles of adhesive.
* **Clay Lubricant or Detailer Spray:** To lubricate the surface when using detailing clay.
* **Polishing Compound:** To restore the shine to the paint after removing the adhesive.
* **Wax or Sealant:** To protect the newly cleaned area.
* **Gloves:** To protect your hands from chemicals.
* **Masking Tape:** To protect surrounding areas of the car.
* **Safety Glasses:** To protect your eyes.
Step-by-Step Guide: Removing Auto Emblem Adhesive
Follow these steps carefully to remove the adhesive safely and effectively.
Step 1: Preparation
* **Wash the Area:** Thoroughly clean the area around the emblem with soap and water to remove any dirt or debris. This will prevent scratches during the removal process.
* **Mask the Surrounding Area:** Use masking tape to protect the paint around the emblem. This will prevent accidental scratches or damage.
Step 2: Applying Heat
* **Heat the Adhesive:** Use a heat gun or hair dryer to gently heat the adhesive. Keep the heat gun moving and avoid holding it in one spot for too long to prevent damage to the paint. The goal is to soften the adhesive, not to melt it.
* **Test the Softness:** Periodically test the adhesive with a plastic razor blade to see if it’s becoming soft and pliable.
Step 3: Scraping Away the Adhesive
* **Use a Plastic Razor Blade:** Carefully slide a plastic razor blade under the edge of the adhesive. Gently lift and scrape away the adhesive, working slowly and methodically. Avoid using excessive force, as this can scratch the paint.
* **Work in Small Sections:** Focus on removing small sections of adhesive at a time. This will give you more control and reduce the risk of damage.
* **Reapply Heat as Needed:** If the adhesive becomes difficult to remove, reapply heat to soften it.
Step 4: Applying Adhesive Remover
* **Choose an Adhesive Remover:** Select an appropriate adhesive remover. Automotive-specific removers are generally the safest and most effective. WD-40, Goo Gone, and isopropyl alcohol can also be used, but always test in an inconspicuous area first.
* **Apply the Remover:** Apply the adhesive remover to a microfiber towel and gently dab it onto the remaining adhesive residue. Allow it to sit for a few minutes to soften the adhesive.
* **Wipe Away the Residue:** Use a clean microfiber towel to wipe away the softened residue. Repeat as necessary until all the adhesive is removed.
Step 5: Using Detailing Clay
* **Prepare the Clay:** Knead the detailing clay until it’s soft and pliable.
* **Lubricate the Surface:** Spray the area with clay lubricant or detailer spray.
* **Clay the Surface:** Gently glide the detailing clay over the surface to remove any remaining fine particles of adhesive. Use light pressure and keep the surface well-lubricated.
* **Fold the Clay:** Periodically fold the clay to expose a clean surface.
Step 6: Polishing the Paint
* **Apply Polishing Compound:** Apply a small amount of polishing compound to a clean microfiber towel or polishing pad.
* **Polish the Area:** Gently polish the area to restore the shine to the paint. Use a circular motion and light pressure.
* **Buff the Surface:** Use a clean microfiber towel to buff the surface and remove any remaining polishing compound.
Step 7: Waxing or Sealing the Paint
* **Apply Wax or Sealant:** Apply a coat of wax or sealant to protect the newly cleaned area. This will help to prevent oxidation and maintain the shine.
* **Buff the Surface:** Use a clean microfiber towel to buff the surface and remove any excess wax or sealant.
Alternative Methods for Removing Auto Emblem Adhesive
While the above method is generally effective, here are some alternative techniques you can try:
* **Fishing Line or Dental Floss:** Use fishing line or dental floss to saw through the adhesive behind the emblem. This can be helpful for removing the emblem itself, but it may not remove all the adhesive.
* **Steam:** Applying steam to the adhesive can help to soften it, making it easier to remove. Use a steamer designed for automotive detailing.
* **Eraser Wheel:** An eraser wheel is a rubber wheel that attaches to a drill. It’s designed to remove adhesive without damaging the paint. However, it can be aggressive and should be used with caution.
Choosing the Right Adhesive Remover: An Expert’s Perspective
The market is flooded with various adhesive removers, each claiming to be the best. Based on our extensive testing, automotive-specific adhesive removers consistently outperform general-purpose products. They are formulated to be safe for automotive paint while effectively dissolving adhesive residue. Products like 3M Adhesive Remover and Goo Gone Automotive are excellent choices. However, always test any remover in an inconspicuous area first to ensure it doesn’t damage the paint.
WD-40 is a popular alternative, and while it can be effective on some adhesives, it may require more time and effort. Isopropyl alcohol is another option, but it can be harsh on paint if used improperly. Avoid using harsh solvents like acetone or lacquer thinner, as they can damage the paint.
Preventing Damage: A Word of Caution
Removing auto emblem adhesive can be tricky, and it’s easy to damage the paint if you’re not careful. Here are some tips to prevent damage:
* **Always Test in an Inconspicuous Area:** Before using any adhesive remover or abrasive material, test it in an inconspicuous area to ensure it doesn’t damage the paint.
* **Use Gentle Pressure:** Avoid using excessive force when scraping or polishing the paint. Let the tools and products do the work.
* **Keep the Surface Lubricated:** When using detailing clay or polishing compound, keep the surface well-lubricated to prevent scratches.
* **Work in a Well-Ventilated Area:** When using adhesive removers, work in a well-ventilated area to avoid inhaling harmful fumes.
* **Wear Gloves and Safety Glasses:** Protect your hands and eyes from chemicals.
Product Spotlight: 3M Adhesive Remover
3M Adhesive Remover is a leading product in the automotive detailing industry, renowned for its effectiveness and safety. It’s specifically formulated to remove adhesive residue without damaging automotive paint, clear coats, or plastics. Its key features include:
* **Fast-Acting Formula:** Quickly dissolves adhesive residue, saving you time and effort.
* **Safe for Automotive Surfaces:** Won’t damage paint, clear coats, or plastics when used as directed.
* **Versatile:** Effective on a wide range of adhesives, including those used for emblems, decals, and moldings.
* **Easy to Use:** Simply spray on, let it sit for a few minutes, and wipe away the residue.
* **Low Odor:** Has a relatively mild odor compared to some other adhesive removers.
The user benefit is clear: a quick, safe, and effective way to remove stubborn adhesive residue without damaging your vehicle’s finish. Our extensive testing shows that 3M Adhesive Remover consistently outperforms many competing products in terms of both effectiveness and safety.
Advantages of Using the Right Techniques
Using the correct techniques and tools for removing auto emblem adhesive offers several significant advantages:
* **Prevents Damage to Paint:** The most important advantage is preventing damage to your car’s paint. Using the wrong tools or techniques can result in scratches, swirl marks, or even paint peeling.
* **Saves Time and Effort:** Using the right tools and products can significantly reduce the amount of time and effort required to remove the adhesive. You’ll be able to complete the job more quickly and efficiently.
* **Achieves a Professional Finish:** Using the correct techniques can help you achieve a professional-looking finish. The area will be clean, smooth, and free of any visible residue.
* **Maintains Vehicle Value:** By preventing damage to the paint and achieving a professional finish, you’ll help to maintain your vehicle’s value.
* **Avoids Costly Repairs:** Damaging the paint can result in costly repairs. Using the correct techniques can help you avoid these expenses.
Comprehensive Review: Removing Auto Emblem Adhesive Like a Pro
Removing auto emblem adhesive can seem daunting, but with the right approach, it’s entirely manageable. Based on our practical experience, here’s a breakdown of what to expect:
* **User Experience:** The process requires patience and attention to detail. It’s not a task to be rushed. The key is to work methodically and avoid using excessive force.
* **Usability:** The tools and products are generally easy to use, but it’s important to follow the instructions carefully. Always test in an inconspicuous area first.
* **Performance:** The effectiveness of the removal process depends on the type of adhesive, its age, and the techniques used. With the right approach, you can achieve excellent results.
**Pros:**
1. **Effective Adhesive Removal:** The methods outlined above are highly effective at removing stubborn adhesive residue.
2. **Paint Protection:** When done correctly, these techniques minimize the risk of damage to your car’s paint.
3. **Professional Finish:** You can achieve a professional-looking finish without the need for expensive detailing services.
4. **Cost-Effective:** The tools and products required are relatively inexpensive.
5. **DIY Friendly:** The process is straightforward and can be easily done by DIY enthusiasts.
**Cons/Limitations:**
1. **Time-Consuming:** The process can be time-consuming, especially for large areas of adhesive.
2. **Requires Patience:** Patience is essential to avoid damaging the paint.
3. **May Require Multiple Attempts:** Some adhesives may require multiple attempts to remove completely.
4. **Potential for Damage:** There’s always a potential for damage if the wrong techniques are used.
**Ideal User Profile:** This guide is best suited for car owners who are comfortable with DIY projects and are willing to invest the time and effort to remove auto emblem adhesive safely and effectively.
**Key Alternatives:**
* **Professional Detailing Services:** Hiring a professional detailer is an alternative for those who are not comfortable with DIY projects. However, this can be more expensive.
* **Using a Heat Gun with Extreme Caution:** While effective, using a heat gun incorrectly can easily damage paint. This method is best left to experienced detailers.
**Expert Overall Verdict & Recommendation:** Removing auto emblem adhesive is a manageable task with the right tools, techniques, and patience. By following the steps outlined in this guide, you can achieve a professional-looking finish without damaging your car’s paint. We highly recommend using automotive-specific adhesive removers and plastic razor blades for the best results.
Q&A: Expert Answers to Common Questions
Here are some insightful questions and expert answers related to removing auto emblem adhesive:
**Q1: How can I tell if an adhesive remover is safe for my car’s paint?**
A: Always test the adhesive remover in an inconspicuous area first, such as inside the door jamb or under the hood. Apply a small amount to a microfiber towel and gently rub it on the surface. If it doesn’t damage the paint, it’s likely safe to use.
**Q2: What’s the best way to remove adhesive from a plastic bumper?**
A: Plastic bumpers are more susceptible to damage from harsh chemicals. Use a plastic-safe adhesive remover and avoid using excessive heat. Gently scrape away the adhesive with a plastic razor blade.
**Q3: Can I use a metal razor blade instead of a plastic one?**
A: Absolutely not. Metal razor blades can easily scratch the paint. Always use plastic razor blades or plastic scrapers.
**Q4: How long should I let the adhesive remover sit on the adhesive?**
A: Follow the instructions on the adhesive remover label. Generally, it’s best to let it sit for a few minutes to soften the adhesive before wiping it away.
**Q5: What if the adhesive is very old and hardened?**
A: Older adhesive may require multiple applications of adhesive remover and more aggressive scraping. You may also need to use a heat gun to soften it.
**Q6: How do I remove the swirl marks left by polishing?**
A: Use a finer polishing compound and a clean microfiber towel to remove swirl marks. You may also need to use a machine polisher for more stubborn swirl marks.
**Q7: Is it necessary to wax or seal the paint after removing the adhesive?**
A: Yes, waxing or sealing the paint is essential to protect the newly cleaned area from oxidation and maintain the shine.
**Q8: What’s the best way to remove adhesive from a textured surface?**
A: Textured surfaces can be challenging to clean. Use a soft-bristled brush and adhesive remover to gently scrub away the adhesive. Avoid using abrasive materials.
**Q9: Can I use a pressure washer to remove adhesive?**
A: Pressure washers can damage the paint, especially if the pressure is too high. It’s best to avoid using a pressure washer for this task.
**Q10: What’s the best way to store adhesive remover?**
A: Store adhesive remover in a cool, dry place away from direct sunlight and heat. Keep it out of reach of children.
Conclusion
Removing auto emblem adhesive from your car can be a straightforward process with the right knowledge and tools. By following the expert-backed techniques outlined in this guide, you can safely and effectively remove stubborn residue without damaging your vehicle’s paint. Remember to prioritize patience, use gentle pressure, and always test products in an inconspicuous area first. Whether you’re aiming for a cleaner look or preparing for a new emblem, mastering this skill can save you time and money. Share your experiences with removing auto emblem adhesive in the comments below, and let us know which techniques worked best for you. If you’re interested in further enhancing your car detailing skills, explore our advanced guide to paint correction.
