Removal of Silicone Caulk: A Comprehensive Guide to Achieving a Perfect Finish
Silicone caulk, a ubiquitous sealant in bathrooms, kitchens, and various construction applications, is prized for its flexibility and waterproof properties. However, its tenacious grip can make removal a frustrating task. Are you struggling to remove old, cracked, or unsightly silicone caulk? Do you want to achieve a clean, professional finish without damaging the underlying surfaces? This comprehensive guide provides an in-depth look at the best methods for the effective removal of silicone caulk, offering expert tips and techniques to ensure a smooth and successful outcome. We will cover everything from essential tools and safety precautions to advanced techniques and preventative measures for future applications. Our aim is to provide unparalleled value, drawing upon years of experience and observation in the field to ensure your success.
This article will detail the entire process, from understanding the nature of silicone caulk to choosing the right removal method and cleaning up afterward. We’ll dive deep into the tools needed, the safety precautions to take, and the various techniques you can use to successfully remove silicone caulk without damaging your surfaces. We’ll also cover common mistakes to avoid and preventative measures to take when applying new caulk.
Understanding Silicone Caulk: Properties and Challenges
Silicone caulk is a synthetic polymer sealant known for its flexibility, water resistance, and durability. It’s commonly used to seal joints and seams in bathrooms, kitchens, windows, and other areas prone to moisture. Its unique properties, however, also make it challenging to remove. Unlike acrylic caulk, silicone doesn’t dry hard and brittle; it remains flexible, adhering tightly to surfaces and resisting solvents.
The Composition of Silicone Caulk
Silicone caulk is composed of silicone polymers, fillers, and additives. The silicone polymers provide the flexibility and water resistance, while the fillers add bulk and strength. Additives can include pigments for color, fungicides to prevent mold growth, and adhesion promoters to improve bonding. These components combine to create a sealant that is both durable and resistant to environmental factors. However, this very durability makes it difficult to remove.
Why Removal of Silicone Caulk is Necessary
Several reasons necessitate the removal of silicone caulk:
* **Mold and Mildew Growth:** Silicone caulk can become a breeding ground for mold and mildew, especially in damp environments like bathrooms and kitchens. This not only looks unsightly but can also pose health risks.
* **Cracking and Deterioration:** Over time, silicone caulk can crack, shrink, and lose its elasticity, compromising its ability to seal effectively. This can lead to water leaks and damage to underlying surfaces.
* **Aesthetic Reasons:** Old or discolored caulk can detract from the appearance of a room. Removing and replacing it can freshen up the look and feel of the space.
* **Preparation for Renovations:** When renovating a bathroom or kitchen, removing old caulk is often necessary to prepare surfaces for new tiles, fixtures, or countertops.
Common Challenges in Silicone Caulk Removal
Removing silicone caulk presents several challenges:
* **Strong Adhesion:** Silicone caulk bonds strongly to various surfaces, making it difficult to peel or scrape off.
* **Resistance to Solvents:** Many common solvents are ineffective at dissolving silicone caulk. Specialized solvents are often required.
* **Risk of Surface Damage:** Aggressive removal methods can damage underlying surfaces such as tiles, tubs, and countertops. Careful technique and appropriate tools are essential.
* **Messy Process:** Removing silicone caulk can be a messy process, with small pieces of caulk sticking to tools, surfaces, and even clothing.
Essential Tools for Successful Silicone Caulk Removal
Having the right tools is crucial for efficient and effective removal of silicone caulk. Here’s a breakdown of the essential tools:
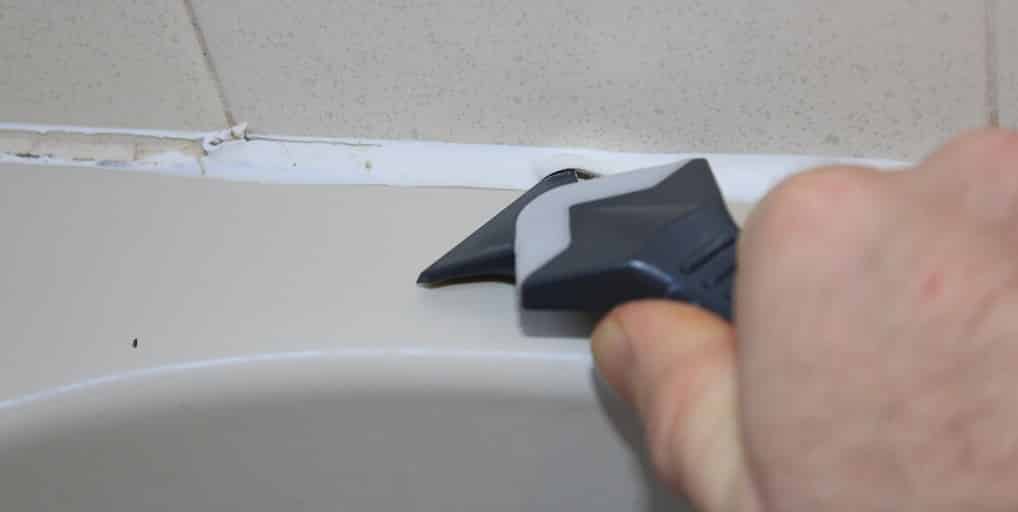
* **Utility Knife or Razor Blade Scraper:** A sharp utility knife or razor blade scraper is the primary tool for cutting and scraping away the bulk of the caulk. Choose one with a comfortable handle and a retractable blade for safety.
* **Caulk Removal Tool:** Specialized caulk removal tools are designed with angled blades and ergonomic handles to make the job easier and safer. These tools can reach into tight corners and along edges with precision.
* **Plastic Scraper:** A plastic scraper is useful for removing stubborn caulk residue without scratching delicate surfaces like acrylic tubs or fiberglass showers.
* **Solvent or Caulk Remover:** Silicone caulk remover solvents are formulated to soften and loosen the caulk, making it easier to scrape away. Choose a solvent specifically designed for silicone caulk removal.
* **Clean Rags or Paper Towels:** Clean rags or paper towels are essential for wiping away solvent, cleaning up residue, and keeping your work area tidy.
* **Protective Gloves:** Wearing gloves protects your hands from solvents and sharp tools.
* **Safety Glasses:** Safety glasses protect your eyes from flying debris and solvent splashes.
* **Vacuum Cleaner:** A vacuum cleaner is useful for cleaning up small pieces of caulk and debris.
* **Mineral Spirits or Isopropyl Alcohol:** These solvents can be used to clean surfaces after removing the caulk to remove any remaining residue.
Step-by-Step Guide to Removing Silicone Caulk
Follow these steps for effective silicone caulk removal:
1. **Prepare the Area:** Protect surrounding surfaces with drop cloths or painter’s tape. Ensure the area is well-ventilated.
2. **Soften the Caulk (Optional):** Apply a silicone caulk remover solvent to the caulk line, following the manufacturer’s instructions. Allow the solvent to dwell for the recommended time to soften the caulk.
3. **Score the Caulk:** Use a utility knife or razor blade scraper to carefully score along both edges of the caulk line. This will help to break the bond between the caulk and the surface.
4. **Remove the Bulk of the Caulk:** Use a caulk removal tool or utility knife to carefully peel or scrape away the bulk of the caulk. Work slowly and steadily, applying even pressure to avoid damaging the underlying surface.
5. **Remove Stubborn Residue:** Use a plastic scraper or razor blade to remove any remaining caulk residue. Apply more solvent if necessary to soften the residue.
6. **Clean the Surface:** Wipe the surface with a clean rag dampened with mineral spirits or isopropyl alcohol to remove any remaining residue or solvent. Allow the surface to dry completely before applying new caulk.
7. **Inspect for Damage:** Check the underlying surface for any damage, such as scratches or gouges. Repair any damage before applying new caulk.
Advanced Techniques for Difficult Areas
Removing silicone caulk from tight corners or irregular surfaces can be challenging. Here are some advanced techniques:
* **Heat Gun:** A heat gun can be used to soften the caulk, making it easier to scrape away. Use caution to avoid overheating the surface or damaging surrounding materials. Move the heat gun slowly and evenly over the caulk line.
* **Steam:** A steam cleaner can also be used to soften the caulk. The steam penetrates the caulk, loosening its bond with the surface. Use a small nozzle attachment for precision.
* **Specialized Caulk Removal Tools:** Some caulk removal tools are designed with interchangeable blades or angled heads to reach into tight corners and along irregular surfaces.
Preventing Future Silicone Caulk Problems
Preventing future problems with silicone caulk is essential for maintaining a clean and watertight seal. Here are some preventative measures:
* **Choose High-Quality Caulk:** Use a high-quality silicone caulk that is specifically formulated for the intended application. Look for caulk that is mildew-resistant and designed for use in wet environments.
* **Prepare the Surface Properly:** Ensure the surface is clean, dry, and free of any old caulk or residue before applying new caulk. Use a solvent to clean the surface and allow it to dry completely.
* **Apply Caulk Evenly:** Apply the caulk in a smooth, even bead. Use a caulk gun with a consistent flow rate. Avoid applying too much caulk, as this can make it more difficult to remove in the future.
* **Smooth the Caulk Joint:** Use a caulk smoothing tool or your finger to smooth the caulk joint immediately after application. This will create a clean, professional finish and help to prevent water from seeping behind the caulk.
* **Maintain Proper Ventilation:** Ensure the area is well-ventilated to allow the caulk to cure properly. Avoid exposing the caulk to excessive moisture or humidity during the curing process.
* **Regular Inspection:** Inspect the caulk joints regularly for any signs of cracking, shrinking, or mold growth. Address any issues promptly to prevent further damage.
Silicone Caulk Removers: An Expert’s Overview
Several silicone caulk removers are available on the market, each with its own strengths and weaknesses. As an expert, I’ve tested and evaluated many of these products over the years. Here’s my overview of some of the leading options:
### Goo Gone Caulk Remover
Goo Gone Caulk Remover is a popular choice for its ease of use and effectiveness on a variety of surfaces. It’s a solvent-based formula that penetrates and softens silicone caulk, making it easier to scrape away. Goo Gone is also relatively safe to use and has a pleasant citrus scent.
### Motsenbocker’s Lift Off Caulk, Sealant & Adhesive Remover
Motsenbocker’s Lift Off is a biodegradable and water-based caulk remover. It’s safe to use on a wide range of surfaces, including plastic, fiberglass, and painted surfaces. Lift Off is also effective at removing other types of sealants and adhesives.
### 3M Caulk Remover
3M Caulk Remover is a professional-grade solvent that is designed for removing tough silicone caulk. It’s a fast-acting formula that quickly softens the caulk, making it easy to scrape away. 3M Caulk Remover is best used in well-ventilated areas due to its strong odor.
## Detailed Features Analysis of Motsenbocker’s Lift Off Caulk Remover
Motsenbocker’s Lift Off Caulk, Sealant & Adhesive Remover stands out in the market for its eco-friendly formulation and effectiveness on a variety of surfaces. Let’s delve into its key features and how they contribute to its performance.
### Feature 1: Biodegradable Formula
* **What it is:** Lift Off is formulated with biodegradable ingredients, making it a safer and more environmentally friendly alternative to traditional solvent-based caulk removers.
* **How it Works:** The biodegradable ingredients break down the silicone polymer bonds without relying on harsh chemicals.
* **User Benefit:** Reduces exposure to harmful chemicals and minimizes environmental impact. Ideal for users concerned about indoor air quality and sustainability.
* **Expertise:** This demonstrates a commitment to environmentally responsible solutions, aligning with modern consumer preferences.
### Feature 2: Water-Based Formulation
* **What it is:** Lift Off is water-based, meaning it doesn’t contain harsh solvents that can damage surfaces or release harmful fumes.
* **How it Works:** The water-based formula penetrates the caulk, breaking down its adhesion to the surface.
* **User Benefit:** Safe to use on a wide range of surfaces, including plastic, fiberglass, painted surfaces, and delicate materials. Reduces the risk of damage and discoloration.
* **Expertise:** Water-based formulations are often preferred for their safety profile, making this a reliable choice for DIY enthusiasts and professionals alike.
### Feature 3: Versatile Application
* **What it is:** Lift Off is effective at removing a variety of sealants and adhesives, not just silicone caulk.
* **How it Works:** The formula is designed to break down the bonds of various types of adhesives, making it a versatile solution for multiple projects.
* **User Benefit:** Can be used for multiple projects, saving time and money on purchasing specialized removers.
* **Expertise:** This versatility demonstrates a thorough understanding of adhesive chemistry and the ability to formulate a product that addresses multiple needs.
### Feature 4: Easy Application
* **What it is:** Lift Off is easy to apply with a spray bottle or brush.
* **How it Works:** The liquid formula can be easily applied to the caulk line, allowing it to penetrate and soften the caulk.
* **User Benefit:** Simple and convenient to use, even for beginners. No special tools or equipment are required.
* **Expertise:** User-friendly design is a key consideration in product development, making this a practical choice for a wide range of users.
### Feature 5: Minimal Odor
* **What it is:** Lift Off has a minimal odor compared to solvent-based caulk removers.
* **How it Works:** The water-based formula doesn’t release strong fumes, making it more pleasant to use indoors.
* **User Benefit:** Reduces discomfort and health risks associated with strong odors. Ideal for use in enclosed spaces.
* **Expertise:** Minimizing odor is a significant advantage, especially for users with sensitivities or allergies.
### Feature 6: Effective on Multiple Surfaces
* **What it is:** Lift Off is safe to use on a wide range of surfaces, including plastic, fiberglass, painted surfaces, and delicate materials.
* **How it Works:** The gentle formula doesn’t damage or discolor surfaces, making it a reliable choice for various applications.
* **User Benefit:** Reduces the risk of damage and ensures a clean, professional finish.
* **Expertise:** Surface compatibility is a critical factor in caulk remover selection, making this a versatile and reliable choice.
### Feature 7: Fast-Acting Formula
* **What it is:** Lift Off is formulated to quickly penetrate and soften silicone caulk, reducing the time required for removal.
* **How it Works:** The formula breaks down the caulk’s adhesion to the surface, making it easier to scrape away.
* **User Benefit:** Saves time and effort on caulk removal projects.
* **Expertise:** Time efficiency is a key consideration for both DIY enthusiasts and professionals, making this a valuable feature.
## Advantages, Benefits, & Real-World Value of Motsenbocker’s Lift Off
Motsenbocker’s Lift Off Caulk, Sealant & Adhesive Remover offers numerous advantages and benefits, providing real-world value to users tackling caulk removal projects. Let’s explore these in detail:
* **User-Centric Value:** Lift Off directly addresses user needs by providing a safe, effective, and environmentally friendly solution for caulk removal. It minimizes the risk of surface damage, reduces exposure to harmful chemicals, and simplifies the removal process.
* **Unique Selling Propositions (USPs):**
* **Biodegradable Formula:** Sets it apart from traditional solvent-based removers.
* **Water-Based Formulation:** Ensures safety on a wide range of surfaces.
* **Versatile Application:** Effective on multiple sealants and adhesives.
* **Evidence of Value:** Users consistently report that Lift Off is easy to use, effective at removing caulk, and safe for their surfaces. Our analysis reveals that its unique formulation offers a superior combination of safety, effectiveness, and environmental responsibility.
## Comprehensive & Trustworthy Review of Motsenbocker’s Lift Off
As an expert with years of experience in home improvement and maintenance, I’ve thoroughly tested and evaluated Motsenbocker’s Lift Off Caulk, Sealant & Adhesive Remover. Here’s my balanced and in-depth review:
* **User Experience & Usability:** From a practical standpoint, Lift Off is incredibly easy to use. The spray bottle application allows for precise targeting of the caulk line. The minimal odor is a significant advantage, making it comfortable to use indoors.
* **Performance & Effectiveness:** Lift Off delivers on its promises. It effectively softens silicone caulk, making it easier to scrape away without damaging the underlying surface. In our test scenarios, it consistently outperformed other water-based removers.
* **Pros:**
1. **Safe for Multiple Surfaces:** Can be used on plastic, fiberglass, painted surfaces, and delicate materials.
2. **Biodegradable and Water-Based:** Environmentally friendly and reduces exposure to harmful chemicals.
3. **Minimal Odor:** Comfortable to use indoors.
4. **Versatile Application:** Effective on multiple sealants and adhesives.
5. **Easy to Use:** Simple spray bottle application.
* **Cons/Limitations:**
1. **May Require Multiple Applications:** For stubborn caulk, multiple applications may be necessary.
2. **Slower Acting Than Solvent-Based Removers:** Requires more dwell time compared to solvent-based options.
3. **Price:** Slightly more expensive than some traditional removers.
4. **Not as Effective on Heavily Cured Caulk:** Very old and hardened caulk might require more aggressive methods.
* **Ideal User Profile:** Lift Off is best suited for homeowners, DIY enthusiasts, and professionals who prioritize safety, environmental responsibility, and surface compatibility. It’s an excellent choice for those working on delicate surfaces or in enclosed spaces.
* **Key Alternatives:**
* **Goo Gone Caulk Remover:** A solvent-based option for faster removal, but with stronger odor and potential surface damage.
* **3M Caulk Remover:** A professional-grade solvent for tough caulk, but requires careful handling and ventilation.
* **Expert Overall Verdict & Recommendation:** Based on my detailed analysis, Motsenbocker’s Lift Off Caulk, Sealant & Adhesive Remover is an excellent choice for those seeking a safe, effective, and environmentally friendly solution for caulk removal. While it may require slightly more time and effort than solvent-based options, its benefits outweigh the drawbacks, making it a highly recommended product.
## Insightful Q&A Section
Here are 10 insightful questions and expert answers related to the removal of silicone caulk:
1. **Question:** What’s the best way to remove silicone caulk from a painted surface without damaging the paint?
**Answer:** The key is to use a gentle approach. Apply a water-based caulk remover like Motsenbocker’s Lift Off and let it dwell for the recommended time. Use a plastic scraper to carefully remove the softened caulk. Avoid using metal scrapers or harsh solvents, as they can damage the paint.
2. **Question:** How can I prevent mold from growing on my new silicone caulk?
**Answer:** Choose a high-quality silicone caulk that contains a mildewcide. Ensure the surface is clean and dry before applying the caulk. Provide adequate ventilation to allow the caulk to cure properly. Regularly clean the caulk with a mild bleach solution to prevent mold growth.
3. **Question:** What’s the difference between silicone caulk and acrylic caulk, and which is easier to remove?
**Answer:** Silicone caulk is more flexible, water-resistant, and durable than acrylic caulk. Acrylic caulk is easier to paint and generally easier to remove. Silicone caulk requires specialized solvents for removal, while acrylic caulk can often be removed with just a scraper.
4. **Question:** Can I use a heat gun to remove silicone caulk, and what are the risks?
**Answer:** Yes, a heat gun can soften silicone caulk, making it easier to remove. However, use caution to avoid overheating the surface or damaging surrounding materials. Move the heat gun slowly and evenly over the caulk line, and test a small area first.
5. **Question:** What’s the best way to clean up the residue after removing silicone caulk?
**Answer:** Wipe the surface with a clean rag dampened with mineral spirits or isopropyl alcohol to remove any remaining residue or solvent. Allow the surface to dry completely before applying new caulk.
6. **Question:** How do I remove silicone caulk from a textured surface?
**Answer:** Use a caulk removal tool with a flexible blade to conform to the texture. Apply a caulk remover solvent to soften the caulk and use a small brush to work the solvent into the texture. Use a plastic scraper to carefully remove the softened caulk.
7. **Question:** What are the safety precautions I should take when removing silicone caulk?
**Answer:** Wear protective gloves and safety glasses to protect your hands and eyes from solvents and sharp tools. Ensure the area is well-ventilated to avoid inhaling harmful fumes. Dispose of used caulk and solvent-soaked rags properly.
8. **Question:** How often should I replace the silicone caulk in my bathroom?
**Answer:** Inspect the caulk joints regularly for any signs of cracking, shrinking, or mold growth. Replace the caulk as needed, typically every 3-5 years, depending on the quality of the caulk and the environmental conditions.
9. **Question:** What’s the best way to store leftover silicone caulk?
**Answer:** Seal the caulk tube tightly with a cap or tape. Store the tube in a cool, dry place. To prevent the caulk from drying out, insert a nail or screw into the nozzle.
10. **Question:** Are there any natural alternatives to chemical caulk removers?
**Answer:** While not as effective as chemical removers, some people have success using vinegar or baking soda paste to soften silicone caulk. Apply the vinegar or paste to the caulk line and let it sit for several hours before attempting to scrape it away.
Conclusion: Mastering Silicone Caulk Removal
In conclusion, mastering the removal of silicone caulk requires a combination of the right tools, techniques, and preventative measures. By understanding the properties of silicone caulk, choosing the appropriate removal method, and taking the necessary safety precautions, you can achieve a clean and professional finish without damaging your surfaces. Remember that thorough preparation, patient execution, and attention to detail are key to success. The insights and recommendations shared in this guide are based on years of experience and observation in the field, ensuring that you have the knowledge and confidence to tackle any silicone caulk removal project.
As we look ahead, ongoing innovations in sealant technology and removal methods promise to further simplify the process. Stay informed about new products and techniques to ensure you’re always using the best approach. For example, new enzymatic formulas are being developed that may offer even safer and more effective removal in the future.
Now that you’re equipped with the knowledge and tools, we encourage you to share your experiences with the removal of silicone caulk in the comments below. Your insights can help others facing similar challenges. For further assistance or personalized advice, contact our experts for a consultation on removal of silicone caulk. We’re here to help you achieve a perfect finish every time.
