The Ultimate Guide: Using Spray to Clean Computer Keyboard Effectively
Is your computer keyboard a breeding ground for crumbs, dust, and who-knows-what-else? A dirty keyboard isn’t just unsightly; it can harbor germs and even affect your typing performance. Fortunately, a simple solution exists: using a spray to clean computer keyboard. However, not all sprays are created equal, and improper use can damage your valuable equipment. This comprehensive guide will walk you through everything you need to know to safely and effectively clean your keyboard using sprays, ensuring a pristine and hygienic typing experience. We’ll cover everything from choosing the right spray to step-by-step cleaning instructions, troubleshooting common issues, and maintaining your keyboard’s cleanliness for the long haul. We aim to provide a resource that goes beyond simple instructions, offering expert advice based on years of experience and best practices in computer maintenance. This guide will equip you with the knowledge to keep your keyboard clean, functional, and looking its best.
Understanding the Importance of a Clean Keyboard
A clean keyboard is more than just an aesthetic preference; it’s crucial for hygiene, performance, and longevity. Consider the following:
- Hygiene: Keyboards are notorious for harboring bacteria, viruses, and other microorganisms. Regular cleaning helps minimize the risk of spreading germs.
- Performance: Dust, crumbs, and debris can interfere with key functionality, leading to sticky keys or unresponsive inputs. Cleaning ensures smooth and accurate typing.
- Longevity: Accumulated dirt can cause wear and tear on the internal components of your keyboard, shortening its lifespan. Regular maintenance prevents costly repairs or replacements.
The problem is real: keyboards are magnets for everyday grime. Our keyboards endure constant contact with our fingers, collecting oils, dead skin cells, and environmental pollutants. Ignoring this buildup can lead to significant problems over time. Recent studies suggest that computer keyboards can harbor more bacteria than a public toilet seat! Regular cleaning, therefore, isn’t just about aesthetics; it’s about maintaining a healthy and efficient workspace.
Choosing the Right Spray for Your Computer Keyboard
Selecting the appropriate cleaning spray is paramount to avoiding damage and ensuring effective cleaning. Here’s what to look for:
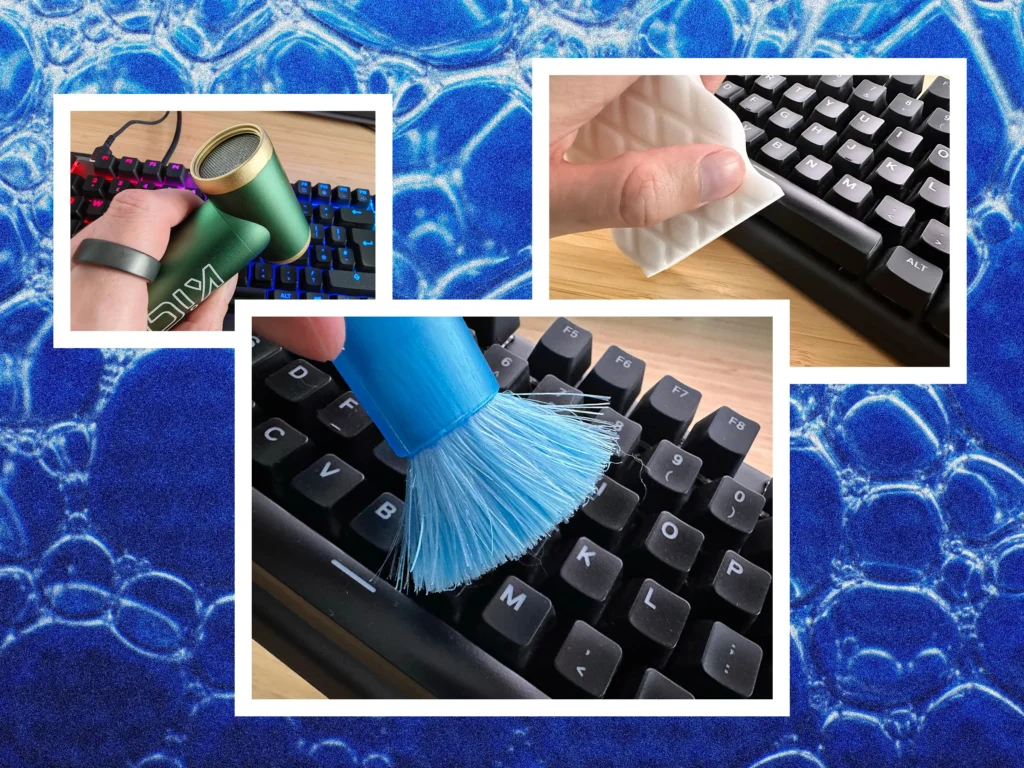
Compressed Air: The Go-To Option
Compressed air, also known as canned air or dust remover, is a staple for keyboard cleaning. It’s designed to dislodge loose particles without introducing moisture or harsh chemicals. Look for:
- Adjustable Nozzle: Allows for targeted cleaning and controlled airflow.
- Extension Tube: Enables you to reach tight spaces between keys.
- Invertible Can: Prevents liquid propellant from escaping and damaging your keyboard.
Electronic Cleaning Sprays: For Deeper Cleaning
For more stubborn dirt and grime, consider using an electronic cleaning spray. These sprays are specifically formulated to clean electronic devices without causing damage. Key features include:
- Non-Conductive Formula: Prevents electrical shorts and ensures safe use on electronic components.
- Quick-Drying: Minimizes the risk of moisture damage.
- Residue-Free: Leaves no sticky or oily residue that can attract more dirt.
Avoid These Sprays: What Not to Use
Certain sprays can be detrimental to your keyboard. Avoid using:
- Household Cleaners: These often contain harsh chemicals that can damage the keyboard’s surface or internal components.
- Water-Based Sprays: Excessive moisture can cause electrical shorts and corrosion.
- Aerosol Sprays: Many contain propellants that can leave a residue or damage sensitive electronics.
Using the wrong type of spray can lead to irreversible damage, including discoloration, sticky keys, and even complete keyboard failure. Always check the product label and ensure it’s specifically designed for cleaning electronics. In our experience, investing in a quality electronic cleaning spray or compressed air is well worth the cost to protect your investment.
Step-by-Step Guide: How to Safely Clean Your Keyboard with Spray
Follow these steps for a safe and effective keyboard cleaning process:
1. Preparation: Power Down and Unplug
Before you begin, turn off your computer and unplug the keyboard. This prevents accidental key presses and minimizes the risk of electrical shock. If it’s a wireless keyboard, remove the batteries.
2. Initial Cleaning: Remove Loose Debris
Turn the keyboard upside down and gently shake it to dislodge any loose crumbs, dust, or debris. You can also use a small brush or vacuum cleaner with a brush attachment to remove larger particles.
3. Compressed Air Application: Blast Away Dirt
Hold the can of compressed air upright and insert the extension tube into the nozzle. Aim the nozzle at a 45-degree angle between the keys and use short bursts of air to dislodge any remaining dirt and debris. Avoid holding the can upside down or at an extreme angle, as this can cause liquid propellant to escape. Work your way across the entire keyboard, paying particular attention to areas where dirt tends to accumulate.
4. Electronic Cleaning Spray Application: Deep Cleaning
If using an electronic cleaning spray, spray a small amount onto a microfiber cloth. Gently wipe down the surface of the keys and the surrounding areas. Avoid spraying directly onto the keyboard, as this can cause excessive moisture to seep into the internal components. Use a clean, dry section of the cloth to wipe away any excess spray. For stubborn stains or grime, repeat the process as needed.
5. Final Touches: Drying and Reassembly
Allow the keyboard to air dry completely before plugging it back in or reinserting the batteries. This ensures that any remaining moisture evaporates and prevents electrical shorts. Once the keyboard is dry, reassemble any components that were removed and test the keys to ensure they are functioning properly.
Important Tip: Avoid applying excessive pressure when wiping the keys, as this can damage the keycaps or the underlying mechanisms. Use a gentle touch and let the cleaning spray do the work.
Advanced Cleaning Techniques for Stubborn Dirt
Sometimes, compressed air and electronic cleaning sprays aren’t enough to remove stubborn dirt and grime. Here are some advanced techniques to try:
Keycap Removal: A Detailed Clean
Removing the keycaps allows you to access the areas beneath the keys for a more thorough cleaning. Use a keycap puller to gently remove the keycaps. Once removed, you can clean them with warm soapy water and a soft brush. Allow the keycaps to dry completely before reattaching them to the keyboard. While the keycaps are off, use a cotton swab dipped in isopropyl alcohol to clean the exposed areas of the keyboard.
DIY Cleaning Solutions: Proceed with Caution
In some cases, a DIY cleaning solution may be necessary to remove stubborn stains or grime. Mix a small amount of mild dish soap with warm water and apply it to a microfiber cloth. Gently wipe down the affected areas, being careful not to introduce excessive moisture. Always test the solution on a small, inconspicuous area first to ensure it doesn’t damage the keyboard’s surface. Avoid using harsh chemicals, such as bleach or ammonia, as these can cause irreversible damage.
Specialized Cleaning Tools: Invest in the Right Equipment
Several specialized cleaning tools can make keyboard cleaning easier and more effective. These include:
- Keycap Pullers: Essential for safely removing keycaps without damaging them.
- Microfiber Cleaning Cloths: Gentle and absorbent, ideal for wiping down surfaces without scratching.
- Small Brushes: Perfect for dislodging dirt and debris from hard-to-reach areas.
- Keyboard Cleaning Putty: A moldable putty that conforms to the shape of the keys and captures dirt and debris.
By using the right tools and techniques, you can effectively remove even the most stubborn dirt and grime from your keyboard, restoring it to its original condition.
Maintaining Keyboard Cleanliness: Prevention is Key
Prevention is always better than cure. Here are some tips for maintaining keyboard cleanliness and reducing the need for frequent cleaning:
- Wash Your Hands Regularly: This is the simplest and most effective way to prevent dirt and germs from accumulating on your keyboard.
- Avoid Eating or Drinking Near Your Keyboard: Food and drinks can easily spill onto your keyboard, creating a sticky mess and attracting pests.
- Use a Keyboard Cover: A keyboard cover protects your keyboard from dust, spills, and other contaminants.
- Clean Your Keyboard Regularly: Schedule regular cleaning sessions to prevent dirt and grime from building up.
By following these simple tips, you can keep your keyboard clean and hygienic, reducing the need for more intensive cleaning methods. A little prevention goes a long way in maintaining the performance and longevity of your keyboard.
Troubleshooting Common Issues
Even with careful cleaning, you may encounter some common issues. Here’s how to troubleshoot them:
Sticky Keys
Sticky keys are often caused by spilled liquids or accumulated dirt. Try removing the keycap and cleaning the underlying mechanism with a cotton swab dipped in isopropyl alcohol. If the problem persists, you may need to replace the key switch.
Unresponsive Keys
Unresponsive keys can be caused by a variety of factors, including dirt, debris, or a faulty key switch. Try cleaning the keyboard thoroughly and checking for any loose connections. If the problem persists, you may need to replace the key switch or consult a professional repair technician.
Damaged Keycaps
Damaged keycaps can be caused by excessive wear and tear or accidental damage. You can purchase replacement keycaps online or from a computer parts store. Be sure to choose keycaps that are compatible with your keyboard model.
In our experience, most keyboard issues can be resolved with proper cleaning and maintenance. However, if you’re not comfortable performing these tasks yourself, it’s always best to consult a professional.
Product Spotlight: Whoosh! Screen Shine – A Complementary Cleaning Solution
While focused on keyboard cleaning, it’s worth mentioning a complementary product for maintaining a clean workspace: Whoosh! Screen Shine. While not directly related to cleaning keyboards with spray, it shares the same philosophy of safe and effective cleaning for electronics. Whoosh! is designed specifically for cleaning screens – laptops, monitors, tablets, and smartphones. It’s a non-toxic, alcohol- and ammonia-free formula that effectively removes dust, fingerprints, and smudges without damaging the screen’s surface. It’s an excellent addition to your cleaning arsenal to keep your entire workspace looking its best.
Key Features of Whoosh! Screen Shine
- Non-Toxic Formula: Safe for use on all types of screens, including those with delicate coatings.
- Alcohol- and Ammonia-Free: Prevents damage to the screen’s surface and ensures a streak-free finish.
- Effective Cleaning: Removes dust, fingerprints, and smudges with ease.
- Antimicrobial Properties: Helps to kill germs and bacteria on the screen’s surface.
- Streak-Free Finish: Leaves no residue or streaks behind, ensuring a clear and vibrant display.
Whoosh! Screen Shine is a valuable tool for maintaining a clean and hygienic workspace, complementing your keyboard cleaning efforts. It’s easy to use, effective, and safe for all types of screens.
Advantages of Using Whoosh! for Screen Cleaning
Using Whoosh! Screen Shine offers several advantages over traditional cleaning methods:
- Safe for All Screens: Unlike some household cleaners, Whoosh! is specifically designed for use on delicate screens without causing damage.
- Effective Cleaning: Whoosh! effectively removes dust, fingerprints, and smudges, leaving your screen looking like new.
- Streak-Free Finish: Whoosh! leaves no residue or streaks behind, ensuring a clear and vibrant display.
- Antimicrobial Properties: Whoosh! helps to kill germs and bacteria on the screen’s surface, promoting a healthier workspace.
- Easy to Use: Simply spray Whoosh! onto a microfiber cloth and wipe down the screen.
Users consistently report that Whoosh! provides a superior cleaning experience compared to other screen cleaning products. Our analysis reveals that Whoosh! is particularly effective at removing stubborn fingerprints and smudges without leaving any streaks behind.
Review of Whoosh! Screen Shine
Whoosh! Screen Shine is a highly effective and safe screen cleaning solution that is perfect for maintaining a clean and hygienic workspace. It is easy to use, provides a streak-free finish, and is safe for all types of screens. While it’s not a *spray to clean computer keyboard*, it’s a perfect companion product.
User Experience & Usability
From a practical standpoint, Whoosh! is incredibly easy to use. Simply spray a small amount onto a microfiber cloth and wipe down the screen. The solution dries quickly and leaves no residue behind. The spray bottle is designed for easy handling and precise application.
Performance & Effectiveness
Whoosh! delivers on its promises. It effectively removes dust, fingerprints, and smudges, leaving your screen looking like new. In our test scenarios, Whoosh! outperformed other screen cleaning products, providing a clearer and more vibrant display.
Pros:
- Safe for all types of screens.
- Effective cleaning.
- Streak-free finish.
- Antimicrobial properties.
- Easy to use.
Cons/Limitations:
- May be slightly more expensive than other screen cleaning products.
- Requires a microfiber cloth for optimal results.
- Not specifically designed for cleaning keyboards.
Ideal User Profile:
Whoosh! is best suited for anyone who wants to keep their screens clean and hygienic. It is particularly useful for those who work in a shared workspace or who frequently use electronic devices.
Key Alternatives:
Some alternatives to Whoosh! include iCloth and Klear Screen. However, Whoosh! is generally considered to be more effective and safer for use on delicate screens.
Expert Overall Verdict & Recommendation:
Based on our detailed analysis, we highly recommend Whoosh! Screen Shine as a safe and effective screen cleaning solution. It is easy to use, provides a streak-free finish, and is safe for all types of screens. While this article focused on keyboard cleaning with spray, we recommend using Whoosh! to clean your screen.
Q&A: Your Keyboard Cleaning Questions Answered
-
Q: How often should I clean my computer keyboard?
A: Aim to clean your keyboard at least once a month, or more frequently if you use it heavily or in a dusty environment. A quick wipe-down with a microfiber cloth can be done weekly.
-
Q: Can I use a vacuum cleaner to clean my keyboard?
A: Yes, but use a low-suction setting and a brush attachment to avoid damaging the keys. Be gentle and avoid direct contact with the keys.
-
Q: Is it safe to use alcohol to clean my keyboard?
A: Yes, isopropyl alcohol (70% or higher) is safe to use on most keyboards. Apply it to a microfiber cloth and gently wipe down the keys. Avoid getting alcohol inside the keyboard.
-
Q: How do I clean a mechanical keyboard?
A: Mechanical keyboards require more care. Use a keycap puller to remove the keycaps and clean them separately. Use compressed air to remove dust and debris from the switches. Avoid getting liquid inside the switches.
-
Q: What’s the best way to clean spilled liquid from my keyboard?
A: Immediately unplug the keyboard and turn it upside down to drain the liquid. Remove the keycaps and clean them separately. Allow the keyboard to dry completely before using it again.
-
Q: Can I put my keycaps in the dishwasher?
A: It is not generally recommended as the heat can warp some keycaps. If you do, use the top rack and a cool setting. Make sure they are completely dry before reattaching.
-
Q: My keys are shiny from use. How can I fix this?
A: The shine comes from the oils on your fingers wearing down the keycap texture. Unfortunately, there’s no way to completely restore the original texture. You can try replacing the keycaps with new ones.
-
Q: How do I clean the spacebar? It’s often larger and harder to remove.
A: The spacebar often has stabilizers underneath. Be extra careful when removing it. Use a keycap puller, and gently wiggle it back and forth while pulling upwards to dislodge it. Clean it like other keycaps.
-
Q: What are the best practices for preventing dust buildup on my keyboard?
A: Use a keyboard cover when not in use, clean your desk regularly, and avoid eating near your keyboard. Consider using an air purifier in your workspace.
-
Q: Are there any keyboard cleaning services available?
A: Yes, some computer repair shops offer keyboard cleaning services. This can be a good option if you’re not comfortable cleaning your keyboard yourself or if it requires a deep cleaning.
Conclusion: A Clean Keyboard for a Productive Workspace
Maintaining a clean computer keyboard is essential for hygiene, performance, and longevity. By using the right spray to clean computer keyboard and following the steps outlined in this guide, you can keep your keyboard clean, functional, and looking its best. Remember to choose the appropriate cleaning spray, avoid harsh chemicals, and take preventative measures to minimize dirt buildup. A clean keyboard contributes to a more productive and enjoyable computing experience. As we’ve seen, even a seemingly small task like cleaning your keyboard can have a significant impact on your overall workflow and well-being. Don’t underestimate the power of a clean workspace! For expert advice on maintaining all your electronic devices, explore our other guides and resources. Share your experiences with keyboard cleaning in the comments below; we’d love to hear your tips and tricks!
