
How to Clean My Computer Keyboard: A Definitive Guide
Is your computer keyboard a breeding ground for crumbs, dust, and who-knows-what-else? You’re not alone. A dirty keyboard isn’t just unsightly; it can harbor harmful bacteria and even affect your typing performance. But don’t worry, this comprehensive guide will show you *exactly* how to clean your computer keyboard effectively and safely, regardless of the type of keyboard you own – from membrane to mechanical, wired to wireless. We’ll cover everything from quick daily maintenance to deep cleaning for those truly grimy situations. This isn’t just another surface-level guide; we’ll delve into the nuances of keyboard cleaning, addressing common pitfalls and sharing expert-backed techniques to ensure your keyboard is not only clean but also protected. Consider this your one-stop resource for mastering the art of keyboard hygiene.
Why Cleaning Your Computer Keyboard Matters: More Than Just Aesthetics
Cleaning your computer keyboard is about more than just appearances. A dirty keyboard can impact your health, productivity, and even the lifespan of your device. Let’s explore the importance of regular keyboard cleaning:
* **Hygiene:** Keyboards are notorious for accumulating germs and bacteria. Studies have shown that keyboards can harbor more bacteria than a toilet seat! Regular cleaning helps eliminate these harmful microorganisms, reducing the risk of illness.
* **Performance:** Debris trapped beneath the keys can interfere with their movement, leading to sticky or unresponsive keys. This can significantly slow down your typing speed and accuracy. Cleaning removes these obstructions, ensuring smooth and efficient typing.
* **Longevity:** Dust and debris can also damage the internal components of your keyboard over time. By keeping your keyboard clean, you can prevent premature wear and tear, extending its lifespan.
* **Aesthetics:** A clean keyboard simply looks better! It creates a more pleasant and professional workspace.
It’s important to note that different types of keyboards require different cleaning approaches. For example, mechanical keyboards with removable keycaps allow for more thorough cleaning than membrane keyboards.
Understanding Different Keyboard Types and Their Cleaning Needs
Before diving into the cleaning process, it’s crucial to understand the type of keyboard you have. Each type requires a slightly different approach to ensure effective cleaning without causing damage.
* **Membrane Keyboards:** These are the most common type of keyboard, found in most laptops and many desktop setups. They use a membrane layer beneath the keys to register keystrokes. Membrane keyboards are generally more resistant to spills but can be more difficult to clean thoroughly.
* **Mechanical Keyboards:** These keyboards use individual mechanical switches beneath each key, providing a tactile and responsive typing experience. Mechanical keyboards are often more expensive but offer superior durability and customizability. They also tend to be easier to clean deeply due to their removable keycaps.
* **Laptop Keyboards:** Laptop keyboards are typically low-profile and integrated into the laptop chassis. They can be challenging to clean due to their compact design and limited access to the internal components.
* **Wireless Keyboards:** Wireless keyboards connect to your computer via Bluetooth or a USB receiver. The cleaning process is similar to wired keyboards, but it’s essential to disconnect the keyboard and remove any batteries before cleaning.
Essential Tools and Supplies for Cleaning Your Computer Keyboard
Having the right tools and supplies is essential for effective and safe keyboard cleaning. Here’s a list of recommended items:
* **Compressed Air:** This is your primary weapon against dust and debris. Use it to dislodge particles from between the keys and under the keycaps.
* **Microfiber Cloths:** These are ideal for wiping down the keyboard surface and keycaps. Avoid using paper towels, as they can leave behind lint.
* **Isopropyl Alcohol (70% or higher):** This is an excellent disinfectant and cleaning agent. Dilute it with water to prevent damage to the keyboard’s surface.
* **Cotton Swabs:** These are perfect for cleaning hard-to-reach areas and crevices.
* **Keycap Puller (for mechanical keyboards):** This tool allows you to safely remove keycaps for deep cleaning.
* **Small Brush:** A soft-bristled brush can help loosen stubborn debris.
* **Vacuum Cleaner with Brush Attachment:** A vacuum cleaner can be used to remove larger debris particles, but be careful not to damage the keys.
* **Dish Soap (mild):** For cleaning keycaps, mild dish soap and warm water work wonders.
Step-by-Step Guide: How to Clean Your Computer Keyboard
Now that you have the necessary tools and supplies, let’s walk through the step-by-step process of cleaning your computer keyboard.
Step 1: Disconnect the Keyboard
Before you begin, disconnect the keyboard from your computer. This will prevent accidental keystrokes and protect your computer from potential damage. For wireless keyboards, remove the batteries.
Step 2: Turn the Keyboard Upside Down and Shake It
Turn the keyboard upside down and gently shake it to dislodge any loose debris. You’ll be surprised at how much stuff comes out!
Step 3: Use Compressed Air
Use compressed air to blast away dust and debris from between the keys and under the keycaps. Hold the can at an angle and use short bursts of air. Focus on areas where debris tends to accumulate, such as around the space bar and Enter key.
Step 4: Wipe Down the Keyboard Surface
Dampen a microfiber cloth with a mixture of isopropyl alcohol and water (50/50 solution). Wring out the cloth thoroughly to prevent excess moisture from seeping into the keyboard. Wipe down the keyboard surface, paying attention to the keycaps and surrounding areas.
Step 5: Clean Individual Keycaps (for mechanical keyboards)
If you have a mechanical keyboard, you can remove the keycaps for a more thorough cleaning. Use a keycap puller to gently remove the keycaps. Soak the keycaps in warm water with mild dish soap for 15-20 minutes. Rinse the keycaps thoroughly and allow them to air dry completely before reattaching them to the keyboard.
Step 6: Clean Hard-to-Reach Areas with Cotton Swabs
Dampen a cotton swab with the isopropyl alcohol and water solution. Use the cotton swab to clean hard-to-reach areas, such as the crevices between the keys and the edges of the keyboard. Be careful not to use too much liquid, as this could damage the internal components of the keyboard.
Step 7: Vacuum Up Remaining Debris
If you have a vacuum cleaner with a brush attachment, you can use it to vacuum up any remaining debris. Be careful not to damage the keys or scratch the keyboard surface.
Step 8: Reassemble and Test the Keyboard
Once everything is dry, reassemble the keyboard and reconnect it to your computer. Test all the keys to make sure they are working properly. If any keys are sticking or unresponsive, repeat the cleaning process.
Advanced Cleaning Techniques for Stubborn Stains and Grime
Sometimes, a simple cleaning isn’t enough to remove stubborn stains and grime. Here are some advanced cleaning techniques you can try:
* **Baking Soda Paste:** Mix baking soda with a small amount of water to create a paste. Apply the paste to the stain and let it sit for a few minutes. Gently scrub the stain with a soft-bristled brush or cotton swab. Rinse the area thoroughly with water and dry it with a microfiber cloth.
* **Toothpaste:** Toothpaste can also be used to remove stubborn stains. Apply a small amount of toothpaste to the stain and gently rub it with a soft-bristled brush or cotton swab. Rinse the area thoroughly with water and dry it with a microfiber cloth.
* **Magic Eraser:** A magic eraser can be used to remove scuff marks and other surface stains. Dampen the magic eraser and gently rub it on the stain. Be careful not to apply too much pressure, as this could damage the keyboard surface.
**Important Note:** Always test any cleaning solution on a small, inconspicuous area of the keyboard before applying it to the entire surface. This will help you avoid damaging the keyboard.
Keyboard Cleaning Products: A Detailed Overview
While the methods described above are effective, several specialized keyboard cleaning products can make the process even easier. Here’s a breakdown of some popular options:
* **Keyboard Cleaning Gel:** This gel is designed to conform to the shape of your keyboard and pick up dust and debris. It’s easy to use and doesn’t require any wiping or scrubbing.
* **Keyboard Cleaning Wipes:** These pre-moistened wipes are convenient for quick cleanups. They’re typically alcohol-based and can disinfect the keyboard surface.
* **Keyboard Cleaning Kits:** These kits often include a variety of tools and solutions, such as compressed air, microfiber cloths, cleaning brushes, and cleaning solutions.
When choosing a keyboard cleaning product, be sure to read the label carefully and follow the manufacturer’s instructions. Avoid using products that contain harsh chemicals or abrasives, as these could damage the keyboard.
Keychron Keyboards: A Deep Dive into Cleaning a Premium Brand
Keychron keyboards have gained popularity for their high-quality construction, customizable features, and mechanical key switches. Cleaning a Keychron keyboard requires a bit more attention to detail due to its complex design. Keychron keyboards are mechanical and come with different types of switches such as Gateron, Cherry MX, and Keychron’s own switches. These switches are delicate and should be handled with care.
**Key Features of Keychron Keyboards:**
* **Mechanical Switches:** Keychron keyboards feature mechanical switches that provide a tactile and responsive typing experience. These switches are more durable and customizable than membrane switches.
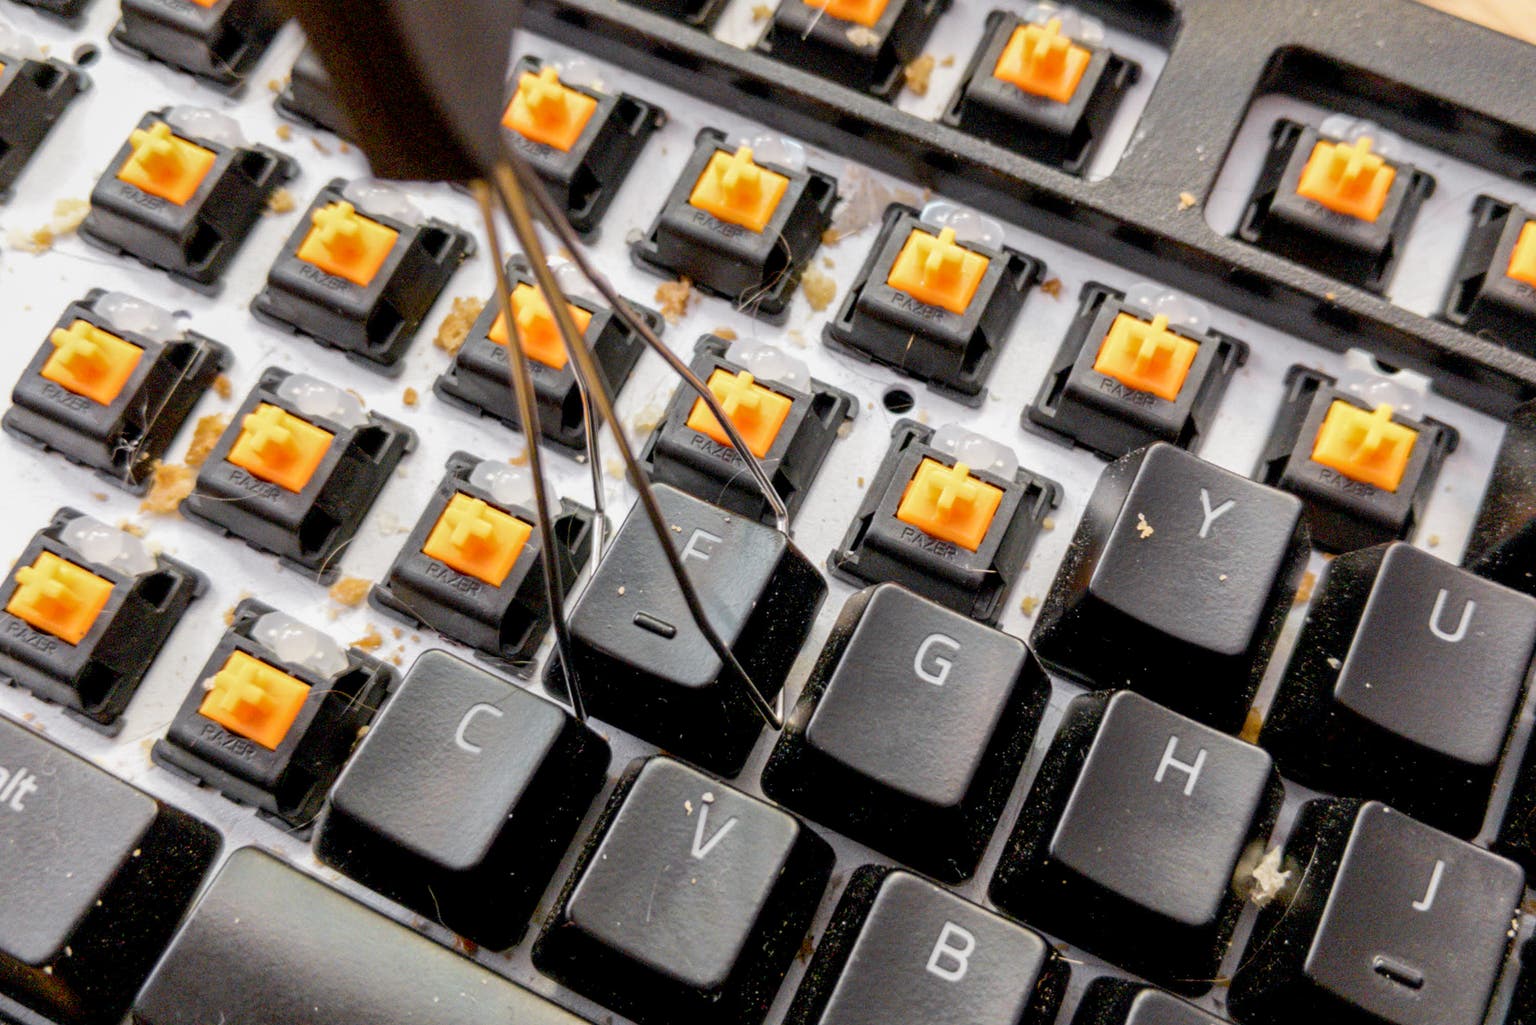
* **Removable Keycaps:** Keychron keyboards have removable keycaps, which makes it easier to clean the keyboard thoroughly. Use a keycap puller to remove the keycaps without damaging the switches.
* **Aluminum Frame:** Many Keychron keyboards have an aluminum frame, which provides a sturdy and premium feel. The frame can be cleaned with a damp microfiber cloth.
* **Wireless Connectivity:** Keychron keyboards offer wireless connectivity via Bluetooth, which makes them convenient for use with multiple devices.
* **Customizable Backlighting:** Keychron keyboards have customizable backlighting, which allows you to personalize the keyboard’s appearance.
**Cleaning Process for Keychron Keyboards:**
1. **Disconnect the Keyboard:** Disconnect the keyboard from your computer and turn it off.
2. **Remove Keycaps:** Use a keycap puller to remove the keycaps. Be gentle and avoid using excessive force.
3. **Clean Keycaps:** Soak the keycaps in warm water with mild dish soap for 15-20 minutes. Rinse them thoroughly and let them air dry completely.
4. **Clean the Keyboard Frame:** Use a damp microfiber cloth to wipe down the keyboard frame. Avoid using harsh chemicals or abrasives.
5. **Clean the Switches:** Use compressed air to blow away dust and debris from the switches. You can also use a cotton swab dampened with isopropyl alcohol to clean the switches individually. Be careful not to get too much liquid into the switches.
6. **Reassemble the Keyboard:** Once everything is dry, reattach the keycaps to the keyboard. Make sure the keycaps are properly aligned and securely attached.
7. **Test the Keyboard:** Reconnect the keyboard to your computer and test all the keys to make sure they are working properly.
**Advantages of Keychron Keyboards:**
* **Superior Typing Experience:** Keychron keyboards offer a superior typing experience compared to membrane keyboards. The mechanical switches provide a tactile and responsive feel, which can improve typing speed and accuracy.
* **Durability:** Keychron keyboards are built to last. The mechanical switches are rated for millions of keystrokes, and the aluminum frame provides a sturdy and durable construction.
* **Customizability:** Keychron keyboards are highly customizable. You can choose from a variety of key switches, keycaps, and backlighting options to create a keyboard that suits your needs and preferences.
* **Wireless Connectivity:** Keychron keyboards offer wireless connectivity via Bluetooth, which makes them convenient for use with multiple devices.
* **Aesthetics:** Keychron keyboards have a sleek and modern design that looks great on any desk.
**Disadvantages of Keychron Keyboards:**
* **Price:** Keychron keyboards are more expensive than membrane keyboards. However, the superior typing experience, durability, and customizability make them worth the investment.
* **Noise:** Mechanical keyboards can be noisy, especially if they use clicky switches. If you’re sensitive to noise, you may want to choose a keyboard with quieter switches.
* **Learning Curve:** It can take some time to get used to typing on a mechanical keyboard, especially if you’re used to membrane keyboards. However, most people find that the learning curve is worth it.
**User Experience and Usability:**
Keychron keyboards are designed with user experience in mind. The keyboards are easy to set up and use, and the customizable features allow you to tailor the keyboard to your specific needs. The mechanical switches provide a comfortable and responsive typing experience, which can improve productivity and reduce fatigue.
**Performance and Effectiveness:**
Keychron keyboards deliver excellent performance and effectiveness. The mechanical switches provide accurate and reliable keystrokes, and the customizable features allow you to optimize the keyboard for your specific tasks. The wireless connectivity is also reliable and provides a seamless user experience.
**Expert Verdict and Recommendation:**
Keychron keyboards are a great choice for anyone who wants a high-quality, customizable, and durable keyboard. The superior typing experience, wireless connectivity, and sleek design make them a worthwhile investment. While they are more expensive than membrane keyboards, the benefits they offer make them worth the price. We highly recommend Keychron keyboards to anyone who spends a lot of time typing.
**Alternatives to Keychron Keyboards:**
* **Logitech MX Keys:** The Logitech MX Keys is a popular wireless keyboard that offers a comfortable typing experience and a sleek design. It’s a good alternative to Keychron keyboards if you prefer a quieter keyboard.
* **Corsair K95 RGB Platinum:** The Corsair K95 RGB Platinum is a high-end mechanical keyboard that offers a variety of features, including customizable backlighting, macro keys, and a durable aluminum frame. It’s a good alternative to Keychron keyboards if you’re looking for a gaming keyboard.
Preventative Measures: Keeping Your Keyboard Clean for Longer
Prevention is always better than cure. Here are some preventative measures you can take to keep your keyboard clean for longer:
* **Wash Your Hands Regularly:** Wash your hands before using your computer to prevent transferring dirt and germs to the keyboard.
* **Avoid Eating and Drinking Near Your Keyboard:** Food and drinks can easily spill onto the keyboard, causing sticky keys and attracting pests.
* **Use a Keyboard Cover:** A keyboard cover can protect the keyboard from dust, spills, and other debris.
* **Clean Your Keyboard Regularly:** Make it a habit to clean your keyboard at least once a week to prevent the buildup of dirt and grime.
Insightful Q&A: Addressing Common Keyboard Cleaning Concerns
Here are some frequently asked questions about cleaning computer keyboards:
**Q1: How often should I clean my computer keyboard?**
*A: Ideally, you should perform a quick cleaning (compressed air and a wipe down) once a week and a deep cleaning (removing keycaps, etc.) every 1-3 months, depending on usage.*
**Q2: Can I use a dishwasher to clean my keycaps?**
*A: While some people have successfully cleaned keycaps in a dishwasher, it’s generally not recommended. The high heat and harsh detergents can damage the keycaps. It’s best to clean them by hand with warm water and mild dish soap.*
**Q3: What type of alcohol is safe to use on my keyboard?**
*A: Isopropyl alcohol with a concentration of 70% or higher is generally safe to use on keyboards. Dilute it with water to prevent damage to the keyboard’s surface.*
**Q4: How do I clean a sticky key on my keyboard?**
*A: Sticky keys are often caused by debris trapped beneath the keycap. Remove the keycap and clean the area beneath it with compressed air and a cotton swab dampened with isopropyl alcohol.*
**Q5: Can I use bleach to clean my keyboard?**
*A: No, you should never use bleach to clean your keyboard. Bleach is a harsh chemical that can damage the keyboard’s surface and internal components.*
**Q6: How do I clean a spill on my keyboard?**
*A: Immediately disconnect the keyboard from your computer and turn it upside down to drain any excess liquid. Use a microfiber cloth to absorb the spill. If the spill was sugary or sticky, you may need to remove the keycaps and clean the area beneath them with a damp cotton swab.*
**Q7: What’s the best way to clean the keyboard on my laptop?**
*A: Cleaning a laptop keyboard can be tricky. Use compressed air to blow away dust and debris. Dampen a microfiber cloth with a mixture of isopropyl alcohol and water and gently wipe down the keyboard surface. Be careful not to get too much liquid on the keyboard.*
**Q8: How do I dry my keyboard after cleaning it?**
*A: After cleaning your keyboard, allow it to air dry completely before reconnecting it to your computer. You can use a fan to speed up the drying process.*
**Q9: Are there any keyboard cleaning services available?**
*A: Yes, some computer repair shops and cleaning services offer keyboard cleaning services. This can be a good option if you’re not comfortable cleaning your keyboard yourself.*
**Q10: My keyboard has a weird smell after cleaning. What should I do?**
*A: The smell is likely due to residual cleaning solution. Ensure you’ve rinsed all components thoroughly and allow them to air dry completely. You can also try wiping the keyboard with a clean, dry microfiber cloth.*
Conclusion: A Clean Keyboard, A Cleaner Mind
Keeping your computer keyboard clean is essential for hygiene, performance, and longevity. By following the steps outlined in this guide, you can effectively clean your keyboard and keep it in top condition. Remember to choose the right cleaning method for your keyboard type and always use safe and gentle cleaning solutions. A clean keyboard contributes to a more pleasant and productive computing experience. So, take a few minutes to clean your keyboard regularly, and you’ll be rewarded with a cleaner, healthier, and more efficient workspace.
Now that you’ve mastered the art of keyboard cleaning, why not share your newfound knowledge with friends and family? Leave a comment below sharing your favorite keyboard cleaning tips or any challenges you’ve encountered. And if you’re looking to take your keyboard care to the next level, explore our guide to ergonomic keyboard setups for enhanced comfort and productivity.
