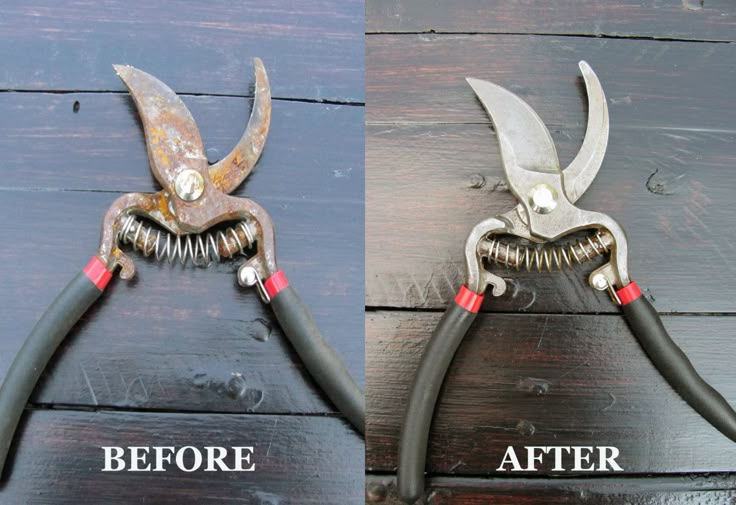
How to Clean Rust Off Garden Tools: The Ultimate Restoration Guide
Is rust threatening to turn your trusty garden tools into useless metal scraps? Don’t despair! This comprehensive guide on how to clean rust off garden tools will walk you through proven methods, expert tips, and preventative measures to restore your tools to their former glory and keep them performing at their best. We understand the frustration of seeing your valuable tools deteriorate, and we’re here to provide a solution that’s both effective and easy to follow. Whether you’re dealing with light surface rust or stubborn, deep-seated corrosion, this article offers a range of techniques to tackle any level of rust. We’ll cover everything from simple household remedies to more specialized tools and products, ensuring you have the knowledge to choose the best approach for your specific needs. Get ready to revitalize your garden tools and extend their lifespan with our expert advice!
Understanding Rust: The Enemy of Your Garden Tools
Rust, scientifically known as iron oxide, is the result of a chemical reaction between iron, oxygen, and moisture. This process, called oxidation, weakens the metal and can eventually lead to complete disintegration. Understanding the nature of rust is crucial in effectively combating it. Different types of metals and alloys react differently to environmental factors. Some are more prone to rust than others, and the type of rust can also vary depending on the specific conditions.
The Science Behind Rust Formation
The electrochemical process of rust formation involves the transfer of electrons from iron to oxygen in the presence of water. This creates an anode (where iron is oxidized) and a cathode (where oxygen is reduced). The resulting flow of electrons leads to the formation of iron ions, which then combine with oxygen and water to form hydrated iron oxide, or rust. The presence of electrolytes, such as salt, can accelerate this process.
Identifying Different Types of Rust
Rust can manifest in various forms, from light surface rust to deep, penetrating corrosion. Surface rust is characterized by a thin, orange-brown layer that is relatively easy to remove. Pitting rust, on the other hand, is more aggressive and creates small holes or pits in the metal. Scale rust is a thick, flaky layer that can compromise the structural integrity of the tool. Identifying the type of rust is essential in choosing the appropriate cleaning method.
Preventative Measures: Keeping Rust at Bay
The best way to deal with rust is to prevent it from forming in the first place. Proper storage, regular cleaning, and protective coatings can significantly extend the lifespan of your garden tools. We will delve into these preventative strategies later in the article.
Essential Tools and Supplies for Rust Removal
Before you begin the rust removal process, gather the necessary tools and supplies. Having everything on hand will make the job easier and more efficient. The specific items you’ll need will depend on the method you choose, but here’s a general list of essentials:
- Safety Glasses and Gloves: Protect your eyes and hands from rust particles and cleaning solutions.
- Wire Brush: For scrubbing away loose rust.
- Sandpaper (various grits): For removing stubborn rust and smoothing the surface.
- Steel Wool: For polishing and removing fine rust particles.
- Rust Remover Solution: Chemical solutions designed to dissolve rust.
- Vinegar: A natural and effective rust remover.
- Baking Soda: For creating a paste to scrub away rust.
- Lemon Juice: Another natural acid that can dissolve rust.
- Oil (e.g., WD-40, Linseed Oil): For lubricating and protecting the tools after cleaning.
- Rags or Cloths: For wiping away rust and applying oil.
- A Container for Soaking: For soaking tools in rust remover solutions.
Proven Methods for How to Clean Rust Off Garden Tools
Now, let’s explore the various methods for removing rust from your garden tools. We’ll cover both natural and chemical approaches, as well as mechanical techniques.
Method 1: Vinegar Soak
Vinegar is a readily available and effective natural rust remover. Its acetic acid content dissolves rust without damaging the underlying metal.
Step-by-Step Guide to Vinegar Soak
- Prepare the Vinegar Solution: Fill a container with white vinegar. Make sure the container is large enough to fully submerge the rusty parts of your tools.
- Soak the Tools: Place the rusty tools in the vinegar, ensuring that all affected areas are submerged.
- Soaking Time: Allow the tools to soak for at least 12-24 hours, or even longer for heavily rusted tools. Check periodically to assess the progress.
- Scrub Away the Rust: After soaking, remove the tools from the vinegar and scrub them with a wire brush or steel wool to remove the loosened rust.
- Rinse and Dry: Rinse the tools thoroughly with water to remove any remaining vinegar and rust particles. Dry them completely with a clean cloth.
- Apply Protective Oil: Apply a thin coat of oil (e.g., WD-40, linseed oil) to protect the tools from future rust.
Method 2: Baking Soda Paste
Baking soda is a mild abrasive that can effectively scrub away rust without being too harsh on the metal.
Step-by-Step Guide to Baking Soda Paste
- Prepare the Baking Soda Paste: Mix baking soda with water to create a thick paste. The consistency should be similar to toothpaste.
- Apply the Paste: Apply the baking soda paste to the rusty areas of your tools.
- Scrub the Rust: Use a wire brush or steel wool to scrub the rust away. Apply firm pressure and work in circular motions.
- Rinse and Dry: Rinse the tools thoroughly with water to remove any remaining baking soda and rust particles. Dry them completely with a clean cloth.
- Apply Protective Oil: Apply a thin coat of oil to protect the tools from future rust.
Method 3: Lemon Juice and Salt
The citric acid in lemon juice, combined with the abrasive action of salt, can effectively dissolve and scrub away rust.
Step-by-Step Guide to Lemon Juice and Salt
- Prepare the Lemon Juice and Salt Mixture: Sprinkle salt generously over the rusty areas of your tools. Then, squeeze lemon juice over the salt.
- Let it Sit: Allow the lemon juice and salt mixture to sit for 2-3 hours.
- Scrub the Rust: Use a wire brush or steel wool to scrub the rust away.
- Rinse and Dry: Rinse the tools thoroughly with water and dry them completely.
- Apply Protective Oil: Apply a thin coat of oil to protect the tools from future rust.
Method 4: Chemical Rust Removers
Chemical rust removers are formulated to dissolve rust quickly and effectively. These products typically contain acids that react with the rust, breaking it down into a soluble form.
Types of Chemical Rust Removers
- Phosphoric Acid-Based Removers: These are effective at dissolving rust and leaving a protective phosphate coating on the metal.
- Oxalic Acid-Based Removers: These are powerful rust removers that can be used on heavily rusted tools.
- Citric Acid-Based Removers: These are gentler than other chemical removers and are suitable for light rust removal.
Step-by-Step Guide to Using Chemical Rust Removers
- Read the Instructions: Carefully read and follow the manufacturer’s instructions for the specific rust remover you are using.
- Apply the Rust Remover: Apply the rust remover to the rusty areas of your tools, using a brush or cloth.
- Soaking Time: Allow the rust remover to sit for the recommended time, as specified in the instructions.
- Scrub Away the Rust: Use a wire brush or steel wool to scrub away the loosened rust.
- Rinse and Dry: Rinse the tools thoroughly with water and dry them completely.
- Apply Protective Oil: Apply a thin coat of oil to protect the tools from future rust.
Method 5: Electrolysis
Electrolysis is a more advanced method of rust removal that uses an electric current to reverse the oxidation process. This method is particularly effective for heavily rusted tools and can remove rust from hard-to-reach areas.
Setting Up an Electrolysis Rust Removal System
To set up an electrolysis system, you’ll need a plastic container, a rebar (sacrificial metal), washing soda (sodium carbonate), a battery charger, and water.
Step-by-Step Guide to Electrolysis
- Prepare the Electrolyte Solution: Dissolve washing soda in water in the plastic container. Use about 1 tablespoon of washing soda per gallon of water.
- Set Up the Electrodes: Place the rebar (sacrificial metal) around the inside of the container, ensuring it doesn’t touch the tool you’re cleaning.
- Connect the Battery Charger: Connect the positive terminal of the battery charger to the rebar (anode) and the negative terminal to the tool (cathode).
- Submerge the Tool: Submerge the tool in the electrolyte solution, ensuring it doesn’t touch the rebar.
- Turn on the Battery Charger: Turn on the battery charger and allow the electrolysis process to run for several hours, or even overnight for heavily rusted tools.
- Remove and Clean the Tool: After the electrolysis process is complete, remove the tool from the solution and scrub it with a wire brush to remove the loosened rust.
- Rinse and Dry: Rinse the tool thoroughly with water and dry it completely.
- Apply Protective Oil: Apply a thin coat of oil to protect the tool from future rust.
The Role of WD-40 in Rust Removal and Prevention
WD-40 is a versatile product that can be used for both rust removal and prevention. Its penetrating properties allow it to loosen rust particles and its lubricating properties help to protect the metal from future corrosion. While not a dedicated rust converter, WD-40 offers a quick and easy solution for light rust and ongoing maintenance.
How WD-40 Works
WD-40 works by penetrating the rust layer and displacing moisture. This helps to loosen the rust particles and make them easier to remove. It also leaves a thin protective coating on the metal, which helps to prevent future rust formation.
Using WD-40 for Rust Removal
- Apply WD-40: Spray WD-40 generously onto the rusty areas of your tools.
- Let it Sit: Allow the WD-40 to sit for 10-15 minutes to penetrate the rust.
- Scrub the Rust: Use a wire brush or steel wool to scrub the rust away.
- Wipe Clean: Wipe the tools clean with a rag or cloth.
- Reapply for Protection: Reapply a thin coat of WD-40 to protect the tools from future rust.
Using WD-40 for Rust Prevention
Regularly applying WD-40 to your garden tools can help to prevent rust from forming in the first place. After each use, clean your tools and spray them with WD-40 before storing them.
Maintaining Your Garden Tools: Long-Term Rust Prevention
Removing rust is only half the battle. To keep your garden tools in top condition, you need to implement a long-term rust prevention strategy.
Cleaning Your Tools After Each Use
After each use, clean your tools thoroughly to remove any dirt, debris, or moisture. Use a brush or cloth to wipe away any residue. For stubborn dirt, you can use a mild soap and water solution.
Drying Your Tools Completely
Moisture is a major contributor to rust formation. After cleaning your tools, dry them completely with a clean cloth. Pay particular attention to joints and crevices where moisture can accumulate.
Applying Protective Coatings
Applying a protective coating to your tools can help to prevent rust from forming. There are several types of protective coatings available, including:
- Oil-Based Coatings: Linseed oil, mineral oil, and WD-40 are all effective oil-based coatings that can help to protect your tools from rust.
- Wax-Based Coatings: Wax-based coatings provide a durable, water-resistant barrier that can help to prevent rust.
- Rust Inhibitors: Rust inhibitors are chemical compounds that react with the metal surface to form a protective layer that prevents rust.
Proper Storage Techniques
Proper storage is essential for preventing rust. Store your tools in a dry, well-ventilated area. Avoid storing them in damp or humid environments. Hanging your tools on a wall or rack can help to keep them dry and prevent them from coming into contact with moisture on the ground. Consider using a dehumidifier in your storage area to reduce humidity levels.
Sharpening Your Tools Regularly
Keeping your tools sharp not only makes them more efficient but also helps to prevent rust. Dull tools require more force to use, which can damage the metal and make it more susceptible to rust. Sharpen your tools regularly to keep them in top condition.
Expert Tips and Tricks for Rust Removal
Here are some additional expert tips and tricks for removing rust from your garden tools:
- Use a Dremel Tool: A Dremel tool with a wire brush attachment can be used to remove rust from hard-to-reach areas.
- Try a Rust Converter: Rust converters are chemical solutions that convert rust into a stable, inert compound that can be painted over.
- Use Naval Jelly: Naval jelly is a thick, acidic gel that can be used to remove rust from vertical surfaces.
- Protect Wooden Handles: When cleaning metal parts, protect wooden handles with masking tape to prevent them from being damaged by cleaning solutions.
- Consider Professional Restoration: For valuable or antique tools, consider professional restoration services.
Q&A: Addressing Common Concerns About Cleaning Rust Off Garden Tools
- Q: Is it safe to use harsh chemicals on my garden tools?
A: While effective, harsh chemicals should be used with caution. Always wear protective gear (gloves, eye protection) and ensure proper ventilation. Consider natural alternatives like vinegar or baking soda for a safer approach.
- Q: How often should I clean my garden tools to prevent rust?
A: Ideally, clean your tools after each use. At a minimum, clean them thoroughly at the end of each gardening season before storing them for the winter.
- Q: What’s the best way to store my garden tools to prevent rust?
A: Store tools in a dry, well-ventilated area. Hanging them on a wall or rack prevents moisture accumulation. Applying a protective oil or wax coating before storage is also highly recommended.
- Q: Can I use steel wool on all types of metal?
A: Steel wool can be abrasive and may scratch softer metals. Test in an inconspicuous area first. Consider using nylon scrubbing pads or gentler abrasives for delicate surfaces.
- Q: My tools have deep pitting rust. Can they be saved?
A: Deep pitting rust can be challenging, but not always a lost cause. Electrolysis or professional restoration may be necessary. Assess the structural integrity of the tool before investing time and resources.
- Q: What type of oil is best for protecting my garden tools from rust?
A: Linseed oil is a popular choice for its protective and penetrating properties. Mineral oil and WD-40 are also effective options. Choose an oil that is specifically designed for metal protection.
- Q: Can I use a dishwasher to clean my garden tools?
A: While convenient, dishwashers can be harsh on metal tools. The high heat and detergents can damage protective coatings and accelerate rust formation. Hand washing is generally recommended.
- Q: How do I clean rust off tools with wooden handles?
A: Protect the wooden handle with masking tape before cleaning the metal parts. Avoid soaking the entire tool in water or cleaning solutions, as this can damage the wood. Dry the handle thoroughly after cleaning.
- Q: Is it worth investing in rust-resistant garden tools?
A: Yes, investing in tools made from stainless steel or other rust-resistant materials can significantly reduce the risk of rust formation and extend the lifespan of your tools. However, even rust-resistant tools require proper care and maintenance.
- Q: What are the signs that a garden tool is beyond saving from rust?
A: If the tool has significant structural damage due to rust, such as large holes or cracks, or if the metal is severely weakened, it may be beyond repair. Consider replacing the tool for safety and efficiency.
Conclusion: Revitalize Your Garden Tools and Extend Their Lifespan
Mastering how to clean rust off garden tools is an essential skill for any gardener. By understanding the causes of rust, employing effective cleaning methods, and implementing preventative measures, you can keep your tools in top condition and extend their lifespan for years to come. We’ve explored a range of techniques, from natural remedies like vinegar and baking soda to more advanced methods like electrolysis, giving you the knowledge to tackle any rust situation. Remember that consistent maintenance and proper storage are key to preventing rust from forming in the first place. Now that you’re equipped with this comprehensive guide, take action to revitalize your garden tools and ensure they’re always ready for your next gardening adventure. Share your experiences with how to clean rust off garden tools in the comments below!
