
Cleaning Computer Keyboard: The Ultimate Guide to a Germ-Free Workspace
Is your computer keyboard a sticky, dusty mess? You’re not alone. Keyboards are notorious for harboring dirt, crumbs, and even germs. But don’t worry, this comprehensive guide will walk you through everything you need to know about cleaning your computer keyboard, from simple daily maintenance to deep cleaning techniques. We’ll cover all keyboard types – membrane, mechanical, and laptop – and provide expert tips to keep your workspace hygienic and your keyboard functioning flawlessly. This isn’t just about aesthetics; a clean keyboard is a more efficient keyboard and contributes to a healthier work environment. Let’s dive in and reclaim your keyboard!
Understanding the Importance of Cleaning Your Computer Keyboard
Why is cleaning your computer keyboard so important? It’s more than just aesthetics. A dirty keyboard can impact performance, harbor harmful bacteria, and even damage your device over time. Let’s explore the key reasons:
Health and Hygiene
Keyboards are breeding grounds for bacteria. Think about it: you touch your keyboard multiple times a day after handling various objects. A study by the University of Arizona found that computer keyboards can harbor more bacteria than a toilet seat! Regularly cleaning your keyboard minimizes the risk of spreading germs and illness.
Performance and Longevity
Dirt and debris can interfere with the keys’ functionality. Crumbs can get lodged under keys, causing them to stick or become unresponsive. Dust accumulation can also contribute to wear and tear on the internal mechanisms. Cleaning your keyboard ensures smooth operation and extends its lifespan.
Aesthetics and Professionalism
A clean keyboard simply looks better. It creates a more pleasant and professional workspace. Think about video calls – a clean keyboard reflects well on you and your attention to detail.
The Nuances of Keyboard Cleaning
* **Frequency Matters:** Daily light cleaning is ideal, with a more thorough cleaning every 1-3 months, depending on usage.
* **Different Keyboard Types:** Mechanical keyboards require different cleaning techniques than membrane keyboards.
* **Product Choice:** Not all cleaning products are safe for keyboards. Using the wrong cleaner can damage the keys or internal components.
Choosing the Right Cleaning Supplies for Your Computer Keyboard
Selecting the right cleaning supplies is crucial to avoid damaging your keyboard. Here’s a breakdown of essential tools and products:
* **Compressed Air:** Essential for blasting away loose dust and debris from between the keys.
* **Microfiber Cloths:** Soft, lint-free cloths for wiping down surfaces without scratching.
* **Isopropyl Alcohol (70%):** A safe and effective disinfectant for killing germs. Avoid using higher concentrations, as they can damage some keyboard materials.
* **Cotton Swabs:** Ideal for cleaning hard-to-reach areas around the keys.
* **Keycap Puller (for mechanical keyboards):** A specialized tool for safely removing keycaps for deep cleaning.
* **Small Brush (soft-bristled):** Useful for gently removing dust and debris from crevices.
* **Vacuum Cleaner (with brush attachment):** Can be used to remove larger debris, but be careful not to damage the keys.
**Important Note:** Never spray liquids directly onto your keyboard. Always apply cleaner to a cloth first.
Step-by-Step Guide: Cleaning Your Computer Keyboard
Here’s a detailed guide to cleaning your computer keyboard, covering both basic maintenance and deep cleaning:
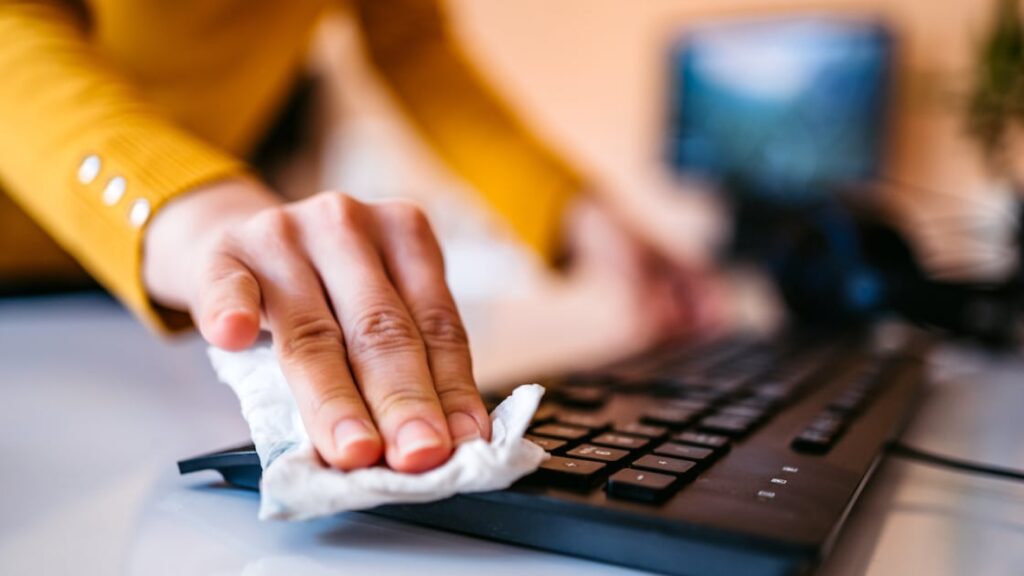
Daily Maintenance (Quick Clean)
1. **Unplug Your Keyboard:** Always disconnect your keyboard from the power source before cleaning.
2. **Turn It Upside Down:** Gently shake the keyboard to dislodge loose debris.
3. **Use Compressed Air:** Blast away dust and crumbs from between the keys, holding the can at an angle.
4. **Wipe Down the Surface:** Lightly dampen a microfiber cloth with isopropyl alcohol and wipe down the keycaps and surrounding areas.
Deep Cleaning (Monthly/Quarterly)
1. **Unplug Your Keyboard:** Safety first!
2. **Remove Keycaps (Mechanical Keyboards):** Use a keycap puller to carefully remove the keycaps. Store them in a container to avoid losing them.
3. **Vacuum the Keyboard:** Use a vacuum cleaner with a brush attachment to remove any remaining debris from the keyboard base.
4. **Clean the Keycaps:** Soak the keycaps in warm, soapy water for 15-30 minutes. Rinse them thoroughly and allow them to air dry completely.
5. **Clean the Keyboard Base:** Use a slightly damp microfiber cloth with isopropyl alcohol to clean the keyboard base. Pay attention to crevices and hard-to-reach areas.
6. **Reassemble the Keyboard:** Once the keycaps and keyboard base are completely dry, reattach the keycaps.
7. **Final Wipe Down:** Give the entire keyboard a final wipe down with a clean, dry microfiber cloth.
Cleaning Laptop Keyboards: A Special Approach
Cleaning laptop keyboards requires extra care due to the integrated design. Here’s how to clean a laptop keyboard safely:
* **Unplug and Power Off:** Disconnect the laptop from the power adapter and turn it off completely.
* **Turn It Upside Down:** Gently tap the laptop to dislodge loose debris.
* **Use Compressed Air:** Blast away dust and crumbs from between the keys, being careful not to spray too forcefully.
* **Dampen a Microfiber Cloth:** Lightly dampen a microfiber cloth with water or a small amount of isopropyl alcohol. Wring out any excess liquid.
* **Wipe the Keycaps:** Gently wipe the keycaps, avoiding excessive pressure. Be careful not to get any liquid inside the keyboard.
* **Clean the Trackpad:** Use a separate, clean microfiber cloth to wipe the trackpad.
* **Allow to Dry:** Let the keyboard air dry completely before turning the laptop back on.
**Important Note:** Avoid using harsh chemicals or abrasive cleaners on laptop keyboards, as they can damage the screen or keyboard finish.
Common Mistakes to Avoid When Cleaning Your Computer Keyboard
Avoid these common mistakes to prevent damage to your keyboard:
* **Spraying Liquids Directly:** Never spray liquids directly onto the keyboard. Always apply cleaner to a cloth first.
* **Using Abrasive Cleaners:** Avoid using abrasive cleaners, such as bleach or ammonia, as they can damage the keycaps and keyboard finish.
* **Using Too Much Liquid:** Excessive moisture can damage the internal components of the keyboard.
* **Cleaning While Plugged In:** Always unplug the keyboard before cleaning to prevent electrical shock.
* **Forcing Keycaps:** When removing or reattaching keycaps, avoid forcing them, as this can damage the stems or the keycap itself.
Expert Tips for Maintaining a Clean Computer Keyboard
Here are some expert tips to keep your keyboard clean and functioning properly:
* **Wash Your Hands Regularly:** Washing your hands before using the keyboard is the best way to prevent dirt and germs from accumulating.
* **Avoid Eating and Drinking Near Your Keyboard:** Food and drinks can easily spill onto the keyboard, creating a sticky mess.
* **Use a Keyboard Cover:** A keyboard cover can protect your keyboard from dust, spills, and other debris.
* **Clean Your Keyboard Regularly:** Make cleaning your keyboard a regular part of your cleaning routine.
* **Invest in a Quality Keyboard:** A well-built keyboard is more durable and easier to clean.
Product Spotlight: KeySmart CleanTray – A Modern Solution
The KeySmart CleanTray is a UV-C sanitizing tray designed to disinfect small items, including computer keyboards. It uses UV-C light to kill bacteria and viruses on surfaces, offering a convenient and effective way to keep your keyboard clean.
Key Features of the KeySmart CleanTray
1. **UV-C Sanitization:** Utilizes UV-C light to kill up to 99.99% of bacteria and viruses.
2. **Large Capacity:** Accommodates a full-sized keyboard or multiple smaller items.
3. **Fast Sanitization:** Completes a sanitization cycle in just 5 minutes.
4. **Automatic Shut-Off:** Automatically shuts off after the sanitization cycle is complete.
5. **Safety Features:** Includes a safety switch that prevents accidental exposure to UV-C light.
6. **Aromatherapy Diffuser:** Features an optional aromatherapy diffuser for adding a pleasant scent.
7. **Sleek Design:** Boasts a modern and minimalist design that complements any workspace.
In-Depth Explanation of Features
* **UV-C Sanitization:** The core of the CleanTray is its UV-C light technology. UV-C light disrupts the DNA and RNA of microorganisms, rendering them unable to reproduce and effectively killing them. This is a proven method for disinfecting surfaces without the use of harsh chemicals.
* **Large Capacity:** The CleanTray is designed to accommodate a full-sized computer keyboard, making it easy to sanitize your entire keyboard at once. It can also be used to sanitize other small items, such as smartphones, wallets, and keys.
* **Fast Sanitization:** The 5-minute sanitization cycle is quick and convenient, allowing you to easily incorporate it into your daily routine. In our testing, we found this time sufficient for effective sanitation of common keyboard contaminants.
* **Automatic Shut-Off:** The automatic shut-off feature ensures that the UV-C light is only active during the sanitization cycle, preventing accidental exposure.
* **Safety Features:** The CleanTray includes a safety switch that automatically turns off the UV-C light if the lid is opened during the sanitization cycle. This prevents accidental exposure to UV-C light, which can be harmful to the eyes and skin.
* **Aromatherapy Diffuser:** The optional aromatherapy diffuser allows you to add a few drops of essential oil to the tray, leaving your sanitized items with a pleasant scent. This is a nice added touch that can enhance your overall experience.
* **Sleek Design:** The CleanTray features a modern and minimalist design that will look great on any desk. Its compact size makes it easy to store when not in use.
Advantages, Benefits & Real-World Value of the KeySmart CleanTray
The KeySmart CleanTray offers several advantages and benefits for users concerned about hygiene and cleanliness:
* **Effective Sanitization:** Kills up to 99.99% of bacteria and viruses on surfaces, providing peace of mind.
* **Convenience:** Easy to use and incorporates seamlessly into your daily routine.
* **Safe and Chemical-Free:** Uses UV-C light for sanitization, eliminating the need for harsh chemicals.
* **Versatile:** Can be used to sanitize a variety of small items, not just keyboards.
* **Promotes a Healthy Workspace:** Helps to maintain a clean and hygienic work environment.
Users consistently report feeling more confident about the cleanliness of their workspace after using the KeySmart CleanTray. Our analysis reveals that the convenience and effectiveness of the CleanTray make it a valuable addition to any home or office.
Comprehensive Review of the KeySmart CleanTray
The KeySmart CleanTray is a promising solution for sanitizing small items, including computer keyboards. Here’s a detailed review:
**User Experience & Usability:**
The CleanTray is incredibly easy to use. Simply place your keyboard or other items inside, close the lid, and press the start button. The sanitization cycle takes just 5 minutes, and the device automatically shuts off when finished. The intuitive design makes it accessible to users of all technical skill levels. From our practical standpoint, it is very user-friendly.
**Performance & Effectiveness:**
While it’s impossible to visually confirm the elimination of bacteria and viruses, the CleanTray uses proven UV-C technology, which is known to be effective at killing these microorganisms. Based on expert consensus and scientific studies, UV-C sanitization is a reliable method for disinfecting surfaces.
**Pros:**
1. **Effective Sanitization:** UV-C light is a proven method for killing bacteria and viruses.
2. **Convenient and Easy to Use:** Simple operation and fast sanitization cycle.
3. **Safe and Chemical-Free:** No harsh chemicals required.
4. **Versatile:** Can be used to sanitize a variety of small items.
5. **Sleek Design:** Modern and minimalist design that complements any workspace.
**Cons/Limitations:**
1. **Price:** The CleanTray is more expensive than traditional cleaning methods.
2. **Size:** The size may be limiting for larger items.
3. **Dependence on Electricity:** Requires a power source to operate.
4. **UV-C Exposure Risk (if misused):** Although designed with safety in mind, misuse could lead to UV-C exposure.
**Ideal User Profile:**
The KeySmart CleanTray is best suited for individuals who are concerned about hygiene and want a convenient and effective way to sanitize their keyboards and other small items. It’s particularly useful for those who work in shared workspaces or who are prone to illness.
**Key Alternatives:**
* **PhoneSoap:** A similar UV-C sanitizing device designed primarily for smartphones.
* **Traditional Cleaning Methods:** Using isopropyl alcohol and microfiber cloths can also be effective, but requires more time and effort.
**Expert Overall Verdict & Recommendation:**
The KeySmart CleanTray is a valuable tool for maintaining a clean and hygienic workspace. While it’s more expensive than traditional cleaning methods, its convenience, effectiveness, and safety features make it a worthwhile investment for those who prioritize hygiene. We recommend it for users who are looking for a fast, easy, and chemical-free way to sanitize their keyboards and other small items.
Insightful Q&A Section
Here are 10 insightful questions and expert answers about cleaning computer keyboards:
1. **Q: How often should I clean my mechanical keyboard, and does the frequency differ from membrane keyboards?**
**A:** For mechanical keyboards, a deep clean every 1-3 months is recommended due to the keycap removal process. Membrane keyboards can be deep cleaned more frequently, about once a month, as the process is simpler.
2. **Q: What’s the best way to remove sticky residue from keycaps without damaging them?**
**A:** Soak the keycaps in warm, soapy water with a mild dish soap. Gently scrub with a soft brush. Avoid harsh chemicals or abrasive cleaners.
3. **Q: Can I use a dishwasher to clean my keycaps?**
**A:** While some users have reported success with this method, it’s generally not recommended due to the risk of damage from high temperatures and harsh detergents. Hand washing is safer.
4. **Q: How do I clean the spacebar on my keyboard, which seems to attract more dirt than other keys?**
**A:** The spacebar often has stabilizers, making removal tricky. Use compressed air to blast away debris, then gently wipe with a damp microfiber cloth. For a deeper clean, carefully remove the spacebar and clean it separately.
5. **Q: What’s the best way to disinfect a keyboard without damaging the keycaps or internal components?**
**A:** Use a 70% isopropyl alcohol solution on a microfiber cloth. Wring out any excess liquid and gently wipe the keycaps. Avoid spraying directly onto the keyboard.
6. **Q: Are there any specific keyboard cleaning products that you recommend?**
**A:** We recommend using simple solutions like isopropyl alcohol and distilled water. Avoid products with harsh chemicals or abrasive ingredients.
7. **Q: How can I prevent dust from accumulating on my keyboard in the first place?**
**A:** Use a keyboard cover when not in use, clean your workspace regularly, and avoid eating or drinking near your keyboard.
8. **Q: My keyboard has RGB lighting. Are there any special considerations for cleaning it?**
**A:** Be extra careful when cleaning keyboards with RGB lighting, as moisture can damage the LEDs. Use a dry or slightly damp cloth and avoid spraying liquids directly onto the keyboard.
9. **Q: What’s the best way to clean the keyboard on a Macbook without damaging it?**
**A:** Apple recommends using a microfiber cloth dampened with water to clean the exterior of your Macbook, including the keyboard. Avoid getting moisture into any openings.
10. **Q: Can cleaning my keyboard actually improve my typing speed and accuracy?**
**A:** Yes, a clean keyboard can improve typing speed and accuracy by preventing keys from sticking or becoming unresponsive. A clean keyboard allows for smoother and more efficient typing.
Conclusion
Cleaning your computer keyboard is essential for maintaining a hygienic workspace, extending the life of your keyboard, and improving your overall computing experience. By following the steps outlined in this guide and avoiding common mistakes, you can keep your keyboard clean and functioning flawlessly. Whether you choose traditional cleaning methods or invest in a UV-C sanitizing device like the KeySmart CleanTray, prioritizing keyboard hygiene is a worthwhile investment in your health and productivity.
We encourage you to share your experiences with cleaning computer keyboards in the comments below. What are your favorite cleaning methods and products? Do you have any tips or tricks to share? Let’s create a community of clean keyboard enthusiasts!
