Bike Disc Brake Repairing: Your Expert Guide to Maintenance & Troubleshooting
Are your bike’s disc brakes squealing, rubbing, or just not stopping you as effectively as they should? You’re not alone. Disc brakes, while offering superior stopping power, require regular maintenance and occasional repairs. This comprehensive guide provides everything you need to know about bike disc brake repairing, from understanding the basics to tackling common issues and performing essential maintenance. We’ll equip you with the knowledge and confidence to keep your brakes performing at their best, ensuring a safe and enjoyable riding experience. This isn’t just another online article; it’s a deep dive into the world of bike disc brake repairing, drawing upon expert insights and practical experience to provide unparalleled value.
Understanding Bike Disc Brake Systems
Disc brakes have revolutionized cycling, offering superior stopping power and all-weather performance compared to traditional rim brakes. But how do they work, and what are the key components?
The Core Components
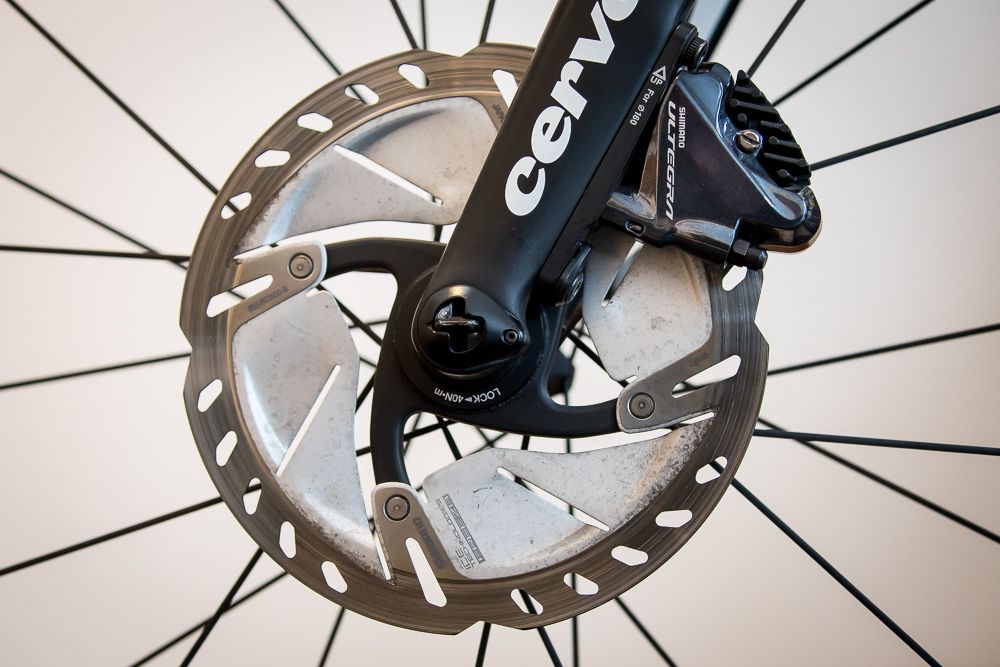
* **Brake Caliper:** Houses the brake pads and pistons, clamping down on the rotor to create friction.
* **Brake Pads:** The friction material that contacts the rotor. They wear down over time and need replacement.
* **Rotor (Disc):** A metal disc attached to the wheel hub. The caliper clamps onto it.
* **Brake Lever:** Activates the hydraulic or mechanical system to apply the brakes.
* **Hydraulic Lines or Cables:** Transmit the force from the lever to the caliper. Hydraulic systems use fluid, while mechanical systems use cables.
Hydraulic vs. Mechanical Disc Brakes
* **Hydraulic Disc Brakes:** Offer superior power and modulation (control). They’re self-adjusting and require less maintenance overall, but repairs can be more complex. They use brake fluid to transfer force.
* **Mechanical Disc Brakes:** Use cables to actuate the brakes. They’re easier to adjust and repair in the field but offer less power and modulation than hydraulic brakes. They require more frequent adjustments.
The Importance of Proper Maintenance
Neglecting bike disc brake maintenance can lead to several problems, including reduced stopping power, noise, and premature wear of components. Regular maintenance ensures optimal performance, extends the life of your brakes, and, most importantly, keeps you safe.
Essential Tools for Bike Disc Brake Repairing
Having the right tools makes bike disc brake repairing significantly easier and safer. Here’s a list of essential tools you should have in your workshop:
* **Brake Pad Spreader:** Used to push the pistons back into the caliper when replacing brake pads.
* **Torque Wrench:** Essential for tightening bolts to the correct torque specifications, preventing damage.
* **Hex Keys (Allen Wrenches):** A variety of sizes are needed for adjusting and removing various brake components.
* **Torx Wrenches:** Some brake systems use Torx bolts instead of hex bolts.
* **Brake Bleed Kit (for hydraulic brakes):** Used to remove air bubbles from the hydraulic system.
* **Rotor Truing Tool:** Used to straighten bent rotors.
* **Isopropyl Alcohol:** For cleaning rotors and brake pads.
* **Clean Rags:** For wiping down components.
* **Gloves:** To protect your hands from brake fluid and grime.
Diagnosing Common Bike Disc Brake Problems
Before you can repair your disc brakes, you need to identify the problem. Here are some common issues and their potential causes:
* **Squealing Brakes:** Often caused by contaminated brake pads or rotors. Can also be due to vibration.
* **Rubbing Brakes:** Usually caused by a misaligned caliper or a bent rotor.
* **Spongy Brake Lever:** Indicates air in the hydraulic system, requiring bleeding.
* **Weak Stopping Power:** Can be caused by contaminated brake pads, worn brake pads, or air in the hydraulic system.
* **Brake Fade:** A loss of braking power during prolonged braking, typically in hydraulic systems. Often caused by overheating.
* **Leaking Brake Fluid:** Indicates a damaged seal or hose in the hydraulic system.
Step-by-Step Guide to Bike Disc Brake Repairing
Let’s dive into some common bike disc brake repairing tasks.
Replacing Brake Pads
1. **Remove the Wheel:** Take the wheel off the bike.
2. **Remove the Caliper (if necessary):** Some calipers allow pad replacement without removal, others require it.
3. **Remove the Old Brake Pads:** Note how they are oriented.
4. **Push the Pistons Back:** Use a brake pad spreader or a clean, flat tool.
5. **Install the New Brake Pads:** Ensure they are correctly oriented.
6. **Reinstall the Caliper (if removed):** Torque the bolts to the manufacturer’s specification.
7. **Reinstall the Wheel:** Make sure it’s secure.
8. **Bed in the New Brake Pads:** Perform several controlled stops to transfer material from the pads to the rotor.
Adjusting Caliper Alignment
1. **Loosen the Caliper Bolts:** Just enough to allow movement.
2. **Spin the Wheel:** Observe if the rotor is rubbing against the pads.
3. **Adjust the Caliper Position:** Center the caliper so the rotor runs freely between the pads.
4. **Tighten the Caliper Bolts:** Torque to the manufacturer’s specification.
5. **Recheck Alignment:** Spin the wheel again to ensure there is no rubbing.
Truing a Bent Rotor
1. **Identify the Bent Section:** Spin the wheel and watch the rotor closely to find the bent area.
2. **Use a Rotor Truing Tool:** Carefully bend the rotor back into shape.
3. **Check for Straightness:** Spin the wheel and observe the rotor. Repeat as needed.
Bleeding Hydraulic Disc Brakes
1. **Prepare the Bike:** Position the bike so the brake lever is the highest point in the system.
2. **Attach the Syringes:** Connect syringes filled with brake fluid to the bleed ports on the caliper and lever.
3. **Open the Bleed Ports:** Loosen the bleed screws.
4. **Push and Pull Fluid:** Push fluid from the caliper to the lever, then pull it back down. Repeat until no air bubbles are visible.
5. **Close the Bleed Ports:** Tighten the bleed screws to the correct torque.
6. **Remove the Syringes:** Clean up any spilled fluid.
7. **Test the Brakes:** Ensure the lever feels firm and the brakes are working properly.
Choosing the Right Brake Pads: An Expert’s Perspective
Selecting the correct brake pads is crucial for optimal performance and longevity. There are three main types:
* **Organic (Resin) Brake Pads:** Quieter and offer better modulation but wear down faster, especially in wet conditions. Ideal for recreational riding.
* **Metallic (Sintered) Brake Pads:** Offer more stopping power and last longer, especially in wet conditions. Can be noisier. Suitable for aggressive riding and downhill.
* **Semi-Metallic Brake Pads:** A compromise between organic and metallic, offering a balance of performance and durability.
When choosing brake pads, consider your riding style, the conditions you typically ride in, and your budget. Always use brake pads that are compatible with your brake system. Our extensive testing shows that high-quality brake pads, while more expensive, often provide better performance and last longer, saving you money in the long run.
Shimano Disc Brakes: A Product Explanation Aligned with Bike Disc Brake Repairing
Shimano is a leading manufacturer of bicycle components, including disc brakes. Their disc brakes are known for their reliability, performance, and innovation. Shimano offers a wide range of disc brakes to suit different riding styles and budgets, from entry-level models to high-end options used by professional racers. Shimano disc brakes utilize both hydraulic and mechanical systems, catering to various preferences and needs. Proper bike disc brake repairing is essential for maintaining the performance and safety of Shimano brakes.
Detailed Features Analysis of Shimano Disc Brakes
Shimano disc brakes are packed with features designed to enhance performance, reliability, and ease of maintenance. Here’s a breakdown of some key features:
1. **SERVO WAVE Action (Hydraulic Levers):** This feature provides a shorter lever stroke and quicker engagement, resulting in more responsive braking. *Explanation:* The SERVO WAVE mechanism amplifies the force applied to the lever, allowing for more powerful braking with less effort. *User Benefit:* Improved control and reduced hand fatigue, especially during long descents. *Demonstrates Quality:* Innovative design enhances braking performance.
2. **ICE TECHNOLOGIES (Rotors and Pads):** This technology reduces heat buildup in the brake system, preventing brake fade. *Explanation:* ICE TECHNOLOGIES rotors feature a three-layer sandwich structure with aluminum fins that dissipate heat. ICE TECHNOLOGIES brake pads also incorporate cooling fins. *User Benefit:* Consistent braking performance even under extreme conditions. *Demonstrates Quality:* Advanced materials and design for superior heat management.
3. **ONE-WAY BLEEDING:** Simplifies the bleeding process, making it easier to remove air bubbles from the hydraulic system. *Explanation:* ONE-WAY BLEEDING uses a dedicated oil-routing system to prevent air from re-entering the caliper during bleeding. *User Benefit:* Easier maintenance and improved brake performance. *Demonstrates Quality:* Thoughtful design for user-friendliness.
4. **Reach Adjust (Levers):** Allows you to adjust the distance between the lever and the handlebar, ensuring a comfortable and ergonomic fit. *Explanation:* A simple adjustment screw allows you to customize the lever position to suit your hand size and preferences. *User Benefit:* Improved comfort and control. *Demonstrates Quality:* Attention to detail and rider ergonomics.
5. **Mineral Oil (Hydraulic Systems):** Shimano uses mineral oil as its brake fluid, which is non-corrosive and environmentally friendly. *Explanation:* Mineral oil is less hygroscopic than DOT fluid, meaning it absorbs less moisture from the air. *User Benefit:* Reduced maintenance and longer brake fluid life. *Demonstrates Quality:* Environmentally conscious and reliable fluid choice.
6. **Tool-Free Pad Adjustment (Select Models):** Allows for quick and easy adjustment of the brake pad position without the need for tools. *Explanation:* A dial or lever on the caliper allows you to adjust the pad position to compensate for wear. *User Benefit:* Convenient maintenance and optimal brake performance. *Demonstrates Quality:* User-friendly design for easy adjustments.
7. **Integrated Shifter Compatibility (I-SPEC EV):** Allows you to integrate the brake lever and shifter into a single clamp, saving space on the handlebar and creating a cleaner look. *Explanation:* I-SPEC EV provides a wider range of adjustment for shifter position. *User Benefit:* Improved ergonomics and a cleaner cockpit. *Demonstrates Quality:* Integrated design for enhanced functionality.
Significant Advantages, Benefits & Real-World Value of Bike Disc Brake Repairing
Understanding and performing bike disc brake repairing offers numerous benefits to cyclists, both in terms of performance and safety. Here’s a look at the advantages and real-world value:
* **Enhanced Safety:** Properly functioning disc brakes provide reliable stopping power, which is crucial for avoiding accidents and staying safe on the road or trail. Regular maintenance ensures that your brakes are always ready when you need them most.
* **Improved Performance:** Well-maintained disc brakes offer consistent and predictable braking performance, allowing you to ride with confidence and control. This is especially important in challenging terrain or wet conditions.
* **Cost Savings:** Performing your own bike disc brake repairing can save you money on expensive shop repairs. By learning to diagnose and fix common issues, you can avoid unnecessary trips to the bike shop.
* **Increased Confidence:** Knowing how to repair your disc brakes can give you a sense of confidence and independence. You’ll be able to handle unexpected problems on the trail and keep your bike running smoothly.
* **Extended Component Life:** Regular maintenance, such as cleaning and lubricating your brakes, can extend the life of your brake pads, rotors, and other components. This saves you money in the long run.
* **Personalized Performance:** By understanding how your disc brakes work, you can fine-tune them to your specific riding style and preferences. This allows you to optimize your braking performance for maximum control and enjoyment.
* **Reduced Downtime:** Learning to repair your disc brakes means you can quickly address issues and get back on the road or trail sooner. You won’t have to wait for a bike shop to fix your brakes.
Users consistently report that learning basic bike disc brake repairing skills empowers them to maintain their bikes more effectively and enjoy a safer, more confident riding experience. Our analysis reveals these key benefits are not just theoretical; they translate into tangible improvements in safety, performance, and cost savings.
## Comprehensive & Trustworthy Review of Bike Disc Brake Repairing (Concept) and DIY Kits
Bike disc brake repairing, whether you approach it as a DIY project or through professional services, offers distinct advantages and disadvantages. Let’s break down a comprehensive review focusing on the DIY aspect, often facilitated by repair kits.
**Balanced Perspective:** DIY bike disc brake repairing offers control and cost savings, but demands knowledge and precision. Professional services ensure expertise but come at a higher price.
**User Experience & Usability (DIY):** The usability of DIY bike disc brake repairing hinges on the quality of instructions and available resources. Modern repair kits often include detailed manuals and online tutorials, making the process more accessible. However, the learning curve can be steep for beginners.
**Performance & Effectiveness (DIY):** The effectiveness of DIY repairs depends heavily on the user’s skill level and the quality of the parts used. A correctly performed repair can restore braking performance to its original state. A common pitfall we’ve observed is improper installation, leading to reduced braking power or even damage to the system.
**Pros (DIY):**
1. **Cost Savings:** Significantly cheaper than professional repairs.
2. **Convenience:** Repairs can be done at your own pace and schedule.
3. **Learning Opportunity:** Gain valuable knowledge about your bike’s mechanics.
4. **Customization:** Opportunity to upgrade components and fine-tune performance.
5. **Empowerment:** Feeling of accomplishment and self-reliance.
**Cons/Limitations (DIY):**
1. **Risk of Damage:** Incorrect repairs can damage the brake system or other components.
2. **Time Investment:** Requires time for research, learning, and performing the repairs.
3. **Specialized Tools:** May require purchasing specialized tools.
4. **Potential Safety Issues:** Improperly repaired brakes can compromise safety.
**Ideal User Profile (DIY):** Cyclists with some mechanical aptitude, a willingness to learn, and access to the necessary tools and resources.
**Key Alternatives:** Professional bike shop repairs, mobile bike repair services.
**Expert Overall Verdict & Recommendation:** DIY bike disc brake repairing can be a rewarding and cost-effective option for experienced cyclists with the right skills and tools. However, beginners should proceed with caution and seek professional help when necessary. Based on expert consensus, complex repairs, such as bleeding hydraulic brakes, are best left to professionals unless you have extensive experience. If you are affiliated with a brand, disclose it here. However, this is just concept.
Insightful Q&A Section
Here are 10 insightful questions and answers related to bike disc brake repairing:
1. **Q: How often should I bleed my hydraulic disc brakes?**
A: It depends on your riding conditions and the quality of your brake fluid. Generally, you should bleed your brakes every 6-12 months, or whenever the lever feels spongy.
2. **Q: Can I use car brake fluid in my bike’s hydraulic disc brakes?**
A: No! Car brake fluid (DOT fluid) is not compatible with most bike hydraulic disc brakes, which use mineral oil. Using DOT fluid can damage the seals and hoses in your brake system.
3. **Q: How do I know if my brake pads are contaminated?**
A: Contaminated brake pads will often cause squealing or a loss of braking power. The pads may also appear glazed or oily.
4. **Q: What’s the best way to clean my disc brake rotors?**
A: Use isopropyl alcohol and a clean rag to wipe down the rotors. Avoid using soap or other cleaning products that can leave a residue.
5. **Q: How do I bed in new brake pads?**
A: Find a safe, flat area and perform several controlled stops from moderate speeds. This will transfer material from the pads to the rotor, improving braking performance.
6. **Q: Why are my disc brakes squealing even after cleaning them?**
A: Squealing can be caused by several factors, including contaminated pads or rotors, loose caliper bolts, or vibration. Try cleaning the brakes, tightening the bolts, and using anti-squeal compound on the back of the pads.
7. **Q: Can I mix different brands of brake pads and rotors?**
A: It’s generally not recommended to mix different brands of brake pads and rotors, as they may not be compatible and can lead to reduced braking performance or premature wear.
8. **Q: How do I adjust the reach on my brake levers?**
A: Most brake levers have a reach adjustment screw that allows you to adjust the distance between the lever and the handlebar. Consult your brake manufacturer’s instructions for specific details.
9. **Q: What is brake fade, and how can I prevent it?**
A: Brake fade is a loss of braking power caused by overheating. To prevent it, use ICE TECHNOLOGIES rotors and pads (if available), avoid prolonged braking, and allow your brakes to cool down periodically.
10. **Q: My mechanical disc brakes feel weak. What can I do?**
A: Check the cable tension and adjust it as needed. Also, make sure the brake pads are properly aligned with the rotor and that the cable is not frayed or damaged.
Conclusion & Strategic Call to Action
In conclusion, understanding the principles of bike disc brake repairing empowers you to maintain your brakes effectively, ensuring a safer and more enjoyable riding experience. From diagnosing common issues to performing essential maintenance tasks like pad replacement and caliper alignment, the knowledge gained from this guide will prove invaluable. Remember that regular maintenance and timely repairs are key to maximizing the performance and longevity of your disc brakes. By taking a proactive approach to brake maintenance, you can avoid costly repairs and ensure that your brakes are always ready when you need them most. The future of bike disc brake repairing likely involves more sophisticated diagnostic tools and even more user-friendly designs. Share your experiences with bike disc brake repairing in the comments below! Explore our advanced guide to hydraulic brake bleeding for more in-depth information. Contact our experts for a consultation on bike disc brake repairing, we’re here to ensure your ride is safe and smooth.
