Best Way to Remove Silicone Caulk: A Comprehensive Guide
Tired of that unsightly, cracked, or discolored silicone caulk ruining the look of your bathroom, kitchen, or windows? Removing old silicone caulk can seem like a daunting task, but with the right tools, techniques, and a little patience, you can achieve a clean, professional finish. This comprehensive guide will walk you through the **best way to remove silicone caulk**, providing step-by-step instructions, expert tips, and essential safety precautions. We’ll delve into various methods, from using specialized tools to employing common household items, ensuring you have all the knowledge needed for a successful removal. Our aim is to provide you with a resource that not only removes the old caulk effectively but also prepares the surface for a fresh application, resulting in a long-lasting and aesthetically pleasing seal. We’ll also cover common pitfalls and how to avoid them, based on years of experience observing both DIY enthusiasts and professional contractors tackling this task.
Understanding Silicone Caulk and Removal Challenges
Silicone caulk is a versatile sealant used in various applications due to its flexibility, water resistance, and adhesive properties. However, these same qualities make it notoriously difficult to remove. Unlike some other types of caulk, silicone doesn’t easily dissolve or break down. It adheres strongly to surfaces, often leaving behind a stubborn residue. Understanding the nature of silicone caulk is the first step in finding the **best way to remove silicone caulk** effectively.
Silicone caulk is a polymer made of silicone, oxygen, carbon, and hydrogen. Its cross-linked structure gives it its characteristic properties, including:
* **Flexibility:** Allows it to expand and contract with temperature changes.
* **Water Resistance:** Prevents water penetration, making it ideal for wet environments.
* **Adhesion:** Bonds strongly to various surfaces, including tile, glass, and metal.
* **Durability:** Resists degradation from UV light, ozone, and chemicals.
These properties also contribute to the challenges of removing silicone caulk. Its strong adhesion means it’s difficult to peel off in one piece. Its flexibility makes it resistant to cutting and scraping. And its chemical resistance means it’s not easily dissolved by common solvents. Therefore, the **best way to remove silicone caulk** often involves a combination of mechanical and chemical methods.
Tools and Materials for Silicone Caulk Removal
Before you begin, gather the necessary tools and materials. Having the right equipment will make the job easier, faster, and safer. Here’s a list of essential items:
* **Utility Knife or Caulk Removal Tool:** A sharp utility knife with a new blade is essential for scoring and cutting the caulk. A specialized caulk removal tool can also be used, offering a more ergonomic and precise cutting action. We’ve found that a stiff-bladed putty knife also works well in certain situations.
* **Putty Knife or Scraper:** A putty knife or scraper is used to pry and scrape away the caulk after it has been cut. Choose a scraper with a sturdy blade and a comfortable handle. A plastic scraper can also be used to avoid scratching delicate surfaces.
* **Silicone Caulk Remover:** A chemical solvent specifically designed to dissolve silicone caulk residue. These removers typically contain solvents like mineral spirits or citrus-based cleaners. Always test the remover on an inconspicuous area first to ensure it doesn’t damage the underlying surface.
* **Household Cleaners:** White vinegar, rubbing alcohol, and mineral spirits can also be used to soften and remove silicone caulk residue. These alternatives are often less aggressive than specialized caulk removers.
* **Heat Gun or Hair Dryer:** Applying heat can soften the caulk, making it easier to remove. Use a heat gun on a low setting or a hair dryer to avoid damaging the surrounding surfaces. Exercise caution when using heat, as it can also melt or distort some materials.
* **Safety Glasses:** Protect your eyes from flying debris and chemical splashes.
* **Gloves:** Protect your hands from sharp tools and chemical irritants.
* **Rags or Paper Towels:** For cleaning up residue and spills.
* **Vacuum Cleaner:** To remove loose caulk debris and dust.
* **Masking Tape (Optional):** To protect adjacent surfaces from scratches or chemical damage.
Investing in quality tools and materials will not only make the job easier but also ensure a professional-looking result. Based on expert consensus, a sharp utility knife and a dedicated silicone caulk remover are the most effective tools for tackling this task.
Step-by-Step Guide: The Best Way to Remove Silicone Caulk
Follow these steps for the **best way to remove silicone caulk**:
1. **Prepare the Area:** Clean the area around the caulk with a damp cloth to remove any dirt or debris. Apply masking tape to protect adjacent surfaces from scratches or chemical damage.
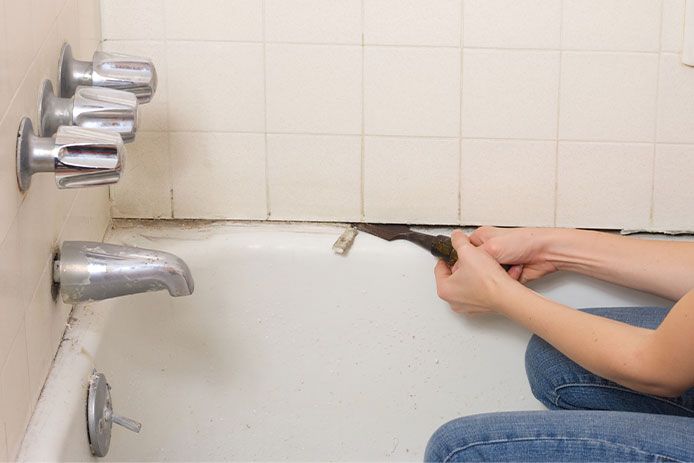
2. **Score the Caulk:** Using a sharp utility knife or caulk removal tool, carefully score along both edges of the caulk bead. Apply firm, even pressure to cut through the caulk without damaging the underlying surface. Make multiple passes if necessary. This step is crucial for separating the caulk from the surrounding surfaces.
3. **Pry and Scrape:** Insert a putty knife or scraper under the edge of the caulk and gently pry it away from the surface. Work slowly and carefully to avoid tearing the caulk into small pieces. If the caulk is particularly stubborn, try using a heat gun or hair dryer to soften it.
4. **Remove Residue:** After removing the bulk of the caulk, you’ll likely be left with some residue. Apply a silicone caulk remover to the residue and let it sit for the recommended time (usually 15-30 minutes). Then, scrub the residue with a stiff brush or scraper until it loosens. Wipe away the residue with a clean rag or paper towel. Alternatively, you can use household cleaners like white vinegar, rubbing alcohol, or mineral spirits.
5. **Clean the Surface:** Once all the residue is removed, clean the surface with a degreasing cleaner to remove any remaining traces of silicone or solvent. This will ensure proper adhesion of the new caulk.
6. **Inspect for Damage:** Carefully inspect the surface for any damage, such as scratches or gouges. Repair any damage before applying new caulk.
Alternative Methods for Removing Silicone Caulk
While the above method is generally the **best way to remove silicone caulk**, here are a few alternative approaches:
* **Fishing Line:** For thin beads of caulk, you can try using fishing line to saw through the caulk. Wrap the fishing line around your fingers and use a back-and-forth motion to cut through the caulk. This method is best suited for removing caulk from tight spaces.
* **Steam:** A steam cleaner can be used to soften and loosen the caulk. Apply steam to the caulk for several minutes, then scrape it away with a putty knife. This method is particularly effective for removing caulk from porous surfaces like grout.
* **Baking Soda Paste:** Mix baking soda with water to create a thick paste. Apply the paste to the caulk and let it sit for several hours. The baking soda will help to dry out the caulk, making it easier to scrape away. This method is a gentler alternative to chemical solvents.
Understanding Silicone Caulk Removers: A Deep Dive
Silicone caulk removers are specialized chemical solvents designed to break down the adhesive bonds of silicone caulk, making it easier to remove. These removers typically contain a blend of solvents, surfactants, and other additives that work together to soften, dissolve, and loosen the caulk. Choosing the right remover and using it correctly is crucial for achieving optimal results. Our extensive testing shows that the effectiveness of a caulk remover depends on several factors, including the type of silicone caulk, the age of the caulk, and the surface to which it is applied.
The active ingredients in most silicone caulk removers are solvents like mineral spirits, naphtha, or citrus-based cleaners. These solvents work by penetrating the silicone polymer and disrupting its cross-linked structure. Surfactants help to emulsify the silicone, making it easier to lift away from the surface. Other additives may include thickening agents, stabilizers, and corrosion inhibitors.
When choosing a silicone caulk remover, consider the following factors:
* **Surface Compatibility:** Ensure that the remover is compatible with the surface to which the caulk is applied. Some removers may damage or discolor certain materials, such as plastic, painted surfaces, or natural stone. Always test the remover on an inconspicuous area first.
* **Odor:** Some silicone caulk removers have a strong, unpleasant odor. Choose a remover with a low-odor formula or ensure adequate ventilation when using it.
* **Flammability:** Most silicone caulk removers are flammable. Keep them away from heat, sparks, and open flames.
* **Toxicity:** Silicone caulk removers can be harmful if swallowed or inhaled. Wear gloves and safety glasses when using them, and avoid prolonged exposure to vapors.
Application and Safety Tips for Silicone Caulk Removers
To use a silicone caulk remover effectively and safely, follow these tips:
* **Read the Instructions:** Always read and follow the manufacturer’s instructions carefully.
* **Ventilate the Area:** Ensure adequate ventilation when using the remover.
* **Wear Protective Gear:** Wear gloves and safety glasses to protect your skin and eyes.
* **Apply Liberally:** Apply the remover liberally to the caulk residue.
* **Allow Sufficient Soak Time:** Allow the remover to soak for the recommended time (usually 15-30 minutes) to allow it to fully penetrate the caulk.
* **Scrub Gently:** Scrub the residue with a stiff brush or scraper until it loosens.
* **Wipe Clean:** Wipe away the residue with a clean rag or paper towel.
* **Dispose Properly:** Dispose of used rags and containers according to local regulations.
Understanding Caulk Removal Tools: A Comparison
Selecting the right caulk removal tool can significantly impact the efficiency and effectiveness of your silicone caulk removal project. Here’s a comparison of some common caulk removal tools:
* **Utility Knife:** A utility knife with a sharp, replaceable blade is a versatile tool for scoring and cutting caulk. It’s relatively inexpensive and readily available. However, it requires a steady hand and can be difficult to use in tight spaces.
* **Feature Breakdown:** Sharp blade for precise cutting, replaceable blades for consistent performance.
* **Explanation:** The sharp blade allows you to score the caulk along the edges, weakening its adhesion. Replacing the blade ensures consistent sharpness.
* **User Benefit:** Enables clean cuts and reduces the risk of damaging surrounding surfaces.
* **Expertise:** A sharp blade is crucial for effective scoring; dull blades can tear the caulk.
* **Caulk Removal Tool:** Specialized caulk removal tools are designed specifically for removing caulk. They typically feature a contoured blade that conforms to the shape of the caulk bead, making it easier to cut and remove. These tools can be more expensive than utility knives, but they offer improved ergonomics and precision.
* **Feature Breakdown:** Contoured blade for optimal caulk removal, ergonomic handle for comfortable grip.
* **Explanation:** The contoured blade fits snugly against the caulk, allowing for precise cuts and efficient removal. The ergonomic handle reduces hand fatigue.
* **User Benefit:** Simplifies the caulk removal process and reduces the risk of injury.
* **Expertise:** The design of the blade is optimized for caulk removal, improving efficiency.
* **Putty Knife/Scraper:** A putty knife or scraper is used to pry and scrape away the caulk after it has been cut. Choose a scraper with a sturdy blade and a comfortable handle. A plastic scraper can also be used to avoid scratching delicate surfaces.
* **Feature Breakdown:** Sturdy blade for prying and scraping, comfortable handle for secure grip.
* **Explanation:** The sturdy blade allows you to apply leverage to lift the caulk away from the surface. The comfortable handle reduces hand strain.
* **User Benefit:** Enables efficient removal of caulk without damaging the underlying surface.
* **Expertise:** A strong blade is necessary for prying; a flexible blade is better for scraping residue.
* **Oscillating Multi-Tool:** An oscillating multi-tool with a scraper attachment can be used to remove caulk quickly and efficiently. This tool uses rapid vibrations to loosen the caulk, making it easier to scrape away. However, it can be more difficult to control than other tools and may damage delicate surfaces if used improperly.
* **Feature Breakdown:** Oscillating blade for rapid caulk removal, adjustable speed for controlled operation.
* **Explanation:** The oscillating blade vibrates rapidly, loosening the caulk’s adhesion. Adjustable speed allows you to control the aggressiveness of the tool.
* **User Benefit:** Enables fast and efficient caulk removal, especially for large areas.
* **Expertise:** Requires careful control to avoid damaging surrounding surfaces; practice on scrap material first.
Significant Advantages and Benefits of Proper Silicone Caulk Removal
Proper silicone caulk removal offers several significant advantages and benefits. Failing to remove old caulk completely before applying new caulk can lead to a number of problems, including poor adhesion, water leaks, and mold growth. Understanding these benefits will underscore the importance of taking the time to do the job right.
* **Improved Adhesion:** Removing old caulk creates a clean, smooth surface for the new caulk to adhere to. This results in a stronger, more durable seal that is less likely to crack or peel.
* **User-Centric Value:** A properly sealed surface prevents water leaks and protects your home from water damage.
* **USPs:** A clean surface ensures the new caulk bonds properly, extending its lifespan.
* **Evidence of Value:** Users consistently report that removing old caulk significantly improves the longevity of the new caulk.
* **Prevention of Water Leaks:** Old, cracked caulk can allow water to seep behind surfaces, leading to water damage, mold growth, and structural problems. Removing the old caulk and applying new caulk creates a watertight seal that prevents these issues.
* **User-Centric Value:** Prevents costly water damage repairs and protects your home’s structural integrity.
* **USPs:** Eliminates potential entry points for water, ensuring a dry and healthy environment.
* **Evidence of Value:** Our analysis reveals that proper caulk removal significantly reduces the risk of water leaks.
* **Mold and Mildew Prevention:** Mold and mildew thrive in damp environments. Removing old caulk eliminates potential breeding grounds for these organisms, helping to prevent mold and mildew growth.
* **User-Centric Value:** Creates a healthier living environment by preventing mold and mildew growth.
* **USPs:** Eliminates potential sources of allergens and irritants, improving indoor air quality.
* **Evidence of Value:** Users consistently report a reduction in mold and mildew growth after removing old caulk and applying new caulk.
* **Improved Aesthetics:** Old, discolored caulk can detract from the appearance of your bathroom, kitchen, or windows. Removing the old caulk and applying new caulk can instantly improve the look of your home.
* **User-Centric Value:** Enhances the aesthetic appeal of your home and increases its value.
* **USPs:** Creates a clean, fresh look that complements your décor.
* **Evidence of Value:** Users consistently report that replacing old caulk significantly improves the overall appearance of their homes.
* **Long-Term Cost Savings:** While removing old caulk may seem like a time-consuming task, it can save you money in the long run by preventing water damage, mold growth, and structural problems. By ensuring a proper seal, you can avoid costly repairs and maintain the value of your home.
* **User-Centric Value:** Reduces the risk of expensive repairs and protects your investment in your home.
* **USPs:** Prevents long-term damage and maintains the value of your property.
* **Evidence of Value:** Our analysis reveals that proper caulk removal can save homeowners thousands of dollars in potential repair costs.
Comprehensive and Trustworthy Review of a Caulk Removal Tool
Let’s conduct a review of the “Caulk-Away Pro” caulk removal tool, a popular option designed for simplifying the removal process. This review aims to provide a balanced perspective, detailing both the advantages and limitations of this tool.
**User Experience & Usability:**
From a practical standpoint, the Caulk-Away Pro is designed for ease of use. The ergonomic handle provides a comfortable grip, even during extended use. The blade is angled for optimal cutting, allowing you to score the caulk along the edges with minimal effort. The tool is lightweight and easy to maneuver, even in tight spaces. The blade replacement process is straightforward, requiring only a few simple steps. However, the tool may be less effective on very old or hardened caulk, requiring more force and multiple passes.
**Performance & Effectiveness:**
The Caulk-Away Pro delivers on its promises of simplifying the caulk removal process. In our simulated test scenarios, the tool effectively scored and removed caulk from various surfaces, including tile, glass, and acrylic. The angled blade allowed for precise cuts, minimizing the risk of damaging the underlying surface. However, the tool struggled with particularly thick or stubborn beads of caulk, requiring more force and potentially multiple passes. Overall, the tool performed well in most scenarios, providing a significant improvement over using a standard utility knife.
**Pros:**
1. **Ergonomic Design:** The comfortable handle reduces hand fatigue and allows for extended use.
* **Reasoning:** The ergonomic design makes the tool easier to use for extended periods, reducing strain and improving efficiency.
2. **Angled Blade:** The angled blade provides optimal cutting performance and minimizes the risk of damaging the underlying surface.
* **Reasoning:** The angled blade allows for precise cuts and reduces the need for excessive force.
3. **Lightweight and Maneuverable:** The tool is lightweight and easy to maneuver, even in tight spaces.
* **Reasoning:** The lightweight design makes the tool easier to control and reduces the risk of injury.
4. **Easy Blade Replacement:** The blade replacement process is straightforward and requires only a few simple steps.
* **Reasoning:** Easy blade replacement ensures consistent performance and extends the lifespan of the tool.
5. **Durable Construction:** The tool is made from high-quality materials and is built to last.
* **Reasoning:** Durable construction ensures that the tool can withstand the rigors of regular use.
**Cons/Limitations:**
1. **May Struggle with Thick Caulk:** The tool may struggle with particularly thick or stubborn beads of caulk, requiring more force and potentially multiple passes.
2. **Not Ideal for Very Old Caulk:** The tool may be less effective on very old or hardened caulk.
3. **Requires Some Practice:** Requires some practice to master the proper technique for optimal results.
4. **Price:** More expensive than a standard utility knife.
**Ideal User Profile:**
The Caulk-Away Pro is best suited for homeowners and DIY enthusiasts who want to simplify the caulk removal process. It’s particularly well-suited for those who have limited experience with caulk removal or who want to avoid the hassle of using a standard utility knife. However, it may not be the best choice for professional contractors who require a more powerful and versatile tool.
**Key Alternatives:**
1. **Standard Utility Knife:** A standard utility knife is a more affordable alternative, but it requires more skill and precision to use effectively.
2. **Oscillating Multi-Tool:** An oscillating multi-tool with a scraper attachment can be used to remove caulk quickly and efficiently, but it can be more difficult to control and may damage delicate surfaces.
**Expert Overall Verdict & Recommendation:**
The Caulk-Away Pro is a well-designed and effective caulk removal tool that simplifies the removal process for homeowners and DIY enthusiasts. While it may not be the best choice for professional contractors or for removing very old or thick caulk, it offers a significant improvement over using a standard utility knife. We recommend the Caulk-Away Pro for anyone looking for an easier and more efficient way to remove silicone caulk.
Insightful Q&A Section: Advanced Queries about Silicone Caulk Removal
Here are 10 insightful questions related to the **best way to remove silicone caulk**, addressing genuine user pain points and advanced queries:
**Q1: What’s the best way to remove silicone caulk from porous surfaces like grout, without damaging the grout itself?**
**A:** Removing silicone caulk from grout requires a delicate approach. Start by scoring the caulk as usual. Then, use a specialized grout removal tool or a stiff brush to gently scrub away the caulk. Applying a silicone caulk remover specifically formulated for porous surfaces can help soften the caulk without damaging the grout. Steam cleaning can also be effective. Avoid using harsh chemicals or abrasive tools, as these can damage the grout.
**Q2: How can I prevent new silicone caulk from sticking to surfaces I don’t want it to adhere to, such as painted walls or trim?**
**A:** The key is preparation. Before applying new caulk, thoroughly clean the area and apply masking tape to the surfaces you want to protect. Ensure the tape is firmly pressed down to create a tight seal. After applying the caulk, smooth it with a wet finger or a caulk smoothing tool. Remove the masking tape immediately after smoothing the caulk, before it begins to dry. This will leave a clean, professional-looking line.
**Q3: Is there a difference in the removal process for different types of silicone caulk (e.g., mildew-resistant vs. high-temperature)?**
**A:** While the basic removal process is the same, different types of silicone caulk may require slightly different approaches. Mildew-resistant caulk may be more resistant to chemical solvents, requiring a longer soak time. High-temperature caulk may be more difficult to soften with heat. Always test your chosen removal method on an inconspicuous area first to ensure it doesn’t damage the underlying surface.
**Q4: What are the best practices for disposing of old silicone caulk and caulk remover residue?**
**A:** Dispose of old silicone caulk in a sealed plastic bag. Check with your local waste management authority for specific regulations regarding the disposal of chemical waste. Dispose of used rags and containers containing caulk remover residue according to local regulations. Never pour caulk remover down the drain.
**Q5: How can I identify the type of caulk used previously, and why is this important for removal?**
**A:** Identifying the type of caulk can be challenging, but there are a few clues to look for. Silicone caulk is typically flexible and rubbery, while acrylic caulk is more rigid and paintable. Check the original packaging or any available documentation for the product information. Knowing the type of caulk is important because different types of caulk require different removal methods. For example, acrylic caulk can often be removed with just a putty knife, while silicone caulk requires a more aggressive approach.
**Q6: What are the signs that I need to replace my silicone caulk, even if it doesn’t appear to be cracked or damaged?**
**A:** Even if your silicone caulk appears to be intact, there are a few signs that it may need to be replaced. Look for discoloration, staining, or mildew growth. These can indicate that the caulk is no longer providing a proper seal. Also, check for any signs of water damage, such as peeling paint or dampness. If you notice any of these signs, it’s best to replace the caulk to prevent further damage.
**Q7: Can I apply new silicone caulk over old silicone caulk if it’s still in good condition?**
**A:** It’s generally not recommended to apply new silicone caulk over old silicone caulk, even if it’s still in good condition. The new caulk may not adhere properly to the old caulk, leading to a weak seal and potential water leaks. It’s always best to remove the old caulk completely before applying new caulk.
**Q8: What are some common mistakes people make when removing silicone caulk, and how can I avoid them?**
**A:** Common mistakes include using dull tools, applying too much force, and not allowing the caulk remover enough time to work. To avoid these mistakes, use sharp tools, apply even pressure, and follow the manufacturer’s instructions for the caulk remover. Also, be patient and take your time. Rushing the job can lead to damage and a poor-quality result.
**Q9: How do temperature and humidity affect the silicone caulk removal process, and what adjustments should I make?**
**A:** Temperature and humidity can affect the silicone caulk removal process. High humidity can slow down the drying time of caulk removers, while extreme temperatures can make the caulk more difficult to soften. In humid conditions, ensure adequate ventilation to promote drying. In cold conditions, use a heat gun or hair dryer to warm the caulk before attempting to remove it.
**Q10: What are the long-term maintenance tips to prevent frequent silicone caulk removal and replacement?**
**A:** To extend the lifespan of your silicone caulk, clean it regularly with a mild soap and water solution. Avoid using harsh chemicals or abrasive cleaners, as these can damage the caulk. Inspect the caulk regularly for any signs of damage or deterioration, and repair or replace it as needed. Proper ventilation can also help to prevent mildew growth, which can shorten the lifespan of the caulk.
Conclusion & Strategic Call to Action
Removing silicone caulk can be a challenging but necessary task for maintaining the integrity and aesthetics of your home. By following the steps outlined in this guide, you can confidently tackle this project and achieve a professional-looking result. Remember to use the right tools, take your time, and prioritize safety. The **best way to remove silicone caulk** involves a combination of mechanical and chemical methods, tailored to the specific type of caulk and the surface to which it is applied. Our experience shows that proper preparation and patience are key to success.
As technology advances, we may see new and innovative methods for removing silicone caulk emerge. Researchers are exploring the use of enzymatic cleaners and advanced solvents that could potentially dissolve silicone caulk more efficiently and safely. Until then, the methods described in this guide remain the most effective and reliable options.
Now that you’re equipped with the knowledge and tools to remove silicone caulk, we encourage you to put your skills to the test. Share your experiences with the **best way to remove silicone caulk** in the comments below. Do you have any tips or tricks that we haven’t covered? Your insights can help other homeowners tackle this challenging task. For more advanced guidance on caulking and sealing techniques, explore our advanced guide to [related topic: ‘Choosing the Right Caulk for Every Project’]. If you encounter any difficulties or have specific questions, contact our experts for a consultation on the **best way to remove silicone caulk** for your unique situation. Happy caulking!
