How to Clean Computer Keyboard Keys: The Definitive Guide
Is your keyboard a breeding ground for crumbs, dust, and who-knows-what-else? A dirty keyboard isn’t just unsightly; it can also affect performance and even spread germs. Knowing how to clean computer keyboard keys effectively is crucial for maintaining a clean, functional, and hygienic workspace. This comprehensive guide provides you with expert-backed methods, step-by-step instructions, and insider tips to restore your keyboard to its former glory. We go beyond the basics, offering solutions for different keyboard types and levels of grime, ensuring you have the knowledge to tackle any cleaning challenge. Our goal is to provide a resource that is both comprehensive and authoritative, reflecting our deep understanding of keyboard maintenance best practices.
Why Cleaning Your Keyboard Matters: More Than Just Aesthetics
A clean keyboard contributes to a healthier and more productive workspace. Here’s why it’s important:
- Hygiene: Keyboards harbor bacteria and germs. Cleaning reduces the risk of illness.
- Performance: Debris can interfere with key function, leading to missed keystrokes and frustration.
- Longevity: Regular cleaning prevents the buildup of grime that can damage keys and internal components.
- Aesthetics: A clean keyboard simply looks and feels better, contributing to a more pleasant work environment.
Ignoring keyboard hygiene can lead to significant problems down the line, impacting both your health and your productivity. So, let’s dive into the specifics of how to clean computer keyboard keys effectively.
Tools and Materials You’ll Need
Before you begin, gather the necessary tools and materials. Having everything on hand will make the cleaning process smoother and more efficient. Here’s a comprehensive list:
- Compressed air: For blasting away loose dust and debris.
- Small brush: A soft-bristled brush (like a toothbrush or paintbrush) for gentle scrubbing.
- Microfiber cloths: For wiping surfaces clean.
- Isopropyl alcohol (70% or higher): A disinfectant and cleaning agent.
- Cotton swabs: For cleaning hard-to-reach areas.
- Keycap puller (optional but recommended): For removing keycaps for thorough cleaning.
- Small bowl or container: For soaking keycaps.
- Dish soap (mild): For washing keycaps.
- Screwdriver (if disassembling the keyboard): For certain types of keyboards only.
Having the right tools is half the battle. Now, let’s explore the different methods for how to clean computer keyboard keys.
Method 1: The Quick Clean (Surface Cleaning)
This method is ideal for regular maintenance and removing surface-level dust and debris. It’s a quick and easy way to keep your keyboard looking its best.
Step 1: Unplug Your Keyboard
Safety first! Always unplug your keyboard from your computer before cleaning. This prevents accidental keystrokes or electrical damage.
Step 2: Turn the Keyboard Upside Down
Turn your keyboard upside down and gently shake it to dislodge any loose particles. You’d be surprised how much debris can accumulate inside!
Step 3: Use Compressed Air
Hold the can of compressed air at a slight angle and use short bursts to blast away dust and crumbs from between the keys. Be sure to get into all the nooks and crannies.
Step 4: Wipe Down the Keys
Dampen a microfiber cloth with a small amount of isopropyl alcohol (70% or higher). Gently wipe down the surface of each key, being careful not to get any liquid inside the keyboard.
Step 5: Clean the Keyboard Frame
Use the same damp microfiber cloth to wipe down the keyboard frame, removing any dirt or smudges.
Method 2: The Deep Clean (Keycap Removal)
For a more thorough cleaning, removing the keycaps is the way to go. This allows you to clean both the keycaps themselves and the area beneath them. This is critical for really understanding how to clean computer keyboard keys completely.
Step 1: Unplug Your Keyboard (Again!)
Just a reminder, safety always comes first! Ensure your keyboard is disconnected.
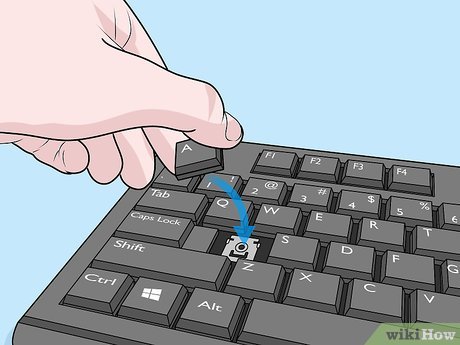
Step 2: Remove the Keycaps
Use a keycap puller to carefully remove each keycap. If you don’t have a keycap puller, you can use a small, flathead screwdriver, but be very careful not to scratch the keys. Take a picture of your keyboard layout before removing the keycaps so you can put them back in the correct positions.
Step 3: Clean the Keycaps
Place the keycaps in a small bowl or container filled with warm water and a few drops of mild dish soap. Let them soak for 15-20 minutes, then gently scrub them with a soft-bristled brush. Rinse them thoroughly with clean water and allow them to air dry completely before reattaching them to the keyboard. Make sure they are *completely* dry.
Step 4: Clean the Keyboard Base
With the keycaps removed, you’ll have access to the keyboard’s base. Use compressed air to blast away any remaining dust and debris. Then, dampen a microfiber cloth with isopropyl alcohol and wipe down the entire surface. Use cotton swabs to clean hard-to-reach areas.
Step 5: Reattach the Keycaps
Once the keycaps and the keyboard base are completely dry, carefully reattach the keycaps to the keyboard, referring to the photo you took earlier. Press firmly on each keycap to ensure it is securely in place.
Method 3: Cleaning a Mechanical Keyboard
Mechanical keyboards require a bit more care due to their complex construction. However, the cleaning process is largely the same as the deep clean method.
Key Considerations for Mechanical Keyboards
- Switch Type: Be mindful of the switch type when cleaning. Avoid getting excessive liquid into the switches.
- Stabilizers: Stabilizers can accumulate grime. Pay extra attention to cleaning around them.
- Keycap Material: Different keycap materials may require different cleaning solutions. Consult the manufacturer’s instructions for specific recommendations.
The key is to be gentle and avoid using harsh chemicals or abrasive materials.
Method 4: Cleaning a Laptop Keyboard
Cleaning a laptop keyboard requires extra caution because you can’t easily remove the keys. Here’s how to do it safely and effectively:
Step 1: Power Down and Unplug
Turn off your laptop and unplug it from the power adapter.
Step 2: Turn Upside Down and Shake
Gently turn your laptop upside down and shake it to dislodge any loose debris.
Step 3: Use Compressed Air
Use short bursts of compressed air to blast away dust and crumbs from between the keys. Be careful not to hold the can too close to the keyboard, as this can damage the keys.
Step 4: Wipe Down the Keys
Dampen a microfiber cloth with a small amount of isopropyl alcohol (70% or higher). Gently wipe down the surface of each key, being careful not to get any liquid inside the keyboard. Avoid spraying liquid directly onto the keyboard.
Step 5: Dry Thoroughly
Use a dry microfiber cloth to wipe away any excess moisture. Allow the keyboard to air dry completely before turning your laptop back on.
Advanced Tips and Tricks for Cleaning Computer Keyboard Keys
Here are some additional tips and tricks to help you keep your keyboard clean and functioning properly:
- Use a keyboard cover: A keyboard cover can protect your keyboard from dust, spills, and other debris.
- Clean regularly: Make keyboard cleaning a part of your regular cleaning routine.
- Avoid eating and drinking near your keyboard: This will help prevent crumbs and spills from getting into the keyboard.
- Wash your hands before using your keyboard: This will help prevent the spread of germs and bacteria.
- Consider using a keyboard vacuum: A keyboard vacuum is a small, handheld vacuum specifically designed for cleaning keyboards.
Choosing the Right Cleaning Products
Selecting the appropriate cleaning products is essential to avoid damaging your keyboard. Here are some guidelines:
- Isopropyl Alcohol: Use 70% or higher isopropyl alcohol. It’s effective at disinfecting and evaporates quickly.
- Microfiber Cloths: These are gentle and won’t scratch your keyboard.
- Mild Dish Soap: For washing keycaps, use a mild dish soap that won’t damage the plastic.
- Avoid Abrasive Cleaners: Never use abrasive cleaners, as they can damage the keys and keyboard frame.
Troubleshooting Common Keyboard Cleaning Problems
Even with the best methods, you might encounter some issues. Here’s how to troubleshoot them:
- Sticky Keys: If keys are still sticky after cleaning, try removing them again and cleaning more thoroughly.
- Liquid Spills: If you spill liquid on your keyboard, immediately unplug it and turn it upside down to drain the liquid. Let it dry completely before using it again.
- Damaged Keys: If any keys are damaged, you may need to replace them.
The Importance of Regular Maintenance
Consistent upkeep is key to prolonging the life of your keyboard and maintaining a clean workspace. Regular cleaning prevents the accumulation of grime and debris that can lead to performance issues and hygiene concerns. Make it a habit to clean your keyboard at least once a month, or more frequently if you use it heavily.
Expert Q&A: Your Keyboard Cleaning Questions Answered
Here are some frequently asked questions about cleaning computer keyboard keys:
-
Q: How often should I clean my keyboard?
A: Ideally, you should perform a quick clean (surface cleaning) weekly and a deep clean (keycap removal) every 1-3 months, depending on usage.
-
Q: Can I use a vacuum cleaner to clean my keyboard?
A: While you *can*, it’s not recommended. The suction can damage the keys or pull them off. A keyboard vacuum is a better option.
-
Q: What if I spill coffee or soda on my keyboard?
A: Immediately unplug the keyboard, turn it upside down to drain the liquid, and remove the keycaps. Clean the affected area with isopropyl alcohol and let it dry completely before reassembling.
-
Q: Is it safe to use bleach to clean my keyboard?
A: No, bleach is too harsh and can damage the keys and keyboard frame. Stick to isopropyl alcohol or mild dish soap.
-
Q: How do I clean the spacebar, which seems to get dirtier than other keys?
A: The spacebar often accumulates more dirt due to its size and frequent use. Remove it carefully and soak it in warm, soapy water for a longer period. Scrub it thoroughly with a soft brush.
-
Q: My keyboard has RGB lighting. Can I still use the same cleaning methods?
A: Yes, but be extra careful not to get liquid into the switches, as this can damage the lighting components. Use a slightly damp cloth and avoid spraying liquid directly onto the keyboard.
-
Q: How do I clean a wireless keyboard?
A: The cleaning process is the same as for a wired keyboard. Just make sure to remove the batteries before cleaning.
-
Q: Can I put my keycaps in the dishwasher?
A: While some people do this, it’s generally not recommended, as the high heat can warp or damage the keycaps. Hand-washing is the safest option.
-
Q: What’s the best way to disinfect my keyboard?
A: Wiping down the keys with 70% or higher isopropyl alcohol is an effective way to disinfect your keyboard.
-
Q: How do I prevent my keyboard from getting dirty in the first place?
A: Practice good hygiene, avoid eating and drinking near your keyboard, use a keyboard cover, and clean regularly.
The Future of Keyboard Hygiene
As technology advances, we can expect to see even more innovative solutions for keyboard hygiene. Self-cleaning keyboards, antimicrobial coatings, and improved keyboard covers are just a few of the possibilities. Staying informed about the latest developments will help you maintain a clean and healthy workspace.
Conclusion: A Clean Keyboard, A Clear Mind
Knowing how to clean computer keyboard keys is more than just a chore; it’s an investment in your health, productivity, and the longevity of your equipment. By following the methods and tips outlined in this guide, you can keep your keyboard clean, functional, and hygienic for years to come. Remember to clean regularly, use the right tools and products, and practice good keyboard hygiene habits. A clean keyboard contributes to a more pleasant and productive work environment, allowing you to focus on what matters most. Share your own keyboard cleaning experiences and tips in the comments below!
