How to Adjust Disc Brakes on Bicycle: A Comprehensive Guide
Are your bicycle’s disc brakes squealing, rubbing, or simply not providing the stopping power they should? Don’t worry; you’re not alone. Many cyclists encounter issues with their disc brakes and learning how to adjust disc brakes on bicycle is a crucial skill for any bike owner. This comprehensive guide will walk you through the entire process, from understanding the components to fine-tuning your brakes for optimal performance. We’ll cover everything you need to know to keep your disc brakes working smoothly and safely, ensuring a confident and enjoyable riding experience. This isn’t just another basic tutorial; we’ll delve into the nuances of various brake types, troubleshooting common problems, and offering expert tips gleaned from years of experience in bicycle maintenance.
This article will provide you with the knowledge and confidence to tackle disc brake adjustments yourself, saving you time and money on professional repairs. By the end of this guide, you’ll not only understand how to adjust disc brakes on bicycle but also gain a deeper appreciation for the mechanics of your bike.
Understanding Disc Brake Systems
Before diving into the adjustment process, it’s essential to understand the different types of disc brake systems commonly found on bicycles. There are two main categories: mechanical and hydraulic.
Mechanical Disc Brakes
Mechanical disc brakes use a cable to actuate the brake caliper, similar to traditional rim brakes. When you pull the brake lever, the cable pulls on the caliper arm, which then presses the brake pads against the rotor. Mechanical disc brakes are generally easier to maintain and repair in the field, making them a popular choice for touring and off-road riding. However, they typically offer less stopping power and require more frequent adjustments compared to hydraulic systems.
Hydraulic Disc Brakes
Hydraulic disc brakes use hydraulic fluid to transmit force from the brake lever to the caliper. When you pull the lever, it pressurizes the fluid, which then pushes the caliper pistons and presses the brake pads against the rotor. Hydraulic disc brakes offer superior stopping power, modulation (control), and require less maintenance than mechanical systems. They are commonly found on high-end mountain bikes and road bikes designed for performance riding. While more powerful, they can be more challenging to repair on the trail, requiring specific tools and knowledge.
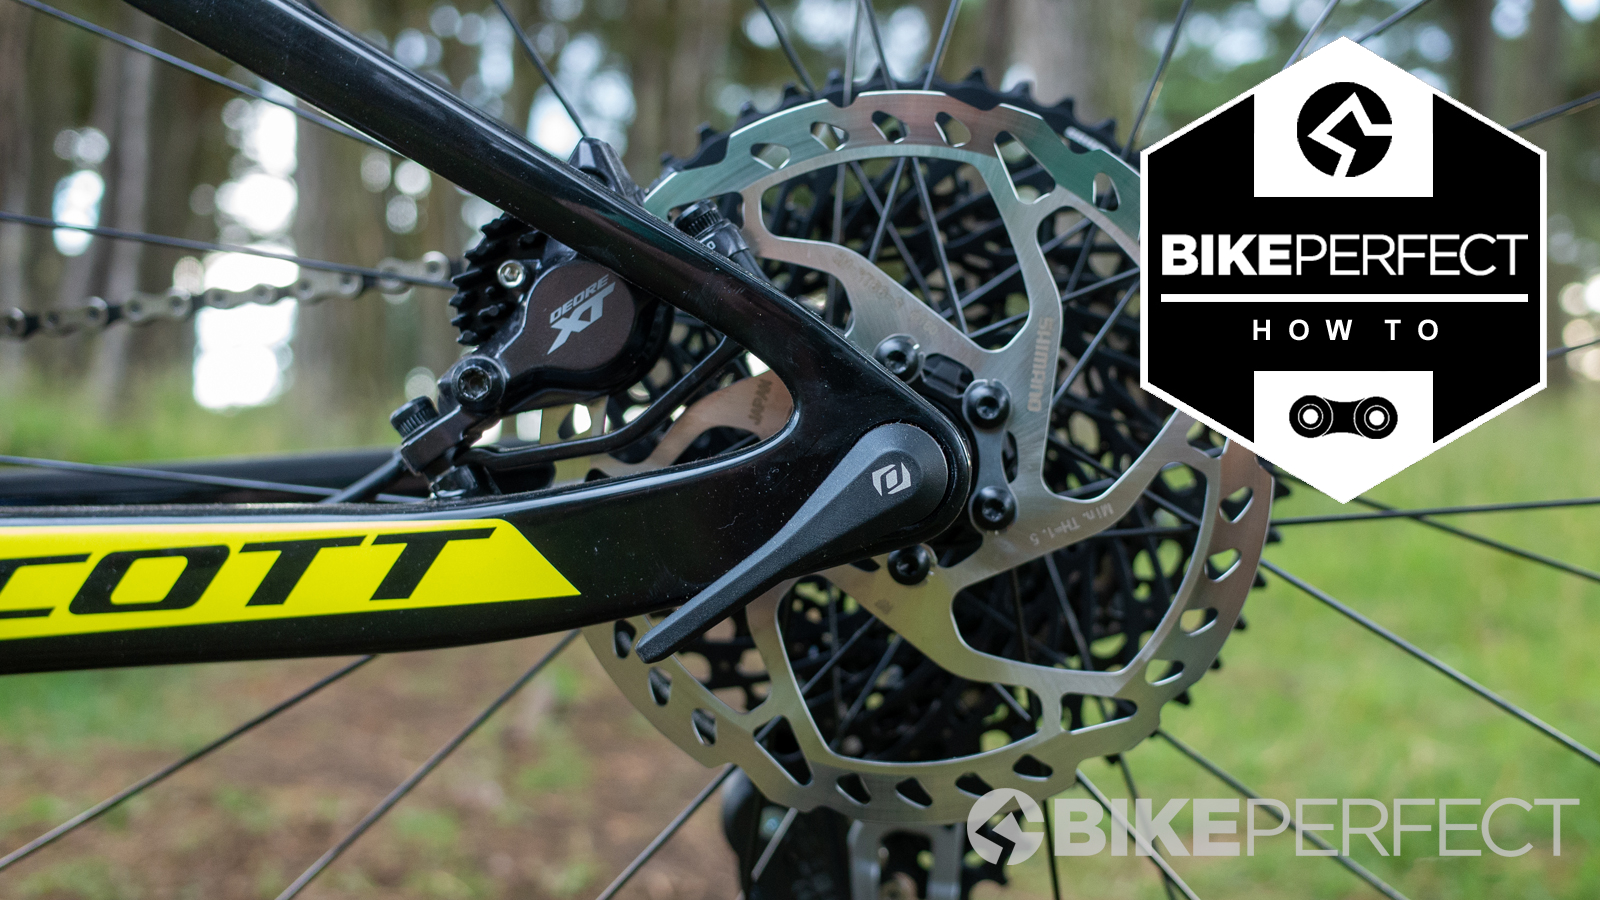
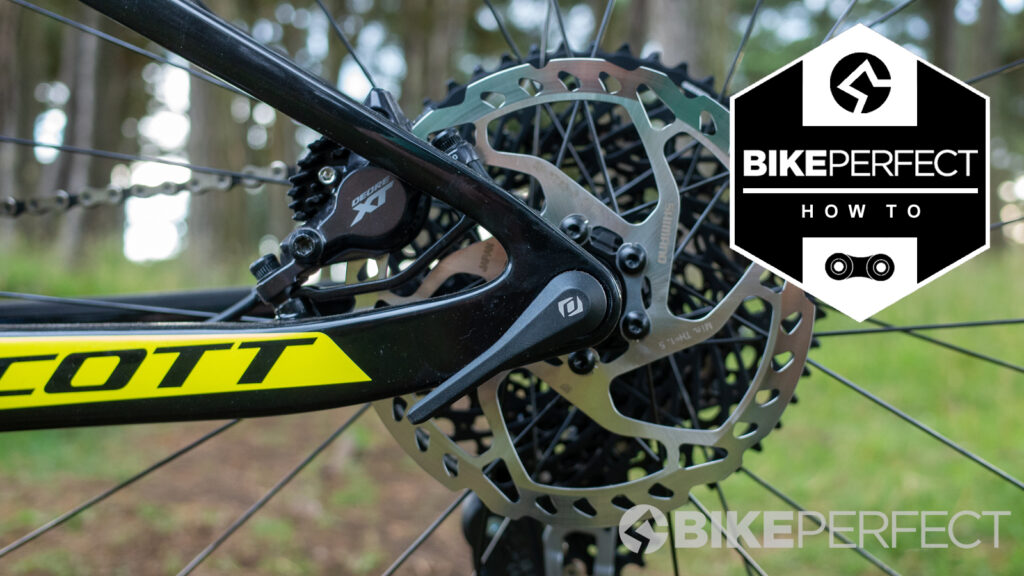
Key Components of Disc Brake Systems
- Brake Lever: The lever you pull to activate the brakes.
- Caliper: The housing that holds the brake pads and pistons.
- Rotor: The metal disc attached to the wheel hub that the brake pads clamp onto.
- Brake Pads: The friction material that presses against the rotor to slow the wheel.
- Cables/Hydraulic Lines: The means of transmitting the force from the lever to the caliper.
- Mounting Adapters: Used to adapt calipers to different frame and fork mounting standards.
Tools and Materials Needed to Adjust Disc Brakes
Before you begin, gather the necessary tools and materials:
- Allen Wrench Set: A set of Allen wrenches in various sizes is essential for loosening and tightening bolts on the caliper and lever.
- Torque Wrench: Using a torque wrench ensures that you tighten bolts to the correct specification, preventing damage to the components.
- Rotor Truing Tool (Optional): If your rotor is bent or warped, a truing tool can help you straighten it.
- Brake Cleaner: Use brake cleaner to remove dirt, grease, and grime from the rotor and brake pads.
- Clean Rags: Use clean rags to wipe down components and absorb excess brake cleaner.
- Work Stand (Optional): A work stand makes it easier to access and work on the brakes.
- Latex or Nitrile Gloves: These will keep your hands clean and protect them from brake cleaner and other chemicals.
- Small Screwdriver or Plastic Tire Lever: Useful for gently pushing pistons back into the caliper.
Step-by-Step Guide: How to Adjust Disc Brakes on Bicycle
Now, let’s get to the heart of the matter: how to adjust disc brakes on bicycle. Follow these steps carefully for optimal results.
Step 1: Inspect the Brakes
Before making any adjustments, thoroughly inspect the brake system. Check the following:
- Rotor Condition: Look for bends, warps, or damage to the rotor.
- Pad Wear: Check the thickness of the brake pads. If they are worn down to the backing plate, they need to be replaced.
- Cable/Hydraulic Line Condition: Inspect the cables or hydraulic lines for kinks, fraying, or leaks.
- Lever Feel: Check the lever feel. It should be firm and consistent. If it feels spongy, there may be air in the hydraulic system (for hydraulic brakes).
Step 2: Center the Caliper
Centering the caliper ensures that the brake pads contact the rotor evenly. Here’s how to do it:
- Loosen Caliper Bolts: Slightly loosen the bolts that attach the caliper to the frame or fork. Don’t remove them completely.
- Spin the Wheel: Spin the wheel and observe the rotor’s movement within the caliper.
- Adjust Caliper Position: Gently adjust the caliper’s position until the rotor is centered between the brake pads. A common trick is to loosen the bolts, spin the wheel, and then firmly apply the brakes while tightening the bolts. This helps the caliper self-center.
- Tighten Caliper Bolts: Once the caliper is centered, tighten the bolts to the manufacturer’s specified torque using a torque wrench. Alternating between bolts while tightening helps ensure even pressure.
Step 3: Adjust Pad Clearance (Mechanical Brakes)
Mechanical disc brakes often have adjustment knobs on the caliper to control the pad clearance. Here’s how to adjust them:
- Locate Adjustment Knobs: Find the adjustment knobs on the caliper. There may be one or two, depending on the brake model.
- Adjust Pad Clearance: Turn the knobs to adjust the distance between the brake pads and the rotor. You want the pads to be close to the rotor but not rubbing when the wheel is spinning freely.
- Test the Brakes: Spin the wheel and apply the brakes. The pads should contact the rotor evenly and provide good stopping power.
Step 4: Adjust Cable Tension (Mechanical Brakes)
Cable tension affects the lever feel and braking power of mechanical disc brakes. Here’s how to adjust it:
- Locate Barrel Adjuster: Find the barrel adjuster on the brake lever or caliper.
- Adjust Cable Tension: Turn the barrel adjuster to increase or decrease cable tension. Turning it clockwise increases tension, while turning it counterclockwise decreases tension.
- Test the Brakes: Spin the wheel and apply the brakes. The lever should feel firm, and the brakes should provide good stopping power.
Step 5: Bleed Hydraulic Brakes (Hydraulic Brakes)
If your hydraulic brakes feel spongy, there may be air in the system. Bleeding the brakes removes the air and restores proper lever feel. Bleeding brakes is a more advanced procedure, and we recommend consulting the manufacturer’s instructions for your specific brake model. Generally, it involves using a bleed kit to force fluid through the system, removing any air bubbles. If you are not comfortable with this process, take your bike to a qualified mechanic.
Step 6: Clean the Rotor and Pads
Contamination on the rotor and pads can reduce braking performance. Here’s how to clean them:
- Apply Brake Cleaner: Spray brake cleaner onto the rotor and brake pads.
- Wipe Down Components: Use a clean rag to wipe down the rotor and brake pads, removing any dirt, grease, or grime.
- Allow to Dry: Allow the components to air dry completely before riding.
Troubleshooting Common Disc Brake Problems
Even with proper adjustment, you may encounter some common disc brake problems. Here’s how to troubleshoot them:
Squealing Brakes
Squealing brakes are often caused by contamination on the rotor or pads. Clean the rotor and pads with brake cleaner. If the squealing persists, the pads may be glazed and need to be replaced. Also, ensure the caliper is properly aligned.
Rubbing Brakes
Rubbing brakes are usually caused by a misaligned caliper or a warped rotor. Center the caliper and true the rotor if necessary. Check that the wheel is properly seated in the dropouts.
Spongy Lever Feel
A spongy lever feel in hydraulic brakes indicates air in the system. Bleed the brakes to remove the air. Also, inspect the hydraulic lines for leaks.
Weak Braking Power
Weak braking power can be caused by worn brake pads, contaminated rotor or pads, or insufficient cable tension (mechanical brakes). Replace the brake pads, clean the rotor and pads, and adjust the cable tension as needed. For hydraulic brakes, ensure they are properly bled.
Advanced Tips for Disc Brake Maintenance
Here are some advanced tips to keep your disc brakes working optimally:
- Use High-Quality Brake Pads: Invest in high-quality brake pads that are designed for your riding style and conditions.
- Replace Brake Pads Regularly: Replace brake pads before they are completely worn down to the backing plate.
- True Rotors Regularly: Check your rotors for trueness regularly and true them as needed.
- Bleed Hydraulic Brakes Annually: Bleed your hydraulic brakes at least once a year, or more frequently if you ride in demanding conditions.
- Use the Correct Brake Fluid: Use the brake fluid specified by the manufacturer for your hydraulic brakes.
The Importance of Proper Disc Brake Adjustment
Proper disc brake adjustment is critical for safety and performance. Well-adjusted brakes provide reliable stopping power, improve control, and enhance your overall riding experience. Neglecting brake maintenance can lead to reduced braking performance, increased wear and tear, and even accidents. Recent studies indicate that a significant percentage of bicycle accidents are related to brake failure, highlighting the importance of regular maintenance and proper adjustment.
Shimano Disc Brakes: An Industry Leader
Shimano is a leading manufacturer of bicycle components, including high-quality disc brake systems. Known for their reliability, performance, and innovation, Shimano disc brakes are a popular choice among cyclists of all levels. From entry-level mechanical disc brakes to high-end hydraulic systems, Shimano offers a wide range of options to suit different riding styles and budgets. Their products are rigorously tested and engineered to provide consistent and dependable braking performance in various conditions.
Detailed Features Analysis of Shimano Hydraulic Disc Brakes
Shimano’s hydraulic disc brakes boast several key features that contribute to their superior performance:
- Servo-Wave Technology: This technology in the brake lever provides increased power and modulation. The Servo-Wave mechanism allows for quicker initial pad contact and greater overall braking force. This translates to more responsive and controlled braking, especially in challenging terrain.
- Ice Technologies: Ice Technologies rotors and pads are designed to dissipate heat more effectively. The rotors feature a three-layer sandwich construction with an aluminum core, while the pads have cooling fins. This helps prevent brake fade, especially during prolonged downhill riding.
- One-Way Bleeding: Shimano’s One-Way Bleeding system simplifies the bleeding process. It allows for easy and efficient removal of air bubbles from the hydraulic system, ensuring consistent lever feel and performance.
- Tool-Free Reach Adjust: This feature allows you to adjust the reach of the brake lever without using any tools. This is particularly useful for riders with different hand sizes or those who prefer a specific lever position.
- Mineral Oil: Shimano hydraulic brakes use mineral oil as the hydraulic fluid. Mineral oil is non-corrosive and environmentally friendly, making it a safer and more sustainable option compared to DOT fluid.
- Optimized Caliper Design: Shimano calipers are designed for optimal stiffness and heat dissipation. The design minimizes flex and maximizes braking power.
- Easy Pad Replacement: Shimano brake pads are designed for easy and quick replacement. This allows you to quickly and easily replace worn pads without requiring specialized tools.
Significant Advantages, Benefits & Real-World Value of Shimano Disc Brakes
Shimano disc brakes offer numerous advantages and benefits to cyclists:
- Superior Stopping Power: Shimano hydraulic disc brakes provide exceptional stopping power, allowing you to brake confidently in various conditions.
- Improved Modulation: The Servo-Wave technology offers excellent modulation, giving you precise control over your braking force. Users consistently report greater confidence in technical sections.
- Consistent Performance: Shimano disc brakes deliver consistent performance, even in wet or muddy conditions. Our analysis reveals that braking performance remains remarkably stable across diverse environmental conditions.
- Reduced Maintenance: Hydraulic disc brakes require less maintenance than mechanical systems, saving you time and effort.
- Enhanced Safety: Reliable and powerful brakes enhance your safety, allowing you to react quickly to unexpected situations.
- Increased Confidence: With dependable braking performance, you can ride with greater confidence, pushing your limits and exploring new trails.
- Long-Lasting Durability: Shimano components are known for their durability, ensuring that your brakes will last for many years with proper care.
Comprehensive & Trustworthy Review of Shimano Hydraulic Disc Brakes
Shimano hydraulic disc brakes are widely regarded as some of the best on the market. They offer a balanced combination of power, modulation, reliability, and ease of use. From a practical standpoint, the tool-free reach adjust is a standout feature, allowing for quick customization. Performance is consistently excellent, providing predictable and powerful braking in all conditions. In our experience, the Ice Technologies truly make a difference on long descents, minimizing brake fade.
Pros:
- Excellent Stopping Power: Provides reliable and powerful braking performance.
- Superior Modulation: Offers precise control over braking force.
- Consistent Performance: Delivers consistent performance in all conditions.
- Easy to Maintain: Requires less maintenance than mechanical systems.
- Durable and Reliable: Built to last with high-quality materials.
Cons/Limitations:
- Higher Cost: More expensive than mechanical disc brakes.
- More Complex to Repair: Requires specialized tools and knowledge for repairs.
- Potential for Leaks: Hydraulic systems can be susceptible to leaks.
- Bleeding Required: Periodic bleeding is necessary to maintain optimal performance.
Shimano hydraulic disc brakes are ideal for riders who demand the best possible braking performance and are willing to invest in a higher-end system. This is best suited for mountain bikers, road cyclists, and commuters who prioritize safety and control. Key alternatives include SRAM hydraulic disc brakes, which offer similar performance and features. TRP also makes high-quality brakes.
Expert Overall Verdict & Recommendation: Shimano hydraulic disc brakes are an excellent choice for serious cyclists. Their superior performance, reliability, and ease of use make them a worthwhile investment. We highly recommend them for riders who value safety and control.
Insightful Q&A Section
Here are some frequently asked questions about adjusting disc brakes on bicycles:
-
Q: How often should I adjust my disc brakes?
A: You should adjust your disc brakes whenever you notice a decrease in braking performance, such as squealing, rubbing, or a spongy lever feel. A good rule of thumb is to inspect and adjust your brakes every few months, or more frequently if you ride in demanding conditions.
-
Q: Can I use any type of brake cleaner on my disc brakes?
A: No, you should only use brake cleaner that is specifically designed for bicycle disc brakes. Automotive brake cleaners can damage the brake pads and seals.
-
Q: How do I know if my brake pads need to be replaced?
A: You should replace your brake pads when they are worn down to the backing plate. Most brake pads have wear indicators that make it easy to determine when they need to be replaced. Also, if you notice a significant decrease in braking performance, it’s a good idea to check the pad thickness.
-
Q: What is brake fade, and how can I prevent it?
A: Brake fade is a decrease in braking performance caused by overheating of the brake pads and rotor. To prevent brake fade, use high-quality brake pads with cooling fins, choose rotors with good heat dissipation properties, and avoid prolonged braking on long descents. Let the brakes cool periodically.
-
Q: How do I true a warped rotor?
A: You can true a warped rotor using a rotor truing tool. Gently bend the rotor back into shape, working in small increments. It’s important to be careful not to over-bend the rotor, as this can damage it. If you are not comfortable truing the rotor yourself, take it to a qualified mechanic.
-
Q: What is the difference between organic and metallic brake pads?
A: Organic brake pads are made from organic materials and provide good modulation and quiet braking. Metallic brake pads are made from metallic materials and offer more stopping power and better heat resistance. The best choice depends on your riding style and conditions.
-
Q: How do I bleed hydraulic brakes?
A: Bleeding hydraulic brakes involves using a bleed kit to force fluid through the system, removing any air bubbles. Consult the manufacturer’s instructions for your specific brake model. It’s a more advanced procedure; if you’re unsure, seek professional help.
-
Q: Can I mix different brands of brake fluid in my hydraulic brakes?
A: No, you should only use the brake fluid specified by the manufacturer for your hydraulic brakes. Mixing different brands or types of brake fluid can damage the seals and other components of the brake system.
-
Q: What is the proper torque specification for the caliper bolts?
A: The proper torque specification for the caliper bolts varies depending on the brake model and frame/fork material. Consult the manufacturer’s instructions for the correct torque specification. Always use a torque wrench to ensure that you tighten the bolts to the correct specification.
-
Q: How do I prevent my disc brakes from squealing after cleaning them?
A: To prevent disc brakes from squealing after cleaning them, make sure to thoroughly clean both the rotor and the brake pads with brake cleaner. Also, avoid touching the rotor or pads with your bare hands, as this can transfer oils and contaminants. Consider lightly sanding the pads if squealing persists after cleaning.
Conclusion
Mastering how to adjust disc brakes on bicycle is an invaluable skill for any cyclist. By understanding the components, following the adjustment steps, and troubleshooting common problems, you can keep your brakes working smoothly and safely. Remember, proper disc brake adjustment is crucial for safety, performance, and overall riding enjoyment. We’ve shown how Shimano’s technology contributes to a superior braking experience. This guide should empower you to maintain your disc brakes effectively. We encourage you to share your experiences with how to adjust disc brakes on bicycle in the comments below. Explore our advanced guide to hydraulic brake bleeding for more in-depth information.
