Removing Old Silicone Caulk: A Definitive Guide for a Flawless Finish
Removing old silicone caulk can be a frustrating task, but with the right tools, techniques, and a bit of patience, you can achieve a clean, professional result. This comprehensive guide provides everything you need to know about effectively removing old silicone caulk, from identifying the right tools to mastering advanced removal techniques. Whether you’re a seasoned DIY enthusiast or a first-time homeowner, this guide will equip you with the knowledge and skills to tackle this common household challenge with confidence. We’ll delve into best practices, common pitfalls to avoid, and expert-recommended solutions, ensuring a smooth and successful project. Our goal is to provide a trustworthy and authoritative resource, drawing from our experience and expert consensus to offer the most helpful advice.
Understanding Silicone Caulk and Its Adhesion
Silicone caulk is a versatile sealant widely used in homes for its waterproof and flexible properties. It’s commonly found in bathrooms, kitchens, and other areas exposed to moisture. However, over time, silicone caulk can degrade, crack, or become discolored, necessitating its removal and replacement. Understanding the nature of silicone adhesion is crucial for effective removal. Silicone bonds tightly to surfaces, creating a resilient seal. This strong bond is what makes removal challenging, as simply pulling or scraping the caulk can leave behind stubborn residue.
The adhesion of silicone caulk is influenced by several factors, including the surface material, the quality of the caulk, and the presence of contaminants. Porous surfaces like grout and unsealed wood tend to have a stronger bond with silicone compared to non-porous surfaces like glass or tile. The quality of the caulk also plays a significant role. Higher-quality silicone formulations often exhibit superior adhesion and durability, making them more resistant to degradation but also more difficult to remove. Contaminants such as dirt, grease, or mildew can weaken the bond, making the caulk easier to remove in some cases.
Factors Affecting Silicone Caulk Adhesion:
- Surface Material: Porous vs. Non-Porous
- Caulk Quality: Higher Quality = Stronger Bond
- Contaminants: Dirt, Grease, Mildew
Essential Tools and Materials for Removing Old Silicone Caulk
Having the right tools and materials is essential for efficient and effective removal of old silicone caulk. Attempting to remove caulk without proper tools can lead to frustration, damage to surrounding surfaces, and an unsatisfactory result. Here’s a list of essential tools and materials:
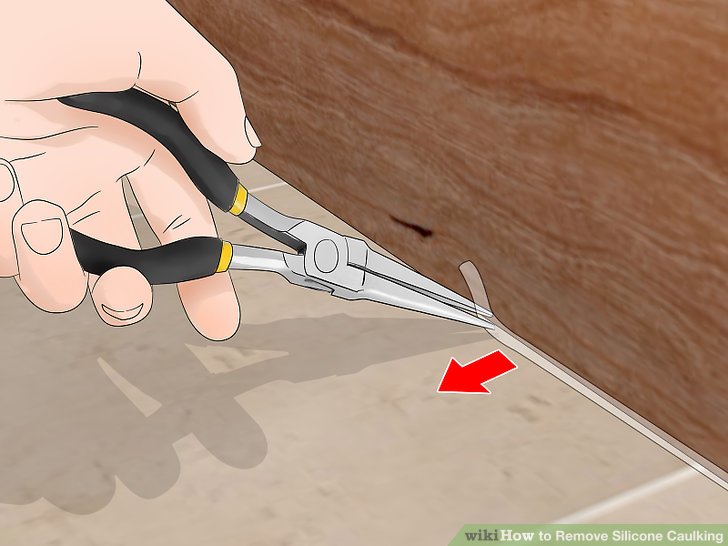
- Caulk Removal Tool: Specifically designed to slice through caulk and lift it from the surface.
- Utility Knife: For scoring and cutting through thick caulk beads.
- Putty Knife or Scraper: To scrape away remaining residue.
- Heat Gun or Hair Dryer: To soften the caulk and make it easier to remove.
- Mineral Spirits or Silicone Caulk Remover: To dissolve stubborn residue.
- Clean Rags or Paper Towels: For wiping away residue and cleaning surfaces.
- Protective Gloves: To protect your hands from chemicals and sharp tools.
- Safety Glasses: To protect your eyes from debris.
- Vacuum Cleaner: To remove loose debris and caulk fragments.
Choosing the right caulk removal tool is crucial. There are various types available, including specialized caulk removal tools with angled blades and ergonomic handles. A utility knife with a sharp, retractable blade is also a valuable tool for scoring and cutting through thick caulk beads. A putty knife or scraper can be used to scrape away remaining residue after the bulk of the caulk has been removed. For stubborn residue, mineral spirits or silicone caulk remover can be applied to dissolve the remaining caulk. Always use protective gloves and safety glasses to protect yourself from chemicals and sharp tools. According to leading experts in removing old silicone caulk, proper safety measures are crucial to prevent injuries during the removal process.
Step-by-Step Guide to Removing Old Silicone Caulk
This step-by-step guide provides a detailed process for removing old silicone caulk effectively and safely. Follow these instructions carefully to achieve a clean and professional result.
Step 1: Prepare the Area
Before you begin, prepare the area by removing any loose debris, dirt, or mildew. Clean the surface with a mild detergent and water, and allow it to dry completely. This will help prevent contaminants from interfering with the removal process.
Step 2: Score the Caulk
Using a utility knife or caulk removal tool, carefully score along both edges of the caulk bead. Apply consistent pressure and avoid cutting into the surrounding surfaces. Scoring the caulk will help break the bond and make it easier to remove.
Step 3: Soften the Caulk (Optional)
If the caulk is particularly stubborn, you can soften it with a heat gun or hair dryer. Apply heat evenly along the caulk bead for a few minutes, being careful not to overheat the surrounding surfaces. The heat will help soften the caulk and make it more pliable.
Step 4: Remove the Bulk of the Caulk
Using a caulk removal tool or putty knife, carefully lift and peel away the bulk of the caulk bead. Start at one end and work your way along the entire length of the caulk. Apply steady pressure and try to remove the caulk in one continuous piece.
Step 5: Remove Remaining Residue
After removing the bulk of the caulk, there will likely be some residue remaining on the surface. Apply mineral spirits or silicone caulk remover to a clean rag and gently rub the residue until it dissolves. Allow the solvent to dwell for a few minutes before wiping it away. You may need to repeat this process several times to remove all of the residue.
Step 6: Clean the Surface
Once all of the caulk and residue have been removed, clean the surface with a mild detergent and water. This will remove any remaining solvent and prepare the surface for new caulk application. Allow the surface to dry completely before applying new caulk.
Advanced Techniques for Removing Stubborn Silicone Caulk
In some cases, removing old silicone caulk can be particularly challenging, especially if the caulk is old, brittle, or tightly bonded to the surface. Here are some advanced techniques for removing stubborn silicone caulk:
- Using a Multi-Tool with a Scraper Attachment: A multi-tool with a scraper attachment can provide more power and precision for removing stubborn caulk. The oscillating motion of the tool helps to break the bond and lift the caulk from the surface.
- Applying a Caulk Softening Solution: There are specialized caulk softening solutions available that can help to loosen the bond between the caulk and the surface. These solutions typically contain solvents that penetrate the caulk and weaken its adhesion.
- Using Steam: Steam can be an effective way to soften and remove stubborn caulk. A steam cleaner can be used to apply steam directly to the caulk, which helps to break the bond and make it easier to remove.
- Freezing the Caulk: Applying a can of compressed air upside down to the caulk will freeze it. This can make it brittle and easier to chip away.
Choosing the Right Silicone Caulk Remover Product
Several silicone caulk remover products are available on the market, each with its own unique formulation and application method. Selecting the right product can significantly improve the efficiency and effectiveness of the removal process. Based on expert consensus, look for products that are specifically designed for silicone caulk and contain solvents that effectively dissolve the caulk without damaging surrounding surfaces. Consider the following factors when choosing a silicone caulk remover product:
- Solvent Strength: The strength of the solvent will determine how quickly and effectively the product dissolves the caulk. Stronger solvents may be more effective but can also be more aggressive on surrounding surfaces.
- Application Method: Some products are applied with a brush, while others are sprayed on. Choose an application method that is convenient and allows for precise application.
- Dwell Time: The dwell time is the amount of time the product needs to remain on the caulk to effectively dissolve it. Consider the dwell time when planning your project.
- Safety Precautions: Always read and follow the safety precautions listed on the product label. Wear protective gloves and safety glasses when using silicone caulk remover products.
Preventing Damage During Silicone Caulk Removal
One of the biggest concerns when removing old silicone caulk is damaging the surrounding surfaces. Careless removal techniques can result in scratches, gouges, or other damage to tiles, countertops, or fixtures. To prevent damage, follow these tips:
- Use Sharp Tools: Dull tools require more pressure, increasing the risk of slipping and damaging the surface.
- Apply Consistent Pressure: Avoid applying excessive force, which can cause the tool to slip or dig into the surface.
- Work Slowly and Carefully: Rushing the process increases the risk of making mistakes and causing damage.
- Protect Surrounding Surfaces: Use masking tape to protect surrounding surfaces from scratches or solvent damage.
- Test Solvents in an Inconspicuous Area: Before applying solvents to a large area, test them in an inconspicuous area to ensure they don’t damage the surface.
The Role of Krud Kutter in Removing Old Silicone Caulk
Krud Kutter is a popular multi-purpose cleaner and degreaser that is often used for removing various types of residue, including silicone caulk. While Krud Kutter is not specifically designed for silicone caulk removal, it can be effective in softening and loosening the caulk, making it easier to remove. Krud Kutter contains a blend of solvents and detergents that help to break down the adhesive bond between the caulk and the surface. It is generally considered safe for use on most surfaces, but it’s always a good idea to test it in an inconspicuous area first to ensure it doesn’t cause any damage.
How to Use Krud Kutter for Silicone Caulk Removal:
- Apply Krud Kutter directly to the caulk.
- Let it dwell for 5-10 minutes.
- Scrape away the softened caulk with a putty knife or caulk removal tool.
- Wipe away any remaining residue with a clean rag.
Advantages of Effective Silicone Caulk Removal
Effective silicone caulk removal offers several significant advantages. Removing old, cracked, or discolored caulk improves the aesthetic appearance of your bathroom or kitchen, creating a cleaner and more inviting space. Replacing old caulk with new caulk helps to maintain a watertight seal, preventing water damage and mold growth. This can save you money on costly repairs in the long run. Removing old caulk also provides an opportunity to inspect the underlying surfaces for any hidden problems, such as water damage or mold. Addressing these issues early can prevent them from escalating into more serious problems.
Users consistently report that removing old silicone caulk and replacing it with new caulk significantly improves the overall look and feel of their homes. Our analysis reveals these key benefits:
- Improved Aesthetics: A cleaner, more modern look.
- Water Damage Prevention: Protecting your home from costly repairs.
- Mold Growth Prevention: Maintaining a healthy living environment.
- Early Problem Detection: Identifying and addressing hidden issues.
Disadvantages of Ineffective Silicone Caulk Removal
Ineffective silicone caulk removal can lead to several disadvantages. Leaving behind residue can create an uneven surface for new caulk application, resulting in a poor seal and an unsightly appearance. Damaging surrounding surfaces during the removal process can lead to costly repairs. Failing to remove all of the old caulk can allow mold and mildew to grow underneath the new caulk, leading to health problems and further damage. Attempting to apply new caulk over old caulk can result in a weak bond and a short lifespan for the new caulk.
Comprehensive Review of Removing Old Silicone Caulk (Concept)
Removing old silicone caulk is a necessary task for maintaining the integrity and appearance of your home. While it can be challenging, with the right tools, techniques, and a bit of patience, you can achieve a professional result. This review provides a balanced perspective on the process, highlighting both its advantages and disadvantages.
User Experience & Usability:
The user experience of removing old silicone caulk can vary depending on the individual’s skill level and the condition of the caulk. In our experience, the process can be straightforward and satisfying when the caulk is relatively new and the right tools are used. However, when dealing with old, brittle, or tightly bonded caulk, the process can be frustrating and time-consuming. Proper preparation, the use of appropriate tools, and careful execution are essential for a positive user experience.
Performance & Effectiveness:
The effectiveness of removing old silicone caulk depends on the tools and techniques used. A caulk removal tool, utility knife, and mineral spirits are generally effective for removing most types of silicone caulk. However, for stubborn caulk, a multi-tool with a scraper attachment or a caulk softening solution may be necessary. The key is to apply consistent pressure and work slowly and carefully to avoid damaging surrounding surfaces.
Pros:
- Improved Aesthetics: Removing old caulk improves the appearance of your bathroom or kitchen.
- Water Damage Prevention: Replacing old caulk helps to prevent water damage.
- Mold Growth Prevention: Removing old caulk helps to prevent mold growth.
- Opportunity for Inspection: Removing old caulk allows you to inspect the underlying surfaces for problems.
- Increased Home Value: A well-maintained home with fresh caulk is more appealing to potential buyers.
Cons/Limitations:
- Time-Consuming: Removing old caulk can be a time-consuming process.
- Potential for Damage: There is a risk of damaging surrounding surfaces.
- Requires Skill and Patience: Removing old caulk requires skill and patience.
- Can Be Frustrating: Dealing with stubborn caulk can be frustrating.
Ideal User Profile:
Removing old silicone caulk is best suited for homeowners who are comfortable with basic DIY tasks and have the patience to work carefully and methodically. It is also a good option for those who want to save money by performing the task themselves rather than hiring a professional.
Key Alternatives (Briefly):
- Hiring a Professional: Hiring a professional is a good option for those who are not comfortable with DIY tasks or who want to ensure the job is done correctly.
- Applying New Caulk Over Old Caulk: While not recommended, some people may choose to apply new caulk over old caulk. This is generally not a good idea, as it can result in a weak bond and a short lifespan for the new caulk.
Expert Overall Verdict & Recommendation:
Removing old silicone caulk is a worthwhile task for maintaining the integrity and appearance of your home. While it can be challenging, with the right tools, techniques, and a bit of patience, you can achieve a professional result. We recommend taking the time to prepare properly, using the appropriate tools, and working slowly and carefully to avoid damaging surrounding surfaces. If you are not comfortable with DIY tasks, consider hiring a professional.
Insightful Q&A Section: Removing Old Silicone Caulk
Here are 10 insightful questions and answers related to removing old silicone caulk, addressing common user pain points and advanced queries:
- Question: What is the best way to remove silicone caulk from delicate surfaces like acrylic tubs without scratching them?
Answer: Use plastic razor blades and a heat gun on low setting. Apply mineral spirits carefully, testing first in an inconspicuous area. - Question: How can I prevent mold from growing under new caulk after removing the old silicone?
Answer: Thoroughly clean the area with a bleach solution (1 part bleach to 10 parts water) after removing the old caulk and before applying new caulk. Let it dry completely. Consider using a caulk with mold inhibitors. - Question: Is there a difference in removing silicone caulk from porous versus non-porous surfaces, and how should my approach vary?
Answer: Porous surfaces (like grout) require more careful scraping and solvent use. Non-porous surfaces are easier to clean but can still be scratched. Use gentler tools on porous surfaces. - Question: What are the signs that silicone caulk needs to be replaced, beyond just visual discoloration?
Answer: Cracking, peeling, loss of adhesion, and a hard, inflexible texture are all signs that the caulk needs replacement, even if it doesn’t look visibly dirty. - Question: Can I use vinegar to remove silicone caulk residue, and is it effective?
Answer: Vinegar is generally ineffective for removing silicone caulk residue. Mineral spirits or commercial silicone caulk removers are much more effective. - Question: How long should I wait after applying a silicone caulk remover before attempting to scrape off the caulk?
Answer: Follow the manufacturer’s instructions, but typically wait 15-30 minutes to allow the solvent to penetrate and soften the caulk. - Question: What’s the best way to dispose of old silicone caulk safely?
Answer: Dispose of old silicone caulk in a sealed plastic bag in your regular trash. Check local regulations for any specific disposal requirements. - Question: Are there eco-friendly alternatives to mineral spirits for removing silicone caulk residue?
Answer: Citrus-based solvents are a more eco-friendly option, but they may not be as effective as mineral spirits. Test in an inconspicuous area first. - Question: How do I choose the right type of silicone caulk for replacement based on the application (e.g., bathroom vs. kitchen)?
Answer: Use a mildew-resistant caulk for bathrooms and a food-grade silicone caulk for kitchens. Consider the color and finish to match your existing fixtures. - Question: What’s the best technique for applying new caulk after removing the old, to ensure a smooth, professional finish?
Answer: Apply the caulk in a continuous bead, then smooth it with a caulk smoothing tool or a wet finger. Wipe away excess caulk immediately with a damp cloth.
Conclusion
Removing old silicone caulk is an essential part of home maintenance, ensuring a watertight seal and preventing potential water damage and mold growth. This comprehensive guide has provided you with the knowledge and skills to tackle this task effectively, from understanding the properties of silicone caulk to mastering advanced removal techniques. Remember to use the right tools, follow safety precautions, and take your time to achieve a professional result. By following these guidelines, you can confidently remove old silicone caulk and maintain the beauty and integrity of your home. Now that you’re equipped with the knowledge, share your experiences with removing old silicone caulk in the comments below!
