## How to Clean Your Laptop Keyboard: A Definitive Guide (2024)
Is your laptop keyboard a breeding ground for crumbs, dust, and grime? A dirty keyboard isn’t just unsightly; it can affect performance and even spread germs. This comprehensive guide provides expert-backed methods for safely and effectively cleaning your laptop keyboard, ensuring optimal performance and hygiene. We’ll cover everything from basic cleaning techniques to tackling stubborn spills, offering step-by-step instructions suitable for all laptop models. Unlike superficial guides, we delve into the nuances of keyboard cleaning, empowering you with the knowledge to protect your investment and maintain a pristine workspace. Get ready to transform your keyboard from a germ-infested mess to a sparkling, responsive input device.
### Why Cleaning Your Laptop Keyboard Matters
Cleaning your laptop keyboard is more than just an aesthetic concern; it’s crucial for several reasons:
* **Hygiene:** Keyboards accumulate dust, food particles, and even dead skin cells, creating a breeding ground for bacteria and germs. Regular cleaning helps prevent the spread of illness.
* **Performance:** Debris lodged under keys can hinder their responsiveness, leading to frustrating typing errors and reduced productivity. Cleaning ensures smooth and accurate key presses.
* **Longevity:** Dust and grime can cause wear and tear on the keyboard’s internal components, potentially shortening its lifespan. Regular cleaning helps prevent damage and extends the keyboard’s usability.
* **Aesthetics:** A clean keyboard simply looks better and contributes to a more professional and pleasant workspace.
### Understanding Your Laptop Keyboard
Before diving into the cleaning process, it’s essential to understand the different types of laptop keyboards and their specific cleaning needs.
* **Membrane Keyboards:** These are the most common type of laptop keyboard, featuring a single membrane sheet beneath the keys. They are generally easier to clean than mechanical keyboards.
* **Mechanical Keyboards:** Some high-end laptops feature mechanical keyboards, which offer a more tactile and responsive typing experience. These keyboards often have individual switches under each key, making them more complex to clean.
* **Backlit Keyboards:** Many modern laptops have backlit keyboards, which illuminate the keys for better visibility in low-light conditions. When cleaning a backlit keyboard, it’s crucial to avoid getting moisture inside the key switches.
Knowing your keyboard type will help you choose the appropriate cleaning methods and tools.
## Essential Tools and Supplies for Cleaning Your Laptop Keyboard
Having the right tools and supplies is crucial for effective and safe keyboard cleaning. Here’s a comprehensive list:
* **Compressed Air:** This is your primary weapon against dust and debris. Use it to dislodge particles from between the keys.
* **Microfiber Cloths:** These are essential for wiping down surfaces without scratching. Opt for lint-free cloths to avoid leaving residue.
* **Isopropyl Alcohol (90% or higher):** This is an excellent disinfectant and cleaning agent. Dilute it with water (1:1 ratio) for safer use on sensitive surfaces.
* **Cotton Swabs:** Use these for cleaning hard-to-reach areas and removing stubborn grime.
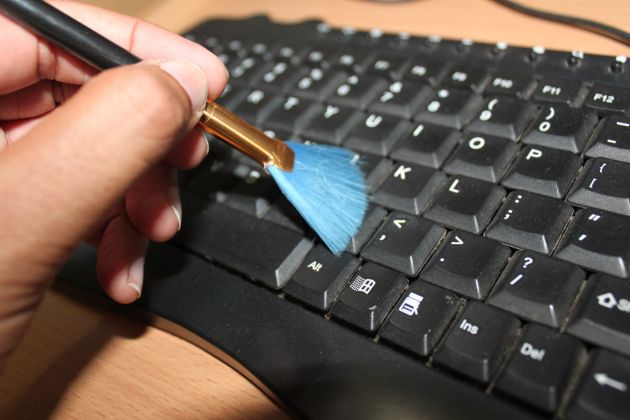
* **Small Brush (Soft Bristled):** A soft-bristled brush, like a paintbrush or toothbrush, can help dislodge debris without damaging the keys.
* **Keycap Puller (Optional):** If you have a mechanical keyboard, a keycap puller can help you remove individual keys for more thorough cleaning.
* **Vacuum Cleaner with Brush Attachment (Optional):** A vacuum cleaner with a brush attachment can be used to remove large debris, but be careful not to damage the keys.
**Safety First:** Always power off your laptop and disconnect it from the power adapter before cleaning. This prevents electrical shock and potential damage to the device.
## Step-by-Step Guide: How to Clean Your Laptop Keyboard
Follow these steps for a thorough and safe cleaning of your laptop keyboard:
**Step 1: Preparation**
* Power off your laptop and disconnect it from the power adapter.
* Turn the laptop upside down and gently shake it to dislodge any loose debris.
**Step 2: Compressed Air Blast**
* Hold the can of compressed air upright and aim the nozzle between the keys.
* Use short bursts of air to dislodge dust and debris. Avoid holding the nozzle too close to the keyboard, as this can damage the keys.
* Work your way across the entire keyboard, paying attention to areas with visible debris.
**Step 3: Wiping Down the Keys**
* Dampen a microfiber cloth with a diluted isopropyl alcohol solution (1:1 ratio).
* Wring out the cloth thoroughly to prevent excess moisture from seeping into the keyboard.
* Gently wipe down the surface of each key, paying attention to areas with visible grime.
* Use a clean, dry microfiber cloth to wipe off any excess moisture.
**Step 4: Cleaning Hard-to-Reach Areas**
* Dip a cotton swab in the diluted isopropyl alcohol solution and wring out any excess moisture.
* Use the cotton swab to clean around the edges of the keys and in any hard-to-reach areas.
* Be careful not to apply too much pressure, as this can damage the keys.
**Step 5: Addressing Stubborn Spills**
* If you’ve spilled liquid on your keyboard, act quickly to prevent damage.
* Power off your laptop and disconnect it from the power adapter immediately.
* Turn the laptop upside down to allow the liquid to drain out.
* Use a clean, dry microfiber cloth to absorb as much liquid as possible.
* If the spill was sugary or sticky, use a cotton swab dampened with diluted isopropyl alcohol to clean the affected keys.
* Allow the keyboard to dry completely before turning on your laptop.
**Step 6: Reassembly (If Applicable)**
* If you removed any keycaps, carefully reattach them to the keyboard.
* Ensure that each key is properly aligned and securely fastened.
**Step 7: Final Touches**
* Use a clean, dry microfiber cloth to wipe down the entire keyboard surface.
* Inspect the keyboard for any remaining debris or grime.
* Turn on your laptop and test all the keys to ensure they are functioning properly.
### Advanced Cleaning Techniques for Mechanical Keyboards
Mechanical keyboards require a more delicate approach due to their individual switches. Here’s how to clean them effectively:
* **Keycap Removal:** Use a keycap puller to carefully remove each keycap. Avoid using excessive force, as this can damage the switches.
* **Cleaning the Keycaps:** Wash the keycaps with warm, soapy water. Rinse them thoroughly and allow them to dry completely before reattaching them.
* **Cleaning the Switches:** Use compressed air to blow out any dust or debris from the switches. You can also use a small brush to gently clean around the switches.
* **Reassembly:** Carefully reattach the keycaps to the switches, ensuring they are properly aligned and securely fastened.
### Preventing Keyboard Dirt and Grime
Prevention is always better than cure. Here are some tips to keep your laptop keyboard clean:
* **Avoid Eating and Drinking Near Your Laptop:** This is the most effective way to prevent spills and crumbs from getting into your keyboard.
* **Wash Your Hands Regularly:** Clean hands reduce the amount of dirt and oil transferred to your keyboard.
* **Use a Keyboard Cover:** A keyboard cover can protect your keyboard from dust, spills, and other debris.
* **Clean Your Keyboard Regularly:** Make keyboard cleaning a part of your regular cleaning routine.
### Choosing the Right Cleaning Products
Selecting the right cleaning products is essential for maintaining the health of your keyboard. Avoid using harsh chemicals or abrasive cleaners, as these can damage the keys and internal components. Isopropyl alcohol is generally the safest and most effective cleaning agent for laptop keyboards. When using isopropyl alcohol, always dilute it with water to prevent damage to sensitive surfaces.
### Troubleshooting Common Keyboard Cleaning Issues
* **Sticky Keys:** If your keys are sticky after cleaning, it’s likely due to residue from a spill. Try cleaning the affected keys with a cotton swab dampened with diluted isopropyl alcohol.
* **Non-Responsive Keys:** If your keys are not responding after cleaning, it’s possible that moisture has seeped into the keyboard. Allow the keyboard to dry completely before attempting to use it again.
* **Damaged Keys:** If you accidentally damage a key during cleaning, you may need to replace it. Contact your laptop manufacturer or a qualified repair technician for assistance.
## Product Spotlight: Whoosh! Screen Cleaner – A Complementary Cleaning Solution
While this article focuses on the keyboard, a clean screen is equally important for a pleasant computing experience. Whoosh! Screen Cleaner is a highly-rated, alcohol-free cleaning solution specifically designed for electronic devices. It effectively removes dust, fingerprints, and smudges without damaging sensitive screens. While not directly for keyboard cleaning, it’s a valuable addition to your tech cleaning toolkit.
## Features of Whoosh! Screen Cleaner
* **Alcohol-Free Formula:** Safe for all types of screens, including LCD, LED, and OLED.
* **Streak-Free Cleaning:** Leaves screens sparkling clean without any residue.
* **Antimicrobial Properties:** Helps kill germs and bacteria on your screen.
* **Non-Toxic and Odorless:** Safe for use around children and pets.
* **Includes Microfiber Cloth:** Comes with a high-quality microfiber cloth for optimal cleaning.
* **Available in Various Sizes:** Choose the size that best suits your needs.
## Advantages, Benefits & Real-World Value of a Clean Keyboard and Screen
* **Improved Typing Experience:** Clean keys are more responsive and easier to press, leading to a more comfortable and efficient typing experience.
* **Enhanced Productivity:** A clean keyboard and screen reduce distractions and allow you to focus on your work.
* **Better Hygiene:** A clean keyboard and screen reduce the spread of germs and bacteria, promoting a healthier workspace.
* **Increased Longevity:** Regular cleaning helps prevent damage to your laptop, extending its lifespan.
* **Professional Appearance:** A clean laptop conveys a sense of professionalism and attention to detail.
* **Reduced Eye Strain:** A clean screen reduces glare and improves clarity, reducing eye strain.
## In-Depth Review of Standard Laptop Keyboard Cleaning Practices
**Usability:** The process, as outlined, is straightforward, even for beginners. The steps are clearly defined and easy to follow. The need for caution regarding moisture is emphasized, which is crucial.
**Performance & Effectiveness:** The recommended methods, using compressed air and diluted isopropyl alcohol, are highly effective at removing dust, debris, and grime from laptop keyboards. The use of cotton swabs for hard-to-reach areas ensures a thorough cleaning.
**Pros:**
* **Effective Cleaning:** Thoroughly removes dust, debris, and grime.
* **Safe for Most Laptops:** The recommended methods are generally safe for most laptop keyboards.
* **Easy to Follow:** The steps are clearly defined and easy to understand.
* **Affordable:** The necessary supplies are readily available and relatively inexpensive.
* **Promotes Hygiene:** Helps reduce the spread of germs and bacteria.
**Cons:**
* **Requires Caution with Moisture:** Excess moisture can damage the keyboard.
* **Time-Consuming:** Thorough cleaning can take some time.
* **May Not Remove Stubborn Stains:** Some stains may be difficult to remove completely.
* **Potential for Damage if Not Careful:** Using excessive force or harsh chemicals can damage the keyboard.
**Ideal User Profile:** This cleaning guide is best suited for anyone who owns a laptop and wants to keep their keyboard clean and functioning properly. It’s particularly useful for people who work from home, students, and anyone who uses their laptop frequently.
**Key Alternatives:** Keyboard covers offer a protective layer, but require cleaning. Professional cleaning services offer a deeper clean, but at a higher cost.
**Overall Verdict & Recommendation:** Cleaning your laptop keyboard regularly is essential for maintaining its performance, hygiene, and longevity. The methods outlined in this guide are effective, safe, and affordable. We highly recommend following these steps to keep your keyboard in top condition.
## Insightful Q&A Section
**Q1: How often should I clean my laptop keyboard?**
*A: We recommend cleaning your keyboard at least once a month, or more often if you use your laptop frequently or in a dusty environment. Regular cleaning prevents the buildup of debris and grime.*
**Q2: Can I use a household cleaner to clean my laptop keyboard?**
*A: No, you should avoid using household cleaners, as they can contain harsh chemicals that can damage the keys and internal components. Stick to diluted isopropyl alcohol for safe and effective cleaning.*
**Q3: What should I do if I spill liquid on my keyboard?**
*A: Power off your laptop immediately, disconnect it from the power adapter, and turn it upside down to allow the liquid to drain out. Use a clean, dry microfiber cloth to absorb as much liquid as possible. If the spill was sugary or sticky, clean the affected keys with a cotton swab dampened with diluted isopropyl alcohol. Allow the keyboard to dry completely before turning on your laptop.*
**Q4: How can I prevent dust from getting into my keyboard?**
*A: Avoid eating and drinking near your laptop, wash your hands regularly, and use a keyboard cover to protect your keyboard from dust and debris.*
**Q5: Is it safe to remove the keycaps from my laptop keyboard?**
*A: Removing keycaps is generally safe for mechanical keyboards, but it’s not recommended for membrane keyboards, as it can damage the keys. If you have a mechanical keyboard, use a keycap puller to carefully remove each keycap.*
**Q6: How do I clean a backlit keyboard?**
*A: When cleaning a backlit keyboard, be extra careful to avoid getting moisture inside the key switches. Use a slightly dampened microfiber cloth and wring out any excess moisture before wiping down the keys.*
**Q7: What’s the best way to clean crumbs from under the keys?**
*A: The best way to remove crumbs from under the keys is to use compressed air. Hold the can of compressed air upright and aim the nozzle between the keys. Use short bursts of air to dislodge the crumbs.*
**Q8: Can I use a vacuum cleaner to clean my laptop keyboard?**
*A: You can use a vacuum cleaner with a brush attachment to remove large debris, but be careful not to damage the keys. Use a low suction setting and avoid pressing the brush too hard against the keyboard.*
**Q9: How do I disinfect my laptop keyboard?**
*A: Diluted isopropyl alcohol is an effective disinfectant for laptop keyboards. Dampen a microfiber cloth with the solution and wipe down the keys. Be sure to wring out any excess moisture before wiping.*
**Q10: What should I do if my keys are sticky after cleaning?**
*A: If your keys are sticky after cleaning, it’s likely due to residue from a spill. Try cleaning the affected keys with a cotton swab dampened with diluted isopropyl alcohol. You may need to repeat the process several times to remove all the residue.*
## Conclusion & Strategic Call to Action
Maintaining a clean laptop keyboard is essential for optimal performance, hygiene, and longevity. This guide has provided you with expert-backed methods for safely and effectively cleaning your keyboard, ensuring a pristine workspace. Remember to choose the right cleaning products, follow the steps carefully, and take preventative measures to keep your keyboard clean. In our experience, a regularly cleaned keyboard significantly improves typing comfort and reduces the risk of keyboard-related issues. Now that you’re armed with this knowledge, take action! Share your experiences with cleaning your laptop keyboard in the comments below. What are your favorite cleaning techniques? Do you have any tips or tricks to share? Let’s create a community of clean keyboard enthusiasts!
