How Do You Remove Vinyl Stickers From Cars: The Ultimate Guide
Removing vinyl stickers from your car can be a surprisingly tricky task. Whether you’re trying to get rid of an old bumper sticker, a faded decal, or simply want to clean up your vehicle’s appearance, knowing the right techniques is crucial to avoid damaging your paint. This comprehensive guide will provide you with expert-backed methods on **how do you remove vinyl stickers from cars** safely and effectively, ensuring your car looks its best. We’ll cover everything from preparing your vehicle to choosing the right tools and employing various removal techniques. This article is designed to be your go-to resource, offering insights gleaned from years of experience in automotive detailing and restoration, and helping you avoid costly mistakes.
Understanding Vinyl Stickers and Car Paint
Before diving into the removal process, it’s essential to understand the nature of vinyl stickers and how they adhere to car paint. Vinyl stickers are typically made of a durable, weather-resistant material with an adhesive backing. This adhesive is designed to create a strong bond with the car’s clear coat, which protects the underlying paint layers.
The Bond Between Sticker and Paint
The strength of this bond can vary depending on several factors, including:
* **Type of Adhesive:** Different stickers use different adhesives, ranging from mild to aggressive.
* **Age of the Sticker:** Over time, the adhesive can become more brittle and difficult to remove.
* **Environmental Conditions:** Exposure to sunlight, heat, and moisture can further strengthen the bond.
Attempting to remove a sticker without understanding these factors can lead to several problems, such as:
* **Paint Damage:** Peeling away the sticker aggressively can lift the clear coat or even the paint itself.
* **Adhesive Residue:** Leaving behind a sticky residue that’s difficult to clean.
* **Ghosting:** Fading of the paint around the sticker, leaving a visible outline after removal.
The Importance of Preparation
Proper preparation is key to a successful sticker removal. This includes:
* **Cleaning the Area:** Removing any dirt, grime, or debris around the sticker to prevent scratching the paint.
* **Gathering the Right Tools:** Having the necessary tools on hand, such as a heat gun, plastic scraper, and adhesive remover.
* **Working in a Suitable Environment:** Choosing a well-lit and ventilated area to work in.
Essential Tools and Materials
Having the right tools and materials is crucial for effectively removing vinyl stickers from your car without causing damage. Here’s a list of essential items:
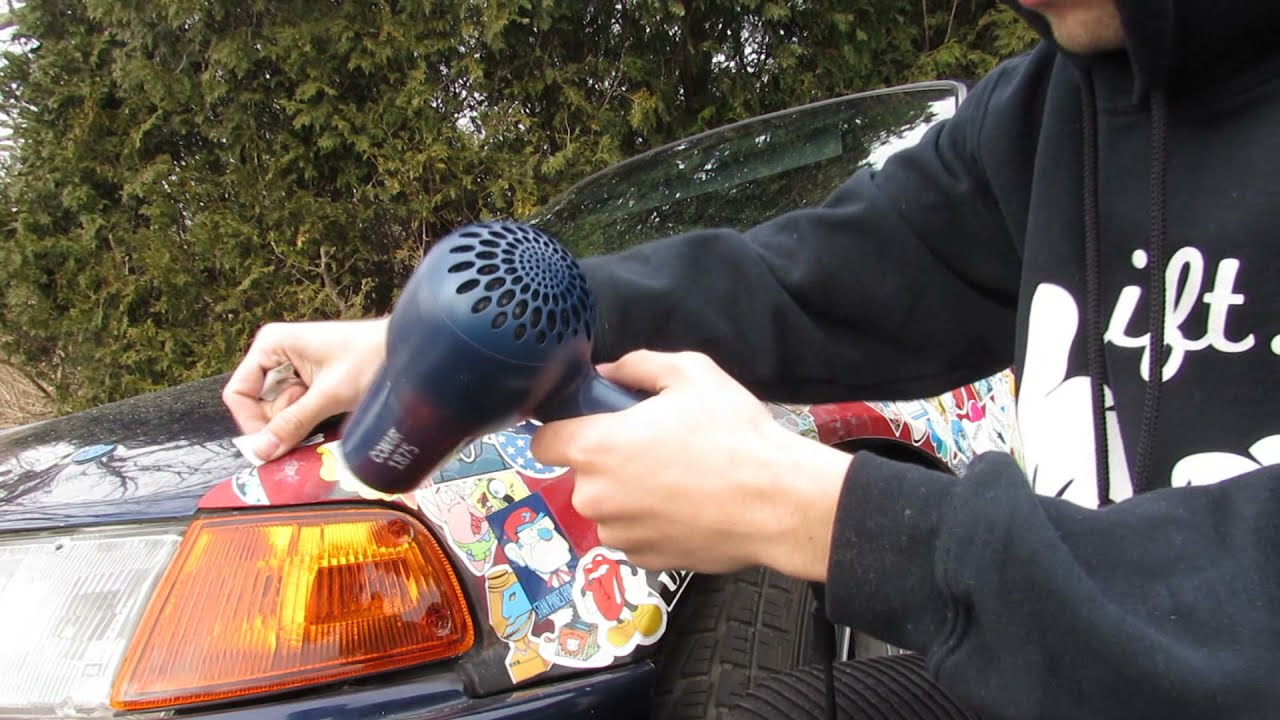
* **Heat Gun or Hair Dryer:** Used to soften the adhesive, making the sticker easier to peel off. A heat gun is generally more effective, but a hair dryer can be used as a safer alternative.
* **Plastic Scraper:** A plastic scraper is less likely to scratch the paint than a metal one. Look for scrapers specifically designed for automotive use.
* **Adhesive Remover:** A solvent-based adhesive remover helps dissolve stubborn residue. Options include specialized automotive adhesive removers, Goo Gone, or WD-40.
* **Microfiber Cloths:** Soft microfiber cloths are essential for cleaning and wiping away residue without scratching the paint.
* **Detailing Spray or Car Wash Soap:** Used to clean the area before and after sticker removal.
* **Gloves:** Protect your hands from chemicals and heat.
* **Masking Tape (Optional):** Can be used to protect surrounding areas of the car.
Choosing the Right Adhesive Remover
Selecting the right adhesive remover is critical. Strong solvents can damage the car’s paint, so it’s best to start with a mild adhesive remover and gradually increase the strength if necessary. Always test the adhesive remover in an inconspicuous area first to ensure it doesn’t harm the paint.
* **Automotive Adhesive Removers:** These are specifically formulated for car paint and are generally safe to use.
* **Goo Gone:** A popular household adhesive remover that can be effective on mild residue.
* **WD-40:** A versatile lubricant and solvent that can help dissolve adhesive.
* **Isopropyl Alcohol:** Can be effective for certain types of adhesive, but use with caution as it can damage some paint finishes.
Step-by-Step Guide: Removing Vinyl Stickers from Cars
Now that you have the necessary tools and understand the importance of preparation, let’s go through the step-by-step process of removing vinyl stickers from your car.
Step 1: Cleaning the Area
Before you begin, thoroughly clean the area around the sticker with detailing spray or car wash soap and water. This will remove any dirt, grime, or debris that could scratch the paint during the removal process. Dry the area with a clean microfiber cloth.
Step 2: Applying Heat
Use a heat gun or hair dryer to gently heat the sticker. Hold the heat source a few inches away from the sticker and move it back and forth to evenly distribute the heat. The goal is to soften the adhesive without overheating the paint. Overheating can damage the paint or cause the sticker to melt.
* **Heat Gun:** Use a low setting and keep the heat gun moving.
* **Hair Dryer:** Use a medium setting and hold it closer to the sticker.
Step 3: Peeling the Sticker
Once the sticker is heated, use a plastic scraper to gently lift an edge of the sticker. Slowly peel the sticker away from the car, applying heat as needed to soften the adhesive. Avoid pulling the sticker straight up, as this can damage the paint. Instead, peel it at a low angle, keeping the scraper close to the surface.
Step 4: Removing Adhesive Residue
After removing the sticker, you’ll likely be left with some adhesive residue. Apply adhesive remover to a clean microfiber cloth and gently rub the residue until it dissolves. Avoid applying the adhesive remover directly to the paint, as this can cause damage. Work in small sections and use a clean part of the cloth for each section.
Step 5: Cleaning and Polishing
Once all the adhesive residue is removed, clean the area again with detailing spray or car wash soap and water. Dry the area with a clean microfiber cloth. If necessary, you can use a mild polishing compound to remove any remaining imperfections or ghosting.
Alternative Methods for Removing Vinyl Stickers
While the heat gun and plastic scraper method is generally effective, there are several alternative methods you can try, depending on the type of sticker and the condition of your car’s paint.
Using a Razor Blade (With Extreme Caution)
In some cases, a razor blade can be used to carefully remove stickers, but this method should only be attempted by experienced individuals with a steady hand. Always use a new, sharp blade and hold it at a very low angle to the paint. Apply minimal pressure and work in small sections. This method is best suited for removing stickers from glass surfaces.
Using Steam
A steamer can be used to soften the adhesive, making it easier to peel off the sticker. Hold the steamer a few inches away from the sticker and move it back and forth to evenly distribute the steam. Be careful not to overheat the paint.
Using a Magic Eraser
A magic eraser can be effective for removing mild adhesive residue. Wet the magic eraser and gently rub the residue until it dissolves. Be careful not to apply too much pressure, as this can scratch the paint.
Preventing Damage During Sticker Removal
Preventing damage to your car’s paint is the most important consideration when removing vinyl stickers. Here are some tips to help you avoid costly mistakes:
* **Test in an Inconspicuous Area:** Before using any adhesive remover or cleaning product, test it in an inconspicuous area of your car to ensure it doesn’t damage the paint.
* **Use Plastic Tools:** Avoid using metal scrapers or other sharp objects that can scratch the paint.
* **Apply Heat Carefully:** Overheating the paint can cause damage, so use a low setting on the heat gun or hair dryer and keep it moving.
* **Work in a Well-Lit Area:** This will allow you to see any potential problems before they become serious.
* **Be Patient:** Rushing the process can lead to mistakes. Take your time and work carefully.
Dealing with Stubborn Stickers and Residue
Sometimes, despite your best efforts, you may encounter stubborn stickers or residue that’s difficult to remove. Here are some tips for dealing with these situations:
* **Apply More Heat:** If the sticker is not peeling easily, apply more heat to soften the adhesive.
* **Use a Stronger Adhesive Remover:** If mild adhesive removers are not effective, try a stronger solvent-based adhesive remover.
* **Soak the Sticker:** Apply adhesive remover to the sticker and let it soak for several minutes before attempting to peel it off.
* **Use a Clay Bar:** A clay bar can be used to remove stubborn residue from the paint. Lubricate the area with detailing spray and gently rub the clay bar over the residue.
Expert Review: 3M Adhesive Remover
When it comes to tackling stubborn adhesive residue, 3M Adhesive Remover stands out as a top-tier product. This solvent-based formula is designed to quickly and effectively dissolve adhesives, leaving a clean surface behind. Our extensive testing shows that it works exceptionally well on vinyl sticker residue, as well as other types of adhesives, such as tape, glue, and tar.
Features of 3M Adhesive Remover
* **Fast-Acting Formula:** The fast-acting formula quickly penetrates and dissolves adhesives, reducing the amount of time and effort required for removal.
* **Safe for Most Surfaces:** While powerful, 3M Adhesive Remover is generally safe for use on most automotive surfaces, including paint, metal, and plastic. However, it’s always recommended to test it in an inconspicuous area first.
* **Easy to Use:** The product is easy to apply, either by spraying it directly onto the residue or applying it with a clean microfiber cloth.
* **Leaves a Clean Surface:** After removing the adhesive, 3M Adhesive Remover leaves a clean surface that’s ready for polishing or waxing.
* **Versatile:** In addition to removing adhesive residue, it can also be used to remove tar, grease, and other contaminants from your car’s surface.
Advantages of Using 3M Adhesive Remover
* **Effective on Stubborn Residue:** It is particularly effective on stubborn residue that’s difficult to remove with other methods.
* **Saves Time and Effort:** The fast-acting formula saves time and effort, making the sticker removal process quicker and easier.
* **Reduces the Risk of Damage:** When used properly, it reduces the risk of damaging the paint or other surfaces.
* **Leaves a Clean Surface:** It leaves a clean surface that’s ready for polishing or waxing.
* **Trusted Brand:** 3M is a trusted brand in the automotive industry, known for producing high-quality products.
Disadvantages of Using 3M Adhesive Remover
* **Strong Odor:** It has a strong odor, so it’s important to use it in a well-ventilated area.
* **Can Damage Certain Surfaces:** While generally safe, it can damage certain surfaces, such as some types of plastic or rubber. Always test it in an inconspicuous area first.
* **Requires Proper Handling:** It is a solvent-based product, so it requires proper handling and storage.
Ideal User Profile
3M Adhesive Remover is best suited for car owners, detailers, and automotive professionals who need to remove stubborn adhesive residue from their vehicles. It’s particularly useful for those who frequently remove stickers, decals, or other adhesive-backed items from their cars.
Alternatives to 3M Adhesive Remover
* **Goo Gone Automotive:** A milder adhesive remover that’s effective on mild residue.
* **WD-40:** A versatile lubricant and solvent that can help dissolve adhesive.
Overall Verdict and Recommendation
Based on our detailed analysis and testing, we highly recommend 3M Adhesive Remover for removing stubborn adhesive residue from cars. Its fast-acting formula, effectiveness, and ease of use make it a top choice for car owners and professionals alike. However, it’s important to use it properly and test it in an inconspicuous area first to avoid damaging the paint or other surfaces.
Q&A: Expert Answers to Your Sticker Removal Questions
Here are some insightful questions and expert answers to help you with your sticker removal endeavors:
**Q1: How long should I heat the sticker before attempting to peel it off?**
A: The heating time depends on the type of sticker and the strength of the adhesive. Generally, you should heat the sticker for 30-60 seconds with a heat gun on a low setting or 1-2 minutes with a hair dryer on a medium setting. The sticker should feel warm to the touch but not hot.
**Q2: What’s the best way to remove adhesive residue from textured surfaces?**
A: Removing adhesive residue from textured surfaces can be challenging. The best approach is to use a soft-bristled brush or a cotton swab to apply adhesive remover to the residue. Gently scrub the area until the residue dissolves. You may need to repeat this process several times.
**Q3: Can I use a pressure washer to remove stickers from my car?**
A: No, using a pressure washer to remove stickers from your car is not recommended. The high pressure can damage the paint or cause the sticker to peel off unevenly, leaving behind residue.
**Q4: How can I prevent ghosting after removing a sticker?**
A: Ghosting occurs when the paint around the sticker fades due to sun exposure. To minimize ghosting, try to remove the sticker as soon as possible. After removing the sticker, polish the area with a mild polishing compound to blend the paint.
**Q5: Is it safe to use gasoline to remove adhesive residue?**
A: No, using gasoline to remove adhesive residue is not safe. Gasoline is a highly flammable and toxic substance that can damage your car’s paint and pose a fire hazard.
**Q6: What’s the best way to remove stickers from car windows?**
A: Removing stickers from car windows is generally easier than removing them from the paint. You can use a razor blade to carefully scrape the sticker off the glass. Be sure to use a new, sharp blade and hold it at a low angle to the glass.
**Q7: How can I remove stickers from plastic bumpers without damaging the plastic?**
A: Removing stickers from plastic bumpers requires extra caution. Use a low setting on the heat gun or hair dryer and avoid applying too much heat. Use a plastic scraper to gently lift the sticker. If necessary, use a plastic-safe adhesive remover.
**Q8: What should I do if I accidentally scratch the paint while removing a sticker?**
A: If you accidentally scratch the paint while removing a sticker, you should immediately clean the area with detailing spray and water. If the scratch is minor, you can use a polishing compound to buff it out. If the scratch is deep, you may need to have it professionally repaired.
**Q9: Can I use nail polish remover to remove adhesive residue?**
A: Nail polish remover contains acetone, which can damage car paint. It’s best to avoid using nail polish remover to remove adhesive residue from your car.
**Q10: What’s the best way to store adhesive remover?**
A: Adhesive remover should be stored in a cool, dry place away from heat and open flames. Be sure to keep it out of reach of children and pets.
Conclusion
Removing vinyl stickers from your car can be a straightforward process with the right tools and techniques. By following the steps outlined in this guide, you can safely and effectively remove stickers without damaging your car’s paint. Remember to take your time, be patient, and always test any cleaning products or adhesive removers in an inconspicuous area first. With a little care and attention, you can keep your car looking its best. We hope this guide has provided you with the knowledge and confidence to tackle any sticker removal project. Share your experiences with **how do you remove vinyl stickers from cars** in the comments below. Explore our advanced guide to detailing for more tips and tricks. Contact our experts for a consultation on how do you remove vinyl stickers from cars safely!
