How to Remove Rust from Nuts and Bolts: The Ultimate Guide
Tired of wrestling with rusty nuts and bolts? Corrosion can turn a simple task into a frustrating ordeal. But don’t despair! This comprehensive guide reveals proven methods on **how to remove rust from nuts and bolts**, restoring them to their former glory and saving you time, money, and frustration. We’ll explore everything from basic household remedies to advanced chemical treatments, empowering you with the knowledge to tackle any rust removal challenge. This isn’t just another surface-level article; we’ll delve into the science of rust, discuss preventative measures, and provide expert tips to ensure your nuts and bolts remain rust-free for years to come. Whether you’re a seasoned mechanic or a DIY enthusiast, this guide is your ultimate resource for conquering rust.
Understanding Rust: The Enemy of Nuts and Bolts
Rust, scientifically known as iron oxide, is the result of a chemical reaction between iron, oxygen, and moisture. This electrochemical process weakens the metal, making it brittle and prone to failure. Understanding the nature of rust is crucial to selecting the most effective removal method. Different types of rust exist, from superficial surface rust to deep, penetrating corrosion. The severity of the rust will dictate the approach you need to take. Ignoring rust can lead to seized bolts, stripped threads, and ultimately, component failure. Therefore, timely and effective rust removal is essential for maintaining the integrity of your equipment and projects.
The Science Behind Rust Formation
Rust forms through a process called oxidation. Iron atoms on the surface of the metal lose electrons when exposed to oxygen and water (or even just humidity). These electrons flow to other areas of the metal, creating an electrochemical cell. At the anode (the area losing electrons), iron atoms become positively charged ions and dissolve into the water. These iron ions then react with oxygen to form iron oxide, or rust. The presence of electrolytes, such as salt, accelerates this process. Understanding this process helps in selecting appropriate rust removal methods and preventative measures.
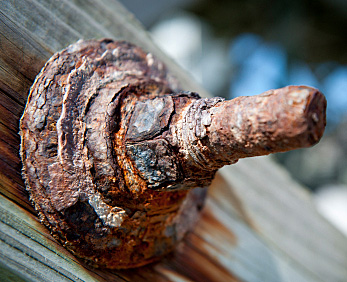
Identifying Different Types of Rust
Not all rust is created equal. Surface rust is a light, powdery coating that’s relatively easy to remove. Pitting rust, on the other hand, is more aggressive and forms small pits or holes in the metal. Scale rust is a thick, layered form of corrosion that can significantly weaken the metal. Identifying the type of rust is crucial because it dictates the severity of the required treatment. For example, surface rust might be easily removed with a wire brush, while pitting rust might require chemical treatment or even replacement of the affected part.
Preventative Measures: Stop Rust Before It Starts
The best way to deal with rust is to prevent it from forming in the first place. Protective coatings, such as paint, powder coating, or galvanization, create a barrier between the metal and the environment. Regularly cleaning and drying your nuts and bolts can also help prevent rust. Applying a rust inhibitor or lubricant can provide an additional layer of protection. Storing your tools and equipment in a dry environment is another crucial step in rust prevention. By taking these preventative measures, you can significantly extend the lifespan of your nuts and bolts and avoid the hassle of rust removal.
Choosing the Right Rust Removal Method
Selecting the appropriate rust removal method depends on several factors, including the severity of the rust, the type of metal, and the tools and resources available. We’ll explore a range of methods, from simple household remedies to more advanced techniques, providing step-by-step instructions for each. Safety is paramount, so always wear appropriate protective gear, such as gloves and eye protection, when handling chemicals or using power tools. Remember, patience and persistence are key to achieving optimal results.
Household Remedies: Vinegar, Baking Soda, and Lemon Juice
Many common household items can be surprisingly effective at removing rust. White vinegar is a mild acid that dissolves rust. Submerge the rusty nuts and bolts in vinegar for several hours or overnight, then scrub them with a wire brush. Baking soda is a mild abrasive that can also remove rust. Make a paste of baking soda and water, apply it to the rusty areas, and scrub with a brush. Lemon juice, another mild acid, works similarly to vinegar. These methods are generally safe and environmentally friendly, making them a good option for light rust removal.
Mechanical Methods: Wire Brushes, Sandpaper, and Grinders
Mechanical methods involve physically removing the rust using abrasive tools. Wire brushes, both manual and powered, are effective for removing surface rust and scale. Sandpaper can be used for more delicate surfaces or to smooth out rough areas after rust removal. Grinders with abrasive attachments can quickly remove heavy rust, but they can also damage the underlying metal if not used carefully. Always start with a coarse grit and gradually move to finer grits to achieve a smooth finish. Wear eye protection and a dust mask when using mechanical methods.
Chemical Treatments: Rust Converters and Derusters
Chemical treatments involve using specialized products to dissolve or convert rust into a stable compound. Rust converters contain chemicals that react with rust to form a protective coating that prevents further corrosion. Derusters contain stronger acids that dissolve rust more quickly. Always follow the manufacturer’s instructions carefully when using chemical treatments. Wear gloves, eye protection, and a respirator, and work in a well-ventilated area. Neutralize the acid after treatment to prevent further corrosion.
Electrolysis: An Advanced Rust Removal Technique
Electrolysis is a more advanced rust removal technique that uses an electric current to separate rust from the metal. It involves submerging the rusty nuts and bolts in an electrolyte solution and connecting them to the negative terminal of a battery charger. A sacrificial anode, such as a piece of steel, is connected to the positive terminal. When the current flows, the rust is drawn away from the nuts and bolts and deposited on the anode. Electrolysis is a highly effective method for removing heavy rust, but it requires specialized equipment and knowledge.
Step-by-Step Guides for Different Rust Removal Methods
Let’s dive into detailed step-by-step guides for some of the most popular and effective rust removal methods. These guides will provide you with the specific instructions you need to achieve optimal results, regardless of the method you choose. Remember to always prioritize safety and wear appropriate protective gear.
Removing Rust with Vinegar: A Detailed Guide
1. **Gather your materials:** You’ll need white vinegar, a container large enough to submerge the nuts and bolts, a wire brush, and protective gloves.
2. **Prepare the vinegar bath:** Pour the vinegar into the container. Ensure there’s enough vinegar to completely cover the rusty nuts and bolts.
3. **Submerge the nuts and bolts:** Place the rusty nuts and bolts into the vinegar bath. Make sure they are fully submerged. For heavily rusted items, consider pre-cleaning them with a wire brush to remove loose debris.
4. **Soak the nuts and bolts:** Allow the nuts and bolts to soak in the vinegar for at least 24 hours, or longer for heavily rusted items. Check the progress periodically.
5. **Scrub the nuts and bolts:** After soaking, remove the nuts and bolts from the vinegar and scrub them thoroughly with a wire brush. The rust should come off relatively easily.
6. **Rinse and dry:** Rinse the nuts and bolts with clean water and dry them thoroughly. Use a towel or compressed air to remove any remaining moisture.
7. **Apply a protective coating:** To prevent future rust, apply a rust inhibitor or lubricant to the nuts and bolts.
Using Baking Soda Paste to Remove Rust: A Practical Approach
1. **Gather your materials:** You’ll need baking soda, water, a container, a wire brush, and protective gloves.
2. **Make the baking soda paste:** Mix baking soda and water in a container to form a thick paste. The consistency should be similar to toothpaste.
3. **Apply the paste to the rusty areas:** Apply the baking soda paste liberally to the rusty areas of the nuts and bolts.
4. **Let the paste sit:** Allow the paste to sit on the rusty areas for at least 30 minutes.
5. **Scrub the nuts and bolts:** Scrub the nuts and bolts thoroughly with a wire brush. The rust should lift off with the abrasive action of the baking soda.
6. **Rinse and dry:** Rinse the nuts and bolts with clean water and dry them thoroughly.
7. **Inspect and repeat:** Inspect the nuts and bolts for any remaining rust. Repeat the process if necessary.
Mechanical Rust Removal with a Wire Brush: A Hands-On Method
1. **Gather your materials:** You’ll need a wire brush (manual or powered), protective gloves, and eye protection.
2. **Prepare the area:** Clean the nuts and bolts to remove any loose dirt or debris.
3. **Scrub the rusty areas:** Use the wire brush to scrub the rusty areas of the nuts and bolts. Apply firm, even pressure.
4. **Work in small sections:** Focus on small sections at a time, working your way around the entire surface.
5. **Inspect and repeat:** Inspect the nuts and bolts for any remaining rust. Repeat the process if necessary.
6. **Clean and protect:** Clean the nuts and bolts with a clean cloth and apply a rust inhibitor or lubricant.
The Role of WD-40 in Rust Removal and Prevention
WD-40 is a versatile product that can be used for both rust removal and prevention. While it’s not a dedicated rust remover, its penetrating properties allow it to loosen rust and make it easier to remove with other methods. WD-40 also creates a protective barrier that helps prevent future rust formation. Many users, including experienced mechanics, rely on WD-40 as a go-to solution for tackling light to moderate rust issues on nuts and bolts.
How WD-40 Works on Rust
WD-40’s effectiveness in rust removal stems from its unique formula, which includes lubricants, solvents, and corrosion inhibitors. The solvents help to dissolve the rust, while the lubricants penetrate the corroded areas, loosening the bond between the rust and the metal. The corrosion inhibitors then create a protective layer that prevents further oxidation. This combination of properties makes WD-40 a valuable tool for both removing existing rust and preventing future corrosion.
Using WD-40 to Remove Rust: A Simple Process
1. **Apply WD-40:** Spray WD-40 liberally onto the rusty nuts and bolts, ensuring that all affected areas are thoroughly coated.
2. **Let it penetrate:** Allow the WD-40 to penetrate the rust for at least 10-15 minutes. For heavily rusted items, you may need to let it soak for several hours or even overnight.
3. **Scrub the nuts and bolts:** Use a wire brush or a clean cloth to scrub the nuts and bolts. The WD-40 should help to loosen the rust, making it easier to remove.
4. **Wipe clean:** Wipe the nuts and bolts clean with a clean cloth. Repeat the process if necessary.
5. **Apply a protective coating:** For long-term protection, apply a rust inhibitor or lubricant after cleaning with WD-40.
Preventing Rust with WD-40: Long-Term Protection
To prevent rust from forming on nuts and bolts, apply a light coat of WD-40 after cleaning and drying them. The WD-40 will create a protective barrier that shields the metal from moisture and oxygen, the key ingredients for rust formation. Reapply WD-40 periodically, especially if the nuts and bolts are exposed to harsh environments or frequent moisture.
Understanding Rust Converters: A Chemical Solution
Rust converters are chemical solutions that transform rust into a stable, inert compound, preventing further corrosion. Unlike rust removers, which dissolve or physically remove the rust, rust converters chemically alter the rust, creating a protective barrier. This makes them a popular choice for treating rust on surfaces that are difficult to clean or access.
How Rust Converters Work
Rust converters typically contain tannic acid or phosphoric acid, which react with iron oxide (rust) to form a black, insoluble compound called iron tannate or iron phosphate. This compound is more resistant to corrosion than rust itself, effectively sealing the metal surface and preventing further oxidation. Rust converters also often contain a primer, which provides a smooth surface for painting or other coatings.
Applying Rust Converter: A Step-by-Step Guide
1. **Prepare the surface:** Remove any loose rust, dirt, or debris from the nuts and bolts. Use a wire brush or sandpaper to clean the surface as thoroughly as possible.
2. **Apply the rust converter:** Apply the rust converter to the rusty areas using a brush, roller, or spray applicator. Follow the manufacturer’s instructions for application thickness and drying time.
3. **Allow it to dry:** Allow the rust converter to dry completely, according to the manufacturer’s instructions. The treated area will typically turn black as the rust is converted.
4. **Apply a topcoat (optional):** Once the rust converter is dry, you can apply a topcoat of paint or other coating to further protect the metal and improve its appearance.
Benefits of Using Rust Converters
* **Prevents further corrosion:** Rust converters effectively stop the spread of rust by transforming it into a stable compound.
* **Easy to apply:** Rust converters are relatively easy to apply, requiring minimal preparation.
* **Can be painted over:** Rust converters provide a smooth surface for painting or other coatings.
* **Penetrates hard-to-reach areas:** Rust converters can penetrate into tight spaces and crevices, treating rust that is difficult to access with other methods.
Safety Precautions When Removing Rust
Safety is paramount when removing rust, especially when using chemical treatments or power tools. Always wear appropriate protective gear, such as gloves, eye protection, and a respirator, to protect yourself from harmful chemicals and flying debris. Work in a well-ventilated area to avoid inhaling fumes. Follow the manufacturer’s instructions carefully when using chemical products. Dispose of waste materials properly. By taking these safety precautions, you can minimize the risk of injury and ensure a safe and effective rust removal process.
Essential Protective Gear
* **Gloves:** Wear chemical-resistant gloves to protect your hands from harsh chemicals and abrasive materials.
* **Eye protection:** Wear safety glasses or goggles to protect your eyes from flying debris and chemical splashes.
* **Respirator:** Wear a respirator to protect your lungs from harmful fumes and dust particles.
* **Hearing protection:** Wear earplugs or earmuffs when using power tools to protect your hearing.
Handling Chemicals Safely
* **Read the label:** Always read and follow the manufacturer’s instructions carefully before using any chemical product.
* **Work in a well-ventilated area:** Ensure adequate ventilation to avoid inhaling harmful fumes.
* **Avoid contact with skin and eyes:** Wear gloves and eye protection to prevent contact with skin and eyes.
* **Store chemicals properly:** Store chemicals in a cool, dry place, away from children and pets.
Disposing of Waste Materials Responsibly
* **Check local regulations:** Check your local regulations for proper disposal of chemical waste.
* **Neutralize acids:** Neutralize acids before disposal to prevent environmental damage.
* **Dispose of rags and brushes properly:** Dispose of rags and brushes contaminated with chemicals in a sealed container.
Expert Tips for Long-Term Rust Prevention
Preventing rust is always better than curing it. By implementing a few simple strategies, you can significantly extend the lifespan of your nuts and bolts and avoid the hassle of rust removal. These tips are based on best practices and expert recommendations, ensuring that your metal components remain rust-free for years to come.
Applying Protective Coatings: Paint, Powder Coating, and Galvanization
Protective coatings create a barrier between the metal and the environment, preventing moisture and oxygen from reaching the surface. Paint is a common and affordable option, but it can chip or scratch over time. Powder coating provides a more durable and long-lasting finish. Galvanization involves coating the metal with a layer of zinc, which provides excellent corrosion resistance. Choose the coating that best suits your needs and budget.
Regular Cleaning and Maintenance
Regularly cleaning and drying your nuts and bolts can help prevent rust from forming. Use a mild detergent and water to remove dirt and grime. Dry the metal thoroughly with a clean cloth or compressed air. Applying a rust inhibitor or lubricant after cleaning can provide an additional layer of protection. Consider using a wire brush periodically to remove any early signs of rust.
Proper Storage Techniques
Storing your tools and equipment in a dry environment is crucial for rust prevention. Avoid storing nuts and bolts in damp or humid areas. Use airtight containers to protect them from moisture. Consider using desiccant packets to absorb any moisture that may be present. Label your containers clearly to easily identify their contents.
Q&A: Addressing Common Questions About Rust Removal
Here are some frequently asked questions about rust removal, along with expert answers to help you tackle even the most challenging rust problems.
1. **What is the best way to remove rust from nuts and bolts without damaging the threads?** Soaking the nuts and bolts in vinegar or using a rust converter is generally the safest option, as these methods are less likely to damage the threads than abrasive methods like wire brushing. After soaking, use a nylon brush to gently scrub the threads.
2. **Can I use a pressure washer to remove rust from nuts and bolts?** While a pressure washer can remove loose rust and debris, it’s not effective for removing deeply embedded rust. It can also force water into crevices, potentially accelerating corrosion. It’s best to use a pressure washer as a pre-cleaning step before using other rust removal methods.
3. **How long should I soak nuts and bolts in vinegar to remove rust?** The soaking time depends on the severity of the rust. For light rust, 24 hours may be sufficient. For heavily rusted items, you may need to soak them for 48 hours or longer. Check the progress periodically and scrub with a wire brush to assess the effectiveness.
4. **Is it safe to use muriatic acid to remove rust from nuts and bolts?** Muriatic acid is a very strong acid that can quickly remove rust, but it’s also highly corrosive and dangerous to handle. It can damage the metal and release toxic fumes. We don’t recommend using muriatic acid for rust removal unless you have extensive experience and proper safety equipment.
5. **What is the best rust inhibitor to use after removing rust from nuts and bolts?** There are many rust inhibitors available on the market. Choose one that is specifically designed for the type of metal you’re working with. Look for products that contain corrosion inhibitors and provide long-term protection.
6. **Can I use electrolysis to remove rust from small nuts and bolts?** Yes, electrolysis is an effective method for removing rust from small nuts and bolts. However, it requires specialized equipment and knowledge. Be sure to follow safety precautions and use a well-ventilated area.
7. **How can I prevent rust from forming on nuts and bolts that are exposed to saltwater?** Saltwater is highly corrosive and accelerates rust formation. To prevent rust, apply a protective coating, such as marine-grade paint or a rust inhibitor specifically designed for saltwater environments. Regularly rinse the nuts and bolts with fresh water to remove salt deposits.
8. **What are the signs that a rusty nut or bolt is too damaged to be salvaged?** If the rust has caused significant pitting or weakening of the metal, or if the threads are stripped or damaged, the nut or bolt may be too damaged to be salvaged. It’s best to replace it with a new one to ensure safety and reliability.
9. **Is it possible to remove rust from nuts and bolts without removing them from the assembly?** It is possible, but more challenging. You can use rust converters or apply WD-40 and scrub the affected areas with a wire brush. However, it’s often easier and more effective to remove the nuts and bolts for thorough cleaning and treatment.
10. **What is the best way to store nuts and bolts to prevent rust in a humid environment?** Store the nuts and bolts in airtight containers with desiccant packets to absorb moisture. Consider using a rust preventative spray or coating before storing. Ensure the storage area is as dry and well-ventilated as possible.
Conclusion: Conquering Rust and Protecting Your Fasteners
Rust is a common problem that can affect the performance and lifespan of nuts and bolts. However, with the right knowledge and techniques, you can effectively remove rust and prevent it from returning. This comprehensive guide has provided you with a range of methods, from simple household remedies to advanced chemical treatments, empowering you to tackle any rust removal challenge. Remember to prioritize safety, choose the appropriate method for your needs, and implement preventative measures to ensure long-term protection. By following these expert tips, you can keep your nuts and bolts rust-free and maintain the integrity of your equipment and projects. Share your experiences with **how to remove rust from nuts and bolts** in the comments below. Explore our advanced guide to rust prevention for more in-depth information.
